
Installation Guide


6
7
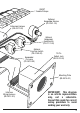
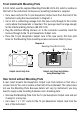
Make sure that there is adequate room in the control cavity for the Hexpander,
and decide how you will arrange it. Remember that you must leave room
to connect the wires, including the ribbon cable that will run to the 13-pin
connector.
Secure the Hexpander in place with double-sided foam tape if required
(Diagram 2).
•
•
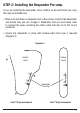
STEP 2: Installing the Hexpander Pre-amp.
If you are installing the Hexpander alone, without an Acousti-Phonic pre-amp,
this may be installed now.
Diagram 2.
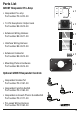
Strat™ Style Instruments Tele™ Style Instruments
Control
Cavity
Control
Cavity
Hexpander
Pre-amp