
Installation Guide


20
21
Installation Tips
Many guitar cavities are coated with either electrically conductive paints or
foil tapes to help isolate the circuitry from interference. When installing the
Acousti-Phonic Intelligent Pre-amp it is very important to make sure that the
pre-amp is completely isolated from this electrically conductive material.
Do not attempt to install the pre-amp by using screws through the two holes in
the pre-amp, as they are there only for manufacturing purposes. Double sided
adhesive tape or hot glue should be used.
Make sure that all plug-in connections are properly in place.
If you are using a wireless system for the Acousti-Phonic Pre-amp sound
you need to have your control cavity well shielded with foil tape to stop RF
interference.
For more installation tips, please visit our website at www.graphtech.bc.ca
•
•
•
•
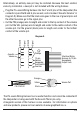
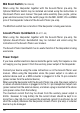
Wire Color Code for Pre-amp Installation
PIN: Teon cable from piezos. NOTE: Blue teon lead is always ground.
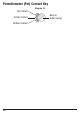
Mid: Blue 7” lead to on/on type Mid/Dark switch or volume pot.
GHOST: Purple 7” lead to on/on type Mid/Dark switch or volume pot.
Volume: Yellow 7” lead piezo volume return.
Mag: Green 7” lead input from magnetic pickups post volume and tone pots.
Ring: Red 7” lead to the ring post on the stereo switched jack.
Tip: Blue 7” lead to the tip post on the stereo switched jack.
SW: White 7” lead to the switch post on the switchcraft “littel j” series stereo
jack. Ensure ground is connected to sleeve.
PWR: Red positive out.
BATT: Red battery connector.
Wire Color Code for Pickup Installation
E 1st - Black. B 2nd - Blue. G 3rd- Green. D 4th - Yellow. A 5th- Red.
E 6th - White.