
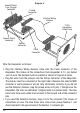
Installation Guide


14
15
Alternatively, an entirely new pot may be installed. Because the best solution
varies by installation, a new pot is not included with the wiring harness.
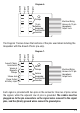
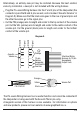
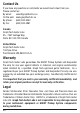
Plug the Pin-seven Wiring Harness into the P and V pins of the Hexpander (the
connector spans the M and G pins as well, and is marked “Acoustic Volume” in
Diagram 9). Make sure that the black wire goes to the row of ground pins and
the other two wires go to the signal pins.
Cut the PIN (orange) wire to length and solder to the top contact of the volume
pot. Cut the VOL (yellow) wire to length and solder to the centre contact of the
volume pot. Cut the ground (black) wire to length and solder to the bottom
contact of the volume pot.
•
•
The Pin-seven Wiring Harness has no useful function and cannot be connected if
the Hexpander is being used with the Acousti-Phonic pre-amp.
A magnetic version of this harness is also available. For information on options
and new products, please visit our website at www.graphtech.bc.ca.
Pickups
Function
13-pin
Volume
Interface Wiring
Harness to 13-pin
Hexaphonic
Output Jack
Diagram 9.
Ground
Signal
Ground
Signal
Acoustic
Volume
Orange
Yellow
Black
Volume Pot
PE-0182-00
Hexpander
QuickSwitch