
Installation Guide


12
13
Step 6: Wiring the Acousti-Phonic Pre-Amp
That’s it! If you are installing the Hexpander with the Acousti-Phonic pre-amp
proceed with the next section. If you are installing any of the optional Hexpander
controls see the following sections.
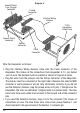
If you are installing the Hexpander with the Acousti-Phonic pre-amp you can wire
the Acousti-Phonic connectors and controls exactly as shown in the Acousti-
Phonic manual.
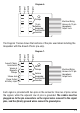
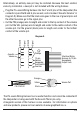
Instead of plugging onto the Acousti-Phonic pre-amp directly, the wires plug
onto the Acousti-Phonic pass-through connector on top of the Hexpander. The
connections are all in exactly the same location and the same order. You do not
need to make any connection to the PIN signal; this is where the piezo input is
usually connected. Instead, the Hexpander will supply this signal to the Acousti-
Phonic pre-amp by combining the six individual pickups.
Step 7: Optional Controls
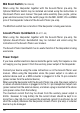
Hexpander Volume Control
The Hexpander Volume pot sends a control voltage to the external device (such
as a MIDI converter or sound processor). The external device usually uses this
signal to control volume, but may also use it to control other effects. If you play
live you will probably want to install this control. If your instrument is usually
played in a studio you can omit this control. Your Hexpander will default to
maximum volume, and you can control the volume at the mixing desk.
Plug the cable assembly from the Hexpander Volume pot into the VO and VI
pins of the Hexpander (marked “Volume” in Diagram 6). Make sure that the
black wire goes to the row of ground pins and the other two wires go to the
signal pins.
•
Hexpander QuickSwitch
The Hexpander QuickSwitch provides a quick way of muting the external device
(by forcing the volume control signal to zero) or muting the analog signal on
the 13-pin Hexpander Output Jack. This center-off switch allows you to select
(PE-0210-00)
(BE-0181-00)
(BE-0111-00)