
Installation Guide


TopTile
Mounting System
21 of 27
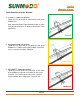
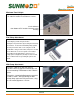
Step 5: Wood Screws
9. Install the three Wood Screws into the Stanchion.
10. Note: Due to the side driving force of installing the screw into the
side of the Stanchion, care should be taken to keep the Stanchion
plum.
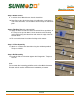
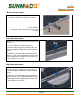
Step 6: Flashing (Materials not provided)
11. Apply a bead of structural sealant, ChemLink M1 or equivalent, in
the shape of an upside down U on the backside of the flashing
and install flashing over Stanchion and under the edge of the tile
located above.
12. For curved tiled roofs hand form flashing to tile contour.
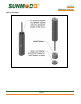
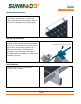
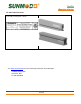
Step 7: L-Foot Assembly
13. Attach an L-Foot to the Stanchion using the 3/8” Bolt provided.
Torque to 15ft-lbs.
Step 8: Rail Assembly
14. Install AL Rail to L-Foot then tighten 3/8” Flange Nut. Torque to
15 ft-lbs.
Note:
For concrete deck mounting guidelines refer to SunModo document
D10091 and the anchor manufacturer’s installation procedure.
5
6
7
8