
Installation Guide


TopTile
Mounting System
20 of 27
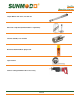
Installation Instructions:
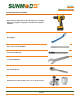
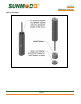
Step 1: Drill
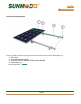
1. Locate and mark the desired location of the TopTile Mount.
2. Using a hand drill guide and a 1-1/2” tile hole saw, drill a hole into
the tile.
3. If installing the Rafter Mounting System:
Drill 5/32" pilot hole into the rafter in accordance with the NDS
guidelines. It is important that the pilot hole is centered about the
hole in the tile.
Step 2: Clean
4. Remove tile dust from around the hole in the tile and
underlayment.
Step 3: Install
5. If installing the Rafter Mounting System:
Screw the Stanchion into the 5/32” pilot hole. Torque to 20 ft-lbs.
6. If installing the Tripod Mounting System:
Screw the Stanchion into the deck of the roof. Torque to 7.5 ft-lbs.
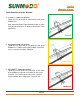
Step 4: Waterproof (Materials not provided)
7. If installing the Rafter Mounting System:
Use the straw nozzle and place a bead of Great Stuff FireBlock
around the Stanchion and hole in the tile.
8. If installing the Tripod Mounting System:
Insert the straw nozzle into the three holes on the side of the
Stanchion and slowly spray Great Stuff FireBlock onto the roof
deck for 2-4 seconds. Also spray around the Stanchion and the
hole in the tile.
Wait 5-10 minutes before proceeding to allow Great Stuff
FireBlock spray foam to setup.
1
2
3
4