
Instructions / Assembly

Subject to technical changes Copyright © 2012 HatiCon Solar, LLC ∙ 2821 E. Philadelphia Street, Suite A, Ontario, CA 91761 USA Page | 3
∙ Telephone: 1-909-235-7150 ∙ Fax: 1-909-235-7151 ∙ Email: info@HatiConSolar.com ∙ Website: www.HatiConSolar.com
Installation Instructions:
Pitched Roof Mounting System
*for framed PV-Modules in portrait mode
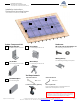
Layout View
3
Standoff spacing or rail span varies per solar module mfg. and site conditions (see Table 1 below)
2
Horizontal rail span: number of modules in horizontal directions x (module width + 0.75”(for inner–module spacing)+3”(for rail overhang))
1
Vertical module span: number of modules in vertical directions x (module length + 0.75”(for inner-module spacing))
4
Rail spacing varies per solar module mfg.
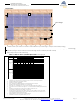
Table 1: Haticon Solar 13/60 Rail Span Chart
a,b,c,d,e,f,g,h,I,j,k,l
3
4
1
2
Roof Edge
a. This table does not include roof capacity check or standoff connection check.
Installer to check lag screw pull-out capacity or roof connection and roof joist capacity.
b. Maximum building mean roof height is 24 feet.
c. Maximum roof slope is 30 degrees.
d. ST-AK 13/60 rails are installed parallel to roof and perpendicular to roof joists.
e. Maximum solar module length dimension is 77" and 40" wide.
f. Roof wind zone 1 installations only. Zones 2 and 3 near building edges are excluded.
g. The width of zones 2 and 3 from roof edges is 3' - 6" for the least horizontal building dimension of 35
feet.
h. Maximum end cantilever span is 35 percent of adjacent interior end span.
i. No rail splices permitted within the middle 1/2 of the span.
j. Provide (3) ST-AK 13/60 rails at (0.35 x Module Length) on center. Installer to check with module
manufacturer for additional panel supports when wind speed is more than 110 mile per hour or
snow load exceeds 45 pound per square feet.
k. Rails installed in two-span continuous condition minimum.
l. Installation is away from topographic effects (Kzt = 1.0)
0 psf 10 psf 20 psf 30 psf 40 psf 50 psf
85 MPH 7' - 10" 7' - 0" 6' - 1" 5' - 5" 4' - 9" 3' - 11"
90 MPH 7' - 6" 6' - 10" 5' - 11" 5' - 4" 4' - 8" 3' - 11"
95 MPH 7' - 2" 6' - 8" 5' - 10" 5' - 2" 4' - 6" 3' - 11"
100 MPH 6' - 10" 6' - 5" 5' - 8" 5' - 1" 4' - 5" 3' - 9"
110 MPH 6' - 3" 6' - 1" 5' - 5" 4' - 10" 4' - 1" 3' - 7"
120 MPH 5' - 10" 5' - 9" 5' - 2" 4' - 6" 3' - 10" 3' - 5"
130 MPH 5' - 5" 5' - 5" 4' - 11" 4' - 2" 3' - 7" 3' - 2"
140 MPH 5' - 1" 5' - 1" 4' - 6" 3' - 10" 3' - 5" 3' - 0"
150 MPH 5' - 8" 5' - 8" 5' - 5" 5' - 1" 4' - 6" 4' - 1" See note j below for this row
85 MPH 6' - 11" 6' - 5" 5' - 9" 5' - 2" 4' - 5" 3' - 10"
90 MPH 6' - 7" 6' - 4" 5' - 7" 5' - 0" 4' - 3" 3' - 8"
95 MPH 6' - 4" 6' - 1" 5' - 5" 4' - 10" 4' - 1" 3' - 7"
100 MPH 6' - 0" 5' - 11" 5' - 3" 4' - 8" 4' - 0" 3' - 6"
110 MPH 5' - 6" 5' - 6" 5' - 0" 4' - 3" 3' - 8" 3' - 3"
120 MPH 5' - 1" 5' - 1" 4' - 6" 3' - 11" 3' - 5" 3' - 0"
130 MPH 5' - 8" 5' - 8" 5' - 5" 5' - 1" 4' - 6" 4' - 1" See note j below for this row
140 MPH 5' - 3" 5' - 3" 5' - 2" 4' - 8" 4' - 2" 3' - 9" See note j below for this row
150 MPH 4' - 10" 4' - 10" 4' - 10" 4' - 4" 3' - 10" 3' - 6" See note j below for this row
CATEGORY
C
SNOW LOAD (POUND PER SQUARE FEET)
CATEGORY
B
WI ND
EXPOSURE
WI ND SPEED
(3-SEC GUST)
Note