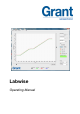
Labwise Operating Manual
Grant Instruments, based near Cambridge, England, is an independent, privately owned company, founded in 1951 by Peter Ward and Cecil Chapman. Grant is a world leader in the manufacture and design of equipment for sample preparation, scientific analysis, data acquisition and data analysis providing solutions to the global scientific and industrial markets. The company has a worldwide reputation for paying the highest attention to quality, reliability, service and support.
Grant Software License Agreement This is a legal Agreement between you, the user, and Grant Instruments (Cambridge) Ltd. By opening the software package(s) you agree to be bound by the terms of this Agreement. If you do not agree to these terms please return all disks, manuals and packaging for a full refund. Use The Software is the property of Grant and is protected by copyright. You may use one copy of the software on only one computer at a time.
General The above terms constitute the entire agreement between you and Grant with regard to the Software. If any provision of this agreement is invalid or unenforceable under applicable law, it is to that extent deemed omitted and the remaining provisions will continue in full force and effect. This agreement is covered by the law of England and both parties accept the jurisdiction of the courts of England. The export of this product is governed by US and UK export regulations.
Table of Contents 1.0 Introduction 6 2.0 Installation & connection 6 2.1. 2.2. 2.3. 2.4. 2.5. 2.6. 2.7. Minimum system requirements Unpacking Installation Connecting to an Optima Disconnecting an Optima Installing Optima USB drivers (Windows XP) Installing Optima USB drivers (Windows Vista/7) 6 6 6 7 7 8 9 3.0 Main control window 10 3.1. Overview 3.2. Real time graph 3.3. Optima status information 3.4. Running presets or programs 3.5. Bath setup 3.5.1. On timer completion 3.5.2. Presets 3.5.3.
1.0 Introduction Labwise is a PC software application that provides configuration and remote control of OptimaTM immersion thermostats. This manual outlines the main functions and settings of Labwise version 2.0 that is suitable for use with GR150, GP200, TX150 & TXF200 models. Labwise offers RS232 connection for the GR150 and GP200 models. The TX150 and TXF200 can be connected either via RS232 or via USB.
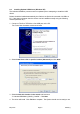
Use the following process for installing the software: 1. Insert the USB flash drive into a USB port on the PC. The drivers for the USB flash drive should automatically install. Follow any on screen instructions if required. 2. Open the USB flash drive directory and run setup.exe. The software installer will launch. Follow the installation wizard instructions. Labwise will be installed and added to the programs menu and a shortcut will be added to the desktop. 2.4.
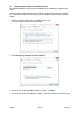
2.6. Installing Optima USB drivers (Windows XP) The Labwise installation process must be completed prior to attempting to install the USB drivers. Drivers should be installed automatically the first time an Optima is connected via USB to a PC. If this does not happen then the drivers can be installed manually using the following method (Windows XP). 1. Connect a TX150 or TXF200 to a free USB port on the PC. The Found New Hardware wizard should start 2.
2.7. Installing Optima USB drivers (Windows Vista/7) The Labwise installation process must be completed prior to attempting to install the USB drivers. Drivers should be installed automatically the first time an Optima is connected via USB to a PC. If this does not happen then the drivers can be installed manually using the following method. 1. Connect a TX150 or TXF200 to a free USB port on the PC. The Found New Hardware wizard should start 2. Select Browse my computer for driver software. 3.
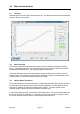
3.0 Main control window 3.1. Overview Labwise opens the main control window at start up. This window shows real time information when an Optima is connected. 3.2. Real time graph The real time graph plots set temperature (green line) and measured temperature (black line). If a high alarm (red line) or a low alarm (blue line) are configured then these will also be displayed as dashed lines. The graph will update continuously.
There are four checkbox indicator/controls: Relay 1 Relay 2 (only enabled for the GP200) Logging External probe The relay checkboxes are for indication only and show the state of the relays. The logging and external probe checkboxes are controls and can be used to switch the associate feature on or off. The indicators are red if the feature is switched off and green when switched on. When the logging checkbox is clicked the indicator changes to green.
3.5. Bath setup The key settings on the Optima can be changed by selecting Bath from the Setup option on the main control window menu. 3.5.1. On timer completion This section allows the timer period to be set and defines the behaviour when the countdown timer reaches zero. This behaviour is only applicable to the GR150 and GP200 models. 3.5.2. Presets This section allows the set temperature and pump speed to be configured for the three presets.
3.6. Logging setup The data logging settings can be changed by selecting Logging from the Setup option on the main control window menu. The log file directory and logging interval are user configurable. There are three options for the log file name configuration depending on test requirements: Prompt the for a filename when the logging is started Generate a log file name automatically based on a date and time Generate a log file name based on a user defined prefix and an incremental number 3.7.
4.0 Programs 4.1. Overview A program allows the temperature and pump speed of the Optima to be controlled with time. A program includes a global set of configurable alarms and a series of segments that are executed in order. An unlimited number of programs can be created and saved on the PC even if an Optima is not connected.
4.3. Creating a new program A new program can be created by selecting New from the File option on the program window menu. A single segment program of duration 10s and set temperature of 0C is created. The program parameters are all set to the default values. 4.3.1. Creating program segments Programs are constructed from a sequence of segments. Segments can be conveniently added or deleted using the buttons in the segment info box.
4.3.1.2. Extension The Extension is a time period in addition to the Duration. A segment with an Extension period set will remain active (e.g. heating) until the temperature is achieved OR the Extension period ends. This is useful if the controller cannot reach the Target Temp within the Duration period. The program enters a hold mode until the Target Temp is reached when the program will then proceed with the next segment.
4.3.2. Setting program alarms Program alarms are used only when a program is running. They are global program parameters and affect all segments. There are three types of alarm: Disabled – No alarm Fixed – Alarm triggered at a fixed temperature Deviation – Alarm triggered when the deviation from the set temperature is exceeded The alarm temperature defines either a fixed temperature or a deviation temperature depending on the alarm type.
4.4. Edit a program 4.4.1. Edit a program previously saved to disk Programs that had been saved to the PC can be opened and edited if required. Select File, Open and select a file for editing. Editing a program uses the same procedures as described for creating a new program. Use File, Save to save the edited program file specifying a different file name if required. Note: Editing a program is always done on the PC.
4.5. Deleting a program installed in the Optima A program that is stored in the Optima can be deleted to free up a slot for a different program. Note: Deleting a program from the Optima is permanent and cannot be retrieved. If the program may be needed in the future it should be saved to the PC before deletion.
5.0 Creating reports 5.1. Creating a report The Reports option allows data logs to be viewed and printed if required. The default directory for log files is C:\Labwise\log. 1. Select Reports from the main control window menu A file browsing dialog box will appear. 2. Browse to the log file and click Open The log file data will be displayed on the graph The Diary button can be used to show or hide any text comments that were added when the log file was started or stopped.
6.0 Calibration (GR150 & GP200 only) 6.1. Performing a single point calibration A single point calibration can be performed using Labwise. This feature is only available with the GR150 and GP200. A temperature offset can be applied such that the temperature displayed by the Optima can be aligned with that taken by an independent temperature probe. 1. Select Calibration from the main control window menu The following dialog box will appear. 2.
7.0 Technical Support Service Address: Grant Instruments (Cambridge) Ltd 29 Station Road Shepreth Cambridgeshire SG8 6GB England Telephone: Fax: Email: (+44) (0) 1763 260811 (+44) (0) 1763 262410 labsales@grantinstruments.com labservice@grantinstruments.com http://www.grantinstruments.
Grant Instruments (Cambridge) Ltd Shepreth Cambridgeshire SG8 6GB England Tel: +44 (0) 1763 260811 Fax: +44 (0) 1763 262410 Email: labsales@grantinstruments.com www.grantinstruments.