Grandstream Networks, Inc.
GXW40XX USER MANUAL INDEX GNU GPL INFORMATION ........................................................................... 5 CHANGE LOG ............................................................................................. 6 CHANGES FROM 1.0.7.6 USER MANUAL .......................................................................................... 6 CHANGES FROM 1.0.6.8 USER MANUAL .......................................................................................... 6 WELCOME ....................
CONFIGURATION GUIDE ......................................................................... 29 CONFIGURING GXW40XX VIA VOICE PROMPT ............................................................................. 29 CONFIGURING GXW40XX WITH WEB BROWSER .......................................................................... 29 ACCESS THE WEB CONFIGURATION MENU ........................................................................... 30 IMPORTANT SETTINGS ..................................................
TABLE OF FIGURES GXW40XX User Manual FIGURE 1: DIAGRAM OF GXW4004-8 AND GXW4024 BACK PANEL ................................................... 10 FIGURE 2: 50 PIN TELCO CONNECTOR ................................................................................................. 11 FIGURE 3: DIAGRAM OF GXW4004-8 AND GXW4024 DISPLAY PANEL .............................................. 12 TABLE OF TABLES GXW40XX User Manual TABLE 1: DEFINITIONS OF THE GXW CONNECTORS............................................
GNU GPL INFORMATION GXW40xx firmware contains third-party software licensed under the GNU General Public License (GPL). Grandstream uses software under the specific terms of the GPL. Please see the GNU General Public License (GPL) for the exact terms and conditions of the license. Grandstream GNU GPL related source code can be downloaded from Grandstream web site from: http://www.grandstream.com/support/faq/gnu_gpl . FIRMWARE VERSION 1.0.8.
CHANGE LOG This section documents significant changes from previous versions of GXW40xx user manuals. Only major new features or major document updates are listed here. Minor updates for corrections or editing are not documented here. CHANGES FROM 1.0.7.6 USER MANUAL Added option to enable/disable SIP NOTIFY Authentication. [Disable SIP NOTIFY Authentication] Added option [Use Configured IP ] in DNS mode.
WELCOME Thank you for purchasing the Grandstream GXW40XX Analog FXS IP Gateway. The GXW40XX offers an easy to manage, easy to configure IP communications solution for any business with virtual and/or branch locations.
If you purchased the product directly from Grandstream, contact your Grandstream Sales and Service Representative for an RMA (Return Materials Authorization) number. Grandstream reserves the right to change the warranty policy without prior notification. Caution: Changes or modifications to this product not expressly approved by Grandstream, or operation of this product in any way other than as detailed by this User Manual, could void your manufacturer warranty.
CONNECT YOUR GXW40XX GATEWAY Connecting the GXW40XX gateway is easy. Before you begin, please verify the contents of the GXW40XX package. EQUIPMENT PACKAGING Unpack and check all accessories. Equipment includes: one device unit one RJ45 Ethernet cable one 12V universal power adapter CONNECT THE GXW40XX Follow these four (4) steps to connect your GXW40XX gateway to the Internet and access the unit’s configuration pages. 1. Connect standard touch-tone analog phones to the FXS ports. 2.
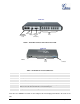
GXW 400x PSTN Console Line Reset Power Supply Connection LAN/WAN RJ-45 Ethernet (PC Ports connection) FXS Ports FIGURE 1: DIAGRAM OF GXW4004-8 AND GXW4024 BACK PANEL GXW 4024 xx LAN Port FXS Ports 50 PIN Telco Connector TABLE 1: DEFINITIONS OF THE GXW CONNECTORS LAN Connect the LAN port with an Ethernet cable to your PC. WAN Connect to the internal LAN network or router. RESET Factory Reset button. Press for 7 seconds to reset factory default settings.
Pin Signal Pin Signal 1 RING1 26 TIP1 2 RING2 27 TIP2 3 RING3 28 TIP3 4 RING4 29 TIP4 5 RING5 30 TIP5 6 RING6 31 TIP6 7 RING7 32 TIP7 8 RING8 33 TIP8 9 RING9 34 TIP9 10 RING10 35 TIP10 11 RING11 36 TIP11 12 RING12 37 TIP12 13 RING13 38 TIP13 14 RING14 39 TIP14 15 RING15 40 TIP15 16 RING16 41 TIP16 17 RING17 42 TIP17 18 RING18 43 TIP18 19 RING19 44 TIP19 20 RING20 45 TIP20 21 RING21 46 TIP21 22 RING22 47 TIP22 23 RIN
GXW4008 Display LEDs FXS status port FIGURE 3: DIAGRAM OF GXW4004-8 AND GXW4024 DISPLAY PANEL GXW4024 Display LEDs FXS port status TABLE 2: DEFINITIONS OF THE GXW DISPLAY PANEL Power LED Indicates Power. Remains ON when Power is connected and turned ON. Ready LED Remains ON after boot-up. Console Turns ON when Console port is being used.
LED POWER, READY and WAN lights are ON when device is up and running and successfully registered to the SIP Server. Slow blinking of READY LED indicates that device has not registered with any SIP Service provider. FIRMWARE VERSION 1.0.8.
GXW40XX FEATURES The GXW4000 series is a next generation IP voice gateway that is interoperable and compatible with leading IP-PBXs, Softswitches and SIP platforms. The GXW4000 series FXS gateway is autoconfigurable, remotely manageable and scalable. The GXW4000 series gateways come in three models - the GXW-4004,GXW-4008 and GXW4024, each offering superb voice quality, traditional telephony functionality, easy deployment, and 4,8 and 24 FXS ports respectively.
SRTP) Voice over Packet Voice Capabilities (VAD) with CNG (comfort (VAD) with CNG (comfort (VAD) with CNG (comfort noise generation) and PLC noise generation) and PLC noise generation) and PLC (packet loss concealment), (packet loss concealment), (packet loss concealment), AEC with NLP Packetized AEC with NLP Packetized AEC with NLP Packetized Voice Voice Protocol Voice (supports RTP/RTCP and (supports RTP/RTCP and AAL2 AAL2 Activity Detection Protocol Unit protocol), G.
V.27ter, V.29 for T.38 fax V.27ter, V.29 for T.38 fax V.27ter, V.29 for T.38 fax relay relay relay Diffserv, TOS, 802.1 P/Q Diffserv, TOS, 802.1 P/Q Diffserv, ToS, 802.
HARDWARE SPECIFICATION The hardware specifications of the GXW FXS series are detailed in Table 4.
BASIC OPERATIONS UNDERSTANDING GXW VOICE PROMPTS GXW40XX has a built-in voice prompt menu for simple device configuration. To enter the voice prompt menu, press *** on the standard analog phone connected to any FXS port.
15 Upgrade Protocol Upgrade protocol for firmware and configuration update. Enter “9” to toggle between TFTP and HTTP 16 Firmware Version Firmware version information. 17 Firmware Upgrade Firmware upgrade mode. Enter “9” to rotate among the following three options: “Direct IP Calling” 47 1. always check 2. check when pre/suffix changes 3. never upgrade Enter the target IP address to make a direct IP call, after dial tone. (See “Make a Direct IP Call”.
PLACING A PHONE CALL PHONE OR EXTENSION NUMBERS 1. Dial the number directly and wait for 4 seconds (To change the default value, modify the following setting - “No Key Entry Timeout”) or 2. Dial the number directly and press # (Use # as dial key” must be configured in web configuration). Examples: 1. Dial a number (e.g. (626) 666-7890), first enter the prefix number (usually 1+ or international code) followed by the phone number. Press # or wait for 4 seconds.
Note: NO dial tone will be played between step 1 and 2. Destination ports can be specified by using “*” (encoding for “:”) followed by the port number. Examples: a) If the target IP address is 192.168.0.160, the dialing convention is *47 or Voice Prompt with option 47, then 192*168*0*160. followed by pressing the “#” key if it is configured as a send key or wait 4 seconds. In this case, the default destination port 5060 is used if no port is specified. b) If the target IP address/port is 192.168.1.
5. Caller A will hear the confirm tone. Then, A can hang up. NOTE: “Enable Call Feature” must be set to “Yes” in web configuration page. Caller A can place a call on hold and wait for one of three situations: 1. A quick confirmation tone (similar to call waiting tone) followed by a dial tone. This indicates the transfer is successful (transferee has received a 200 OK from transfer target). At this point, Caller A can either hang up or make another call. 2.
2. A dials C’s number then # (or wait for 4 seconds). 3. If C answers the call, then A presses FLASH to bring B, C in the conference. 4. If C does not answer the call, A can press FLASH back to talk to B. 5. If A presses FLASH during conference, C will be dropped out. 6. If A hangs up, the conference will be terminated for all three parties when configuration “Transfer on Conference Hangup” is set to “No”.
FXS Port #1: SIP UserID and Authenticate ID entered, Hunting group set to "Active" FXS Port #2: SIP UserID and Authenticate ID left blank, Hunting Group set to "1" FXS Port #3: SIP UserID and Authenticate ID left blank, Hunting Group set to "1" FXS Port #4: SIP UserID and Authenticate ID entered, Hunting group set to "Active" FXS Port #5: SIP UserID and Authenticate ID left blank, Hunting Group set to "4" FXS Port #6: SIP UserID and Authenticate ID left blank, Hunting Group set to "4" FXS Port #7: SIP UserI
will ring in the hunting group only. This feature is applicable to incoming calls only. There are two types of hunting groups, Linear and Circular. Linear style will sort the call to the lowestnumbered available line, this is also called “serial hunting”. Circular style will distribute the calls "roundrobin". If a call is assigned to line 1, the next call goes to 2 and the next to 3. The succession throughout each of the lines continues even if one of the previous lines becomes available.
preferred method because it is more reliable and works well in most network conditions. If the service provider supports T.38, please use this method by selecting T.38 as fax mode (default). If the service provider does not support T.38, pass-through mode may be used. If you have problems with sending or receiving Fax, toggle the Fax Tone Detection Mode setting. SUPPORT RADIUS PROTOCOL GXW40XX supports RADIUS for authentication, authorization and billing purposes.
CALL FEATURES GXW40XX supports the traditional telephony features available in a PBX as well as additional advanced telephony features. TABLE 6: CALL FEATURES TABLE (STAR CODE) Key Call Features *02 Forcing a Codec (per call) *027110 (PCMU), *027111 (PCMA), *02723 (G723), *02729 (G729), *0272616 (G726-r16), *0272624 (G724-r24), *0272632 (G726-r32), *0272640 (G726r40), *027201 (iLBC) *03 Disable LEC (pe call) Dial “*03” + ” number ”. No dial tone is played in the middle.
*87 Blind Transfer *90 Busy Call Forward: Dial “*90” and then the forwarding number followed by “#”. Wait for dial tone then hang up. *91 Cancel Busy Call Forward: dial “*91”. Wait for dial tone. Hang up. *92 Delayed Call Forward: Dial “*92” and then the forwarding number followed by “#”. Wait for dial tone then hang up. *93 Cancel Delayed Call Forward: Dial “*93” for a dial tone, then hang up. Flash/Hook If user hears call waiting beep, flash/hook will switch to the new incoming call.
CONFIGURATION GUIDE CONFIGURING GXW40XX VIA VOICE PROMPT DHCP MODE Select voice menu option 01 to enable GXW40XX to use DHCP. STATIC IP MODE Select voice menu option 01 to enable GXW40XX to use STATIC IP mode, then use option 02, 03, 04, 05 to set up IP address, Subnet Mask, Gateway and DNS server respectively. FIRMWARE SERVER IP ADDRESS Select voice menu option 13 to configure the IP address of the firmware server.
ACCESS THE WEB CONFIGURATION MENU The GXW40XX HTML configuration menu can be accessed via LAN or WAN port: From the LAN port (For GXW4004/8 only):: 1. Directly connect a computer to the LAN port. 2. In Windows, open a ‘Command Prompt’ window 3. Type in “ipconfig /release”, the IP address etc. becomes 0. 4. Type in “ipconfig /renew”, the computer gets an IP address in 192.168.2.x segment by default 5. Open a web browser, type in the default gateway IP address. http://192.168.2.1.
IMPORTANT SETTINGS The end-user must configure the following settings according to the local environment. NOTE: Most settings on the web configuration pages are set to the default values. NAT SETTINGS If you plan to keep the gateway within a private network behind a firewall, we recommend using STUN Server. The following three (3) settings are useful in the STUN Server scenario: 1.
G726 (16/24/32/40) iLBC AAL2 (all G726) DEFINITIONS This section will describe the options in the Web configuration user interface. As mentioned, a user can log in as an administrator or end-user. Functions available for the end-user are: STATUS: Displays the network status, account status, software version and MAC-address of the phone BASIC SETTINGS: Basic preferences such as date and time settings, multi-purpose keys and LCD settings can be set here.
DHCP hostname This option specifies the name of the client. This field is optional but may be required by some Internet Service Providers. Default is blank. DHCP vendor class ID Used by clients and servers to exchange vendor-specific information. Default is HT500. PPPoE account ID PPPoE username. Necessary if ISP requires you to use a PPPoE (Point to Point Protocol over Ethernet) connection. PPPoE password PPPoE account password. PPPoE Service Name This field is optional.
NAT UDP timeout NAT UDP timeout in seconds. Note: This option is not present on GXW4024 Uplink Bandwidth ISP specified WAN uplink bandwidth Note: This option is not present on GXW4024 Downlink Bandwidth ISP specified WAN downlink bandwidth Note: This option is not present on GXW4024 Enable UPnP support If set to “Yes”, the GXW40XX would act as an UPnP gateway for your UPnP enable applications.
DHCP IP Lease Time Value is set in units of hours. Default value is 120 hrs (5 Days.) The time IP address is assigned to the LAN clients. Note: This option is not present on GXW4024 DMZ IP Forward all WAN IP traffic to a specific IP address if no matching port is used by GXW40XX or defined in port forwarding. Note: This option is not present on GXW4024 Port Forwarding Forwards a matching (TCP/UDP) port to a specific LAN IP address with a specific (TCP/UDP) port.
Port Status Displays relevant information regarding the individual FXS ports. Example: Port Hook Registration DND FXS1 On Hook Registered No FXS2 Off Hook Registered No FXS3 On Hook Not No Forward Busy Delayed Forward Forward 613 614 Registered FXS24 On Hook Registered Yes 615 ** FXS port 24 user has set Do Not Disturb. FXS port 1 user has set his calls to be forwarded unconditionally to ext 613 FXS port 2 user has set his calls to be forwarded to 614 when his phone is busy.
Use STUN to detect Use STUN keep-alive to detect WAN side network problems. If keep-alive request network connectivity does not yield any response for configured number of times, the device will restart the TCP/IP stack. If the STUN server does not respond when the device boots up, the feature is disabled. Firmware Upgrade & Enables GXW40XX to download firmware or configuration file using either the TFTP Provisioning or HTTP/S protocols.
Firmware File Postfix Default is blank. This setting is useful for Internet Telephone Service Providers. End users should keep it blank. Config File Prefix Default is blank. This setting is useful for Internet Telephone Service Providers. End users should keep it blank. Config File Postfix Default is blank. This setting is useful for Internet Telephone Service Providers. End users should keep it blank.
ACS Password User specify the ACS password Periodic Inform Enable Default is No.
Lifeline Mode Life line feature ensures user can place/receive a PSTN call in an emergency situation. 1. If set to “Auto”, in case of power loss or loss of SIP registration, the PSTN line will be seamlessly connected to analog phone connected to FXS port. 2. If set to “Always Connected” the PSTN line will be always connected to the phone connected to FXS port. VoIP calls will not be allowed in this configuration. 3.
Syslog Level Select the GXW40XX to report the log level. Default is NONE. The level is one of DEBUG, INFO, WARNING or ERROR. Syslog messages are sent based on the following events: 1. product model/version on boot up (INFO level) 2. NAT related info (INFO level) 3. sent or received SIP message (DEBUG level) 4. SIP message summary (INFO level) 5. inbound and outbound calls (INFO level) 6. registration status change (INFO level) 7. negotiated codec (INFO level) 8.
Default value is 2 seconds. The time between retries the GXW will send “Access- RADIUS Timeout Request” message to RADIUS server in purpose to authenticate it. RADIUS Retry Default value is 3 times. Number of times the device will try to authenticate itself with preconfigured RADIUS server during initialization process. Download Device This setting allows user to download a text file containing all the P values of each Configuration setting as configured on the unit.
Hunting Group This feature enables the gateway to register all existing FXS ports with the same phone number. Each incoming call will be routed to first available port in Linear or Circular mode. User may configure all ports as members of the same Hunting Group or it may configure different port combinations for more than one Hunting Group. For example: Ports 1, 3 and 5 are members of the same Hunting Group, the rest of the ports may have separate numbers and may be reached independently.
Offhook Auto-Dial Configure the delay time for offhook auto-dial function. Range is 0-60 seconds, Delay default is 0. Map to FXO Port# This is used only when peering with a Grandstream GXW410x. Default is 1, Supported values are 1-8, meaning line 1 to line 8 of the GXW410x device where the port will be mapped to. Map to FXO Gateway IP This is used when peering with an FXO gateway of any brand. You have to specifically mention the IP and sip port where the call will be sent to.
DNS Mode One from the 3 modes are available for “DNS Mode” configuration: -A Record (for resolving IP Address of target according to domain name) -SRV (DNS SRV resource records indicates how to find services for various protocols) -NAPTR/SRV (Naming Authority Pointer according to RFC 2915) -Use Configured IP (Use the three configured IP address instead of any DNS query) One mode can be chosen for the client to look up server.
Local SIP port Defines the local SIP port the GXW40XX will listen and transmit. The default value for Profile 1 is 5060 and 6060 for Profile 2. Local RTP Port Defines the local RTP-RTCP port pair the GXW40XX will listen and transmit. It is the base RTP port for channel 0. When configured, channel 0 will use this port _value for RTP and the port_value+1 for its RTCP; channel 1 will use port_value+2 for RTP, port_value+3 for its RTCP and so on.
Preferred DTMF The GXW40xx supports up to 3 different DTMF methods including in-audio, via RTP method (in listed (RFC2833) and via Sip Info. The user can configure DTMF method in a priority list. order) Disable DTMF Default is No. If set to yes, use above DTMF order without negotiation Negotiation Send Hook Flash Default is No. If set to yes, flash will be sent as a DTMF event. Event Enable Call Features Default is Yes.
Disable Visual MWI Visual message indicator is a special on-hook caller ID type message that enables and disables the message waiting light on certain phones. GXW40XX has this feature enabled by default. However, certain phones (rare) that do not support it may mistakenly treat this CID signal as an incoming call. A configuration option is needed to turn on MWI in this case. Visual MWI Type This is the type of signal sent to the analog phone to make it turn the lamp ON upon receiving a Voice mail.
Use # as Dial Key Allows users to configure the “#” key as the “Send” (or “Dial”) key. If set to “Yes”, “#” will send the number. In this case, this key is essentially equivalent to the “Dial” key. If set to “No”, this “#” key can be included as part of number. FIRMWARE VERSION 1.0.8.
Dial Plan Dial Plan Rules: 1. Accept Digits: 1,2,3,4,5,6,7,8,9,0 , *, #, A,a,B,b,C,c,D,d 2. Grammar: x - any digit from 0-9; a. xx+ - at least 2 digits number; b. xx. – at least 2 digits number; c. ^ - exclude; d. [3-5] - any digit of 3, 4, or 5; e. [147] - any digit 1, 4, or 7; f. <2=011> - replace digit 2 with 011 when dialing g. < =1> - add a leading 1 to all numbers dialed, vice versa will remove a 1 from the number dialed h.
Subscribe for MWI Default is No. When set to “Yes” a SUBSCRIBE for Message Waiting Indication will be sent periodically. Send Anonymous If this parameter is set to “Yes”, the “From” header along with Privacy and P_Asserted_Identity headers in outgoing INVITE message will be set to anonymous, blocking Caller ID. Anonymous Call Default is No. If set to Yes, incoming calls with anonymous Caller ID will be rejected with Rejection 486 Busy message. Special Feature Default is Standard.
Send Re-INVITE After Default is No, If set to “Yes”, device will send an INVITE with audio vocoders upon Fax completition of Fax to continue session in audio only. Enable Silence For fax machines that do not send a Disconnect when fax is done. This option Detection for Fax Enables/Disables the detection of silence in order to know the fax has finished. The Disconnect silence period is non-configurable and fixed to 7 seconds.
Symmetric RTP Default is No. When set to Yes the device will change the destination to send RTP packets to the source IP address and port of the inbound RTP packet last received by the device. Fax Mode T.38 (Auto Detect) FoIP by default, or Pass-Through (must use codec PCMU/PCMA) Fax Tone Detection Default is Callee. This decides whether Caller or Callee sends out the re-INVITE for Mode T.38 or Fax Pass Through. Jitter Buffer Type Select either Fixed or Adaptive based on network conditions.
Hook Flash timing Time period when the cradle is pressed (Hook Flash) to simulate FLASH. To prevent unwanted activation of the Flash/Hold and automatic phone ring-back, adjust this time value. On Hook Timing On-hook timing is the minimum time for an on-hook event to be validated. Gain Handset volume adjustment. RX is for receiving volume (direction FXSto analog phone), TX is for transmission volume (Analog phone to FXS). Default values are 0dB for both parameters.
Grandstream provides a central provisioning system GAPS (Grandstream Automated Provisioning System) to support automated configuration of Grandstream devices. GAPS uses enhanced (NAT friendly) TFTP or HTTP (thus no NAT issues) and other communication protocols to communicate with each individual Grandstream device for firmware upgrade, remote reboot, etc. Grandstream provides GAPS service to VoIP service providers. Use GAPS for either simple redirection or with certain special provisioning settings.
SOFTWARE UPGRADE Software upgrade can be done via either TFTP or HTTP/HTTPS. The corresponding configuration settings are in the ADVANCED SETTINGS configuration page. FIRMWARE UPGRADE THROUGH TFTP/HTTP/HTTPS To upgrade via TFTP or HTTP/HTTPS, the “Firmware Upgrade and Provisioning upgrade via” field needs to be set to TFTP HTTP or HTTPS, respectively. “Firmware Server Path” needs to be set to a valid URL of a TFTP or HTTP server, server name can be in either FQDN or IP address format.
Grandstream’s latest firmware is available http://www.grandstream.com/support/firmware . Oversea users are strongly recommended to download the binary files and upgrade firmware locally in a controlled LAN environment. Alternatively, user can download a free TFTP or HTTP server and conduct local firmware upgrade. A free windows version TFTP server is available for download from http://support.solarwinds.net/updates/New-customerFree.cfm.
For more details on Grandstream Device provisioning, please refer to: http://www.grandstream.com/general/gs_provisioning_guide_public.pdf FIRMWARE AND CONFIGURATION FILE PREFIX AND POSTFIX Firmware Prefix and Postfix allows device to download the firmware name with the matching Prefix and Postfix. This makes it possible to store ALL of the firmwares with different version in one single directory.
RESTORE FACTORY DEFAULT SETTING WARNING! Restoring the Factory Default Setting will DELETE all configuration information of the phone. Please BACKUP or PRINT out all the settings before you approach to following steps. Grandstream will not take any responsibility if you lose all the parameters of setting and cannot connect to your VoIP service provider. FACTORY RESET There are two (2) methods for resetting your unit: RESET BUTTON Reset default factory settings following these four (4) steps: 1.
B: 222 C: 2222 D: 33 (press the “3” key twice, “D” will show on the LCD) E: 333 F: 3333 For example: if the MAC address is 000b8200e395, it should be keyed in as “0002228200333395”. NOTE: 1. Factory Reset will be disabled if the “Lock keypad update” is set to “Yes”. 2. Please be aware by default the GXW40XX WAN side HTTP access is disabled. After a factory reset, the device’s web configuration page can be accessed only from its LAN port. FIRMWARE VERSION 1.0.8.