
User Manual and Operating Guide


Epygi Technologies Configuring Grandstream IP Phones on Quadro LAN
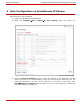
Figure 3- Attaching an IP line to an extension
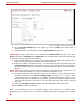
4. On the IP Line Settings page (see Figure 4), select the SIP phone radio button to
activate the line.
5. Select the model of the SIP phone from the Phone Model drop-down list.
Please Note: If the phone model is not included in the Phone Model drop-down list, select
Other and specify a Username and a Password in the respective fields (the same values should
be used when configuring the phone manually).
6. Enter the MAC address of the phone into the appropriate text fields. MAC addresses of IP
phones are usually printed on the back of the phone base unit.
7. Enter the number for simultaneous calls – the total number of active and held calls, in the
Line Appearances text box. If this field is set to 1, only one active call will be possible to
have on the phone. Making or accepting a second call while the other is on hold will not be
allowed.
Please Note: This number cannot exceed the number of simultaneous calls supported by the
phone. For Grandstream GXP2000 it is 11, for Grandstream BT 100/200 it is 2.
8. The Quadro identifies each SIP phone located on its LAN by a unique username and a
password specified on the IP Line Settings Page (see
Figure 4). In case of auto-
configuration, they are specified on the Quadro and are automatically included in the
phone’s configuration file generated by the Quadro. By default the Quadro assigns a unique
username and password to each IP line. The user may either keep these values or specify
new ones.
9. Check the Use Session Timer checkbox to enable SIP Session Timer for this line.
10. Click Save to submit the changes.
Once a corresponding IP line is configured, factory reset the phone to complete Auto-
configuration. For instructions on how to reset a Grandstream SIP phone, please refer to Section
4.
PAGE 6 27-Sep-07