
User's Guide

P a g e | 17
HT81x User Guide
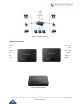
Connecting HT81X
TheHT81Xaredesignedforeasyconfigurationandinstallation.To connect your HT81X, please follow the
steps below:
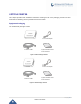
Scenario 1: Connecting the HT81X using WAN Port
When connecting HT81X using the WAN port, they will act as simple DHCP Client.
1. InsertastandardRJ11telephonecableintothephoneportsandconnecttheotherendofthe
telephonecableto astandardtouch-toneanalogtelephone.
2. Connect the WAN port of the HT81X to a router, switch or modem using an Ethernet cable.
3. Insert the power adapter into the HT81X and connect it to a wall outlet and make sure to respect
the technical specifications of the power adapter used.
4. Power, WAN and Phone LEDs will be solidly lit when the HT81X is ready for use.
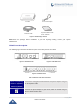
Scenario 2: Connecting the HT81X using LAN Port
When connecting the HT81X using the LAN port, they will act as a router and DHCP serving addresses,
the devices connected with HT81XLAN will pull DHCP addresses from your HT81X.
1. InsertastandardRJ11telephonecableintothephoneportsandconnecttheotherendofthe
telephonecableto astandardtouch-toneanalogtelephone.
2. Connect a computer or switch to the LAN port of the HT81X using an Ethernet Cable.
3. Insert the power adapter into the HT81X and connect it to a wall outlet and make sure to respect
the technical specifications of the power adapter used.
4. Power, LAN and Phone LEDs will be solidly lit when the HT81X is ready for use.
Note: Please make sure to enable NAT Router under Web GUI Basic Settings Device Mode.
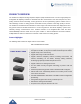
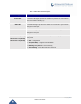
LAN
Connects the phone adapter to your PC or switch using an Ethernet
RJ45 network cable.
DC Power
Connects the phone adapter to PSU (12V – 0.5A for HT812), (12V - 1A
for HT814) and (12V – 1.5A for HT818).
Reset
Factoryresetbutton. Pressfor 7seconds toresetfactory default settings.