Grandstream Networks, Inc. HT502 Dual FXS Port Analog Telephone Adaptor HT502 User Manual Firmware Version 1.0.4.2 www.grandstream.com support@grandstream.
TABLE OF CONTENTS HT502 User Manual WELCOME.................................................................................................................................................... 4 SAFETY COMPLIANCES ................................................................................................................................. 4 WARRANTY..................................................................................................................................................
TABLE OF FIGURES HT502 USER MANUAL FIGURE 1: CONNECTING THE HT502 ............................................................................................................................... 5 FIGURE 2: HT502 CONNECTION DIAGRAM ...................................................................................................................... 6 FIGURE 3: UPLINK/DOWNLINK BANDWIDTH LIMITATION……………………………………………………………...19 TABLE OF TABLES HT502 USER MANUAL TABLE 1: DEFINITIONS OF THE HT502 CONNECTORS .....
WELCOME Thank you for purchasing Grandstream’s HT502, the affordable, feature rich Analog Telephone Adaptor. Grandstream HandyTone502 is a new addition to the popular HandyTone ATA product family. It features the rich audio quality, a broad range of voice codecs, and functionality of the HT502, including two (2) FXS ports each with independent SIP accounts.
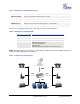
CONNECT YOUR HT502 Equipment Packaging The HT502 ATA package contains: • • • • One HT502 Main Case One Universal Power Adaptor One Ethernet Cable One HT502 Vertical Stand Connecting the HT502 The HT502 is designed for easy configuration and easy installation. Configure the HT502 following the directions in the Configuration section of this manual. 1. Connect a standard touch-tone analog telephone to the PHONE port. 2.
TABLE 1: DEFINITIONS OF THE HT502 CONNECTORS Power Cable Power adapter connection WAN Port (RJ-45) Connect to the internal LAN network or router. LAN Port (RJ-45) Connect the LAN port with an Ethernet cable to your PC. RESET Factory Reset button. Press for 7 seconds to reset factory default settings. PHONE1 (RJ-11) FXS port to be connected to analog phones / fax machines. PHONE2 (RJ-11) FXS port to be connected to analog phones / fax machines.
PRODUCT OVERVIEW The HT502 is a full feature voice and fax-over IP device that offers a high-level of integration including dual 10M/100Mbps network ports with integrated router, NAT, DHCP server, dual port FXS telephone gateway, market-leading sound quality, rich functionalities, and a compact and lightweight design. The VoIP network signaling protocol supported is SIP.
DTMF Method Flexible DTMF transmission method, user interface of In-audio, RFC2833, and/or SIP Info IP Signaling SIP (RFC 3261) Provisioning TFTP, HTTP, HTTPS Control TLS/SIPS , SIP over TCP/TLS Device Management Web interface or via secure encrypted AES or non-encrypted central configuration file for mass deployment, Auto/manual provisioning system or via built-in IVR. NAT-friendly remote software upgrade (via TFTP/HTTP/HTTPS) for deployed devices including behind firewall/NAT.
BASIC OPERATIONS Understanding HT502 Voice Prompt HT502 has a built-in voice prompt menu for simple device configuration. The IVR menu and the LED button work with any of the FXS port. Pick up the handset and dial “***” to use the IVR menu.
99 “RESET” Press “9” to reboot the device Enter MAC address to restore factory default setting (See Restore Factory Default Setting section) “Invalid Entry” Automatically returns to main menu “Device not registered” This prompt will be played immediately after off hook If the device is not register and the option “Outgoing Call without Registration” is in NO Five Success Tips when using the Voice Prompt 1. “*” shifts down to the next menu option 2. “#” returns to the main menu 3.
Using Star Code 1. Pick up the analog phone then dial “*47” 2. Enter the target IP address. Note: NO dial tone will be played between step 1 and 2. Destination ports can be specified using “*” (encoding for “:”) followed by the port number. Examples of Direct IP Calls: a) If the target IP address is 192.168.0.160, the dialing convention is *47 or Voice Prompt with option 47, then 192*168*0*160. followed by pressing the “#” key if it is configured as a send key or wait 4 seconds.
Note: continuous busy tone does not indicate the transfer has been successful, nor does it indicate the transfer has failed. It often means there was a failure to receive second NOTIFY – check firmware for most recent release. Attended Transfer Assume that Caller A and B are in conversation. Caller A wants to Attend Transfer B to C: 1. Caller A presses FLASH on the analog phone for dial tone. 2. Caller A then dials Caller C’s number followed by # (or wait for 4 seconds). 3.
CALL FEATURES The HT502 supports all the traditional and advanced telephony features. TABLE 6: HT502 CALL FEATURES Key *02 *03 *16 *17 *30 *31 *47 *50 *51 *67 *82 *69 *70 *71 *72 *73 *74 *78 *79 *87 *90 *91 *92 *93 Flash/Hook # Call Features Forcing a Codec (per call) *027110 (PCMU), *027111 (PCMA), *02723 (G723), *02729 (G729), *0272616 (G726-r16), *0272624 (G724-r24), *0272632 (G726-r32), *0272640 (G726-r40), *027201 (iLBC) Disable LEC (pe call) Dial “*03” + ” number ”.
CONFIGURATION GUIDE Configuring the HT502 through Voice Prompts DHCP MODE Select voice menu option 01 to enable HT502 to use DHCP. STATIC IP MODE Select voice menu option 01 to enable HT502 to use STATIC IP mode, then use option 02, 03, 04, 05 to set up IP address, Subnet Mask, Gateway and DNS server respectively. FIRMWARE SERVER IP ADDRESS Select voice menu option 13 to configure the IP address of the firmware server.
Configuring the HT502 Via Web Browser HT502 has an embedded Web server that will respond to HTTP GET/POST requests. It also has embedded HTML pages that allow users to configure the HT502 through a web browser such as Microsoft’s IE, AOL’s Netscape or Mozilla Firefox installed on Windows or Unix OS. (Macintosh OS is not included). ACCESS THE WEB CONFIGURATION MENU The HT502 HTML configuration page can be accessed via LAN or WAN ports. • FROM THE LAN PORT: 1. Directly connect a computer to the LAN port 2.
NOTE: If you can not log into the configuration page by using the default password, please check with the VoIP service provider. It is most likely the VoIP service provider has provisioned the device and configured for you therefore the password has already been changed. Important Settings The end-user must configure the following settings according to the local environment. settings on the web configuration pages are set to the default values.
TABLE 7: BASIC SETTINGS End User Password Password to access the Web Configuration Menu. This field is case sensitive with a maximum length of 25 characters. Web Port By default, HTTP uses port 80. This field is for customizable web port. Telnet Server Default is set to YES. IP Address There are two modes to operate the HT502: DHCP mode: all the field values for the Static IP mode are not used (even though they are still saved in the Flash memory.
NAT TCP Timeout NAT TCP idle timeout in seconds. Connection will be closed after preconfigured, timeout if not refreshed. Range: 0 - 3600 NAT UDP Timeout NAT TCP idle timeout in seconds. Connection will be closed after preconfigured, timeout if not refreshed. Range: 0 – 3600, default is 300 Uplink Bandwidth The maximum uplink bandwidth permitted by the device. This function is disabled by default. The total bandwidth can be set as: 128K, 256K, 512K, 1M, 2M, 3M, 4M, 5M, 10M or 15M.
Port Forwarding Forwards a matching (TCP/UDP) port to a specific LAN IP address with a specific (TCP/UDP) port. FIGURE 3: UPLINK/DOWNLINK BANDWIDTH LIMITATION In addition to the Basic Settings configuration page, end users also have access to the Device Status page. TABLE 8: STATUS PAGE MAC Address The device ID, in HEX format. This is very important ID for ISP troubleshooting. LAN and WAN Mac addresses will appear in this place.
Port Status Displays relevant information regarding the each FXS port. Port Hook Registration DND Forward FXS1 FXS2 On Hook On Hook Registered Registered Yes No 613 Busy Forward Delayed Forward 614 Both FXS port1 and FXS port2 are registered with this SIP Server. FXS Port 1 user has set Do Not Disturb. FXS Port 1 user has set his calls to be forwarded unconditionally to ext 613. FXS Port 2 user has set his calls to forward to 614 when his phone is busy.
Via TFTP Server This is the IP address of the configured TFTP server. If selected and it is non-zero or not blank, the HT502 retrieves the new configuration file or new code image from the specified TFTP server at boot time. After 5 attempts, the system will timeout and will start the boot process using the existing code image in the Flash memory. If a TFTP server is configured and a new code image is retrieved, the new downloaded image is saved into the Flash memory.
Firmware Key Used for firmware encryption. Should be 32 digit in hexadecimal representation. End user should keep it blank. SSL Certificate The user specify SSL certificate used for SIP over TLS in X.509 format. SSL Private Key The user specify SSL private key used for SIP over TLS in X.509 format. SSL Private Key Password User specify password to protect the private key above.
Syslog Level Select the HT502 to report the log level. Default is NONE. The level is one of DEBUG, INFO, WARNING or ERROR. Syslog messages are sent based on the following events: 1. 2. 3. 4. 5. 6. 7. 8. 9. 10.
DNS Mode One from the 3 modes are available for “DNS Mode” configuration: -A Record (for resolving IP Address of target according to domain name) -SRV (DNS SRV resource records indicates how to find services for various protocols) -NAPTR/SRV (Naming Authority Pointer according to RFC 2915) One mode can be chosen for the client to look up server. The default value is “A Record” User ID is Phone Number If the HT502 has an assigned PSTN telephone number, this field should be set to “Yes”.
SIP T1 Timeout SIP T2 Interval DTMF Payload Type Preferred DTMF method Disable DTMF Negotiation DTMF via RFC2833 DTMF via SIP INFO T1 is an estimate of the round-trip time between the client and server transactions. If the network latency is high, select larger value for more reliable usage. Maximum retransmission interval for non-INVITE requests and INVITE responses. Sets the payload type for DTMF using RFC2833.
seconds have elapsed if the user forgets to press the “Re-Dial” button. The “Yes” option should be used ONLY if there is a SIP proxy configured and the proxy server supports 484 Incomplete Address response. Otherwise, the call will likely be rejected by the proxy (with a 404 Not Found error). Dial Plan Prefix Use # as Dial Key Dial Plan This feature does NOT work with and should NOT be enabled for direct IP-to-IP calling. Sets the prefix added to each dialed number.
Anonymous Call Rejection Default is No. If set to Yes, incoming calls with anonymous Caller ID will be rejected with 486 Busy message. Special Feature Default is Standard. Choose the selection to meet some special requirements from Softswitch vendors. Session Expiration Grandstream implemented SIP Session Timer. The session timer extension enables SIP sessions to be periodically “refreshed” via a SIP request (UPDATE, or re-INVITE.
VAD Fax Mode Default is No. VAD allows detecting the absence of audio and conserve bandwidth by preventing the transmission of "silent packets" over the network. Default is No. When set to Yes the device will change the destination to send RTP packets to the source IP address and port of the inbound RTP packet last received by the device. T.38 (Auto Detect) FoIP by default, or Pass-Through (must use codec PCMU/PCMA) Fax Tone Detection Mode Jitter Buffer Type Default is Callee.
Saving the Configuration Changes Click the “Update” button in the Configuration page to save the changes to the HT502 configuration. The following screen confirms that the changes are saved. Reboot or power cycle the HT502 to make the changes take effect. Rebooting the HT502 from Remote Press the “Reboot” button at the bottom of the configuration menu to reboot the ATA remotely. The web browser will then display a message window to confirm that reboot is underway. Wait 30 seconds to log in again.
SOFTWARE UPGRADE Software upgrade can be done via either TFTP or HTTP. The corresponding configuration settings are in the ADVANCED SETTINGS configuration page. Firmware Upgrade through TFTP/HTTP/HTTPS To upgrade via TFTP or HTTP/HTTPS, the “Firmware Upgrade and Provisioning upgrade via” field needs to be set to TFTP HTTP or HTTPS, respectively. “Firmware Server Path” needs to be set to a valid URL of a TFTP or HTTP server, server name can be in either FQDN or IP address format.
3. Please go to File -> Configure -> Security to change the TFTP server's default setting from "Receive Only" to "Transmit Only" for the firmware upgrade. 4. Start the TFTP server, in the phone’s web configuration page 5. Configure the Firmware Server Path with the IP address of the PC 6. Update the change and reboot the unit End users can also choose to download the free HTTP server from http://httpd.apache.org/ or use Microsoft IIS web server.
RESTORE FACTORY DEFAULT SETTING WARNING! Restoring the Factory Default Setting will DELETE all configuration information of the phone. Please BACKUP or PRINT out all the settings before you approach to following steps. Grandstream will not take any responsibility if you lose all the parameters of setting and cannot connect to your VoIP service provider. FACTORY RESET There are two (2) methods for resetting your unit: Reset Button Reset default factory settings following these four (4) steps: 1.