Grandstream Networks, Inc. HT496 Dual FXS Port Analog Telephone Adaptor HT496 User Manual Firmware Version 1.0.3.86 www.grandstream.com support@grandstream.
TABLE OF CONTENTS HT496 User Manual WELCOME.................................................................................................................................................... 4 SAFETY COMPLIANCES ................................................................................................................................. 4 WARRANTY..................................................................................................................................................
TABLE OF FIGURES HT496 User Manual FIGURE 1: CONNECTING THE HT496 ............................................................................................................... 5 FIGURE 2: CONFIGURING THE HT496 .............................................................................................................. 6 FIGURE 3: SCREENSHOT OF CONFIGURATION LOG-IN PAGE ............................................................................ 17 FIGURE 4: SCREENSHOT OF SAVE CONFIGURATION PAGE ........
WELCOME Thank you for purchasing the Grandstream HT496, the affordable, feature rich Analog Telephone Adaptor designed for both the residential and business user. HT496 is a next generation dual-port SIP IAD for Internet data, voice, and fax. The HT496 is a full feature voice and fax-over IP device that offers a high-level of integration including an integrated router, NAT, DHCP server, dual port FXS telephone gateway, market-leading sound quality, rich functionalities, and a compact and lightweight design.
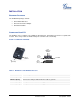
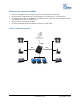
INSTALLATION EQUIPMENT PACKAGING The HT496 ATA package contains: • One HT496 Main Case • One Universal Power Adaptor • One Ethernet Cable CONNECTING YOUR ATA The HT496 is easy to configure. The HT496 has two FXS ports. Each FXS port can have a separate SIP account. This is a key feature of HT496. Both ports can make calls concurrently.
FIVE EASY STEPS TO INSTALL THE HT496 1. Connect a standard touch-tone analog telephone (or fax machine) to first FXS port. 2. Connect another standard touch-tone analog telephone (or fax machine) to second FXS port. 3. Insert the Ethernet cable into the WAN port of HT496 and connect the other end of the Ethernet cable to an uplink port (a router or a modem, etc.) 4. Connect a PC to the LAN port of HT496. 5. Insert the power adapter into the HT496 and connect it to a wall outlet.
PRODUCT OVERVIEW The HT496 is a full feature voice and fax-over IP device that offers a high-level of integration including dual 10M/100Mbps network ports with integrated router, NAT, DHCP server, dual port FXS telephone gateway, market-leading sound quality, rich functionalities, and a compact and lightweight design. The H496 is fully compatible with SIP industry standard and is interoperable with most other SIP compliant devices and software. It also supports comprehensive voice codecs.
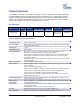
TABLE 3: HT496 Hardware Specifications LAN Interface 1 x RJ45 10 Mbps WAN Interface 1 x RJ45 10 Mbps FXS phone port 2 x FXS Button 1 LED Green and red / solid state & blinking state Universal Switching Power Adaptor Input: 100-240VAC 50-60 Hz Output: +5VDC, 1200mA UL certified Dimension 70mm (W) x 130mm (D) x 27mm (H) Weight 0.6lbs (0.3kg) Temperature 40 - 130ºF / 5 45ºC Humidity 10% - 90% (non-condensing) Compliance FCC/CE/C-Tick Grandstream Networks, Inc.
BASIC OPERATIONS GET FAMILIAR WITH VOICE PROMPT HT496 stores a voice prompt menu (Interactive Voice Response or IVR) for quick browsing and simple configuration. The IVR menu and the LED button work with the FXS port 1 only.
IVR Definition NOTES: 1. Once the button is pressed, it enters the voice prompt main menu. If the button is pressed again, while it is already in the voice prompt menu, it jumps to “Direct IP Call” option and a dial tone is prompted 2. “*” shifts down to the next menu option “#” returns to the main menu “9” functions as the ENTER key in many cases to confirm an option 3. All entered digit sequences have known lengths a. 2 digits for menu option and 12 digits for IP address. b.
PLACING A PHONE CALL PHONE OR EXTENSION NUMBERS 1. Dial the number directly and wait for 4 seconds (Default “No Key Entry Timeout”); or 2. Dial the number directly and press # (Use # as dial key” must be configured in web configuration). Examples: 1. Dial an extension directly on the same proxy, (e.g. 1008), and then press the # or wait for 4 seconds. 2. Dial an outside number (e.g. (626) 666-7890), first enter the prefix number (usually 1+ or international code) followed by the phone number.
Expected outcomes: a) A quick confirmation tone (call waiting tone) followed by a dial tone. This indicates the transfer is successful. Hang up or place another call. b) A quick busy tone followed by a restored call (on supported platforms only). The busy tone indicates the transfer failed. c) Continuous busy tone. The phone call has timed out. Note: continuous busy tone does not indicate the transfer has been successful, nor does it indicate the transfer has failed.
CALL FEATURES The HT496 supports all the traditional and advanced telephony features.
LED LIGHT PATTERN INDICATION Following tables show the LED light pattern indication. The LED shows PHONE1 status only. TABLE 6: HT496 LED Definitions RED LED always indicates not normal status Button flashes every 2 seconds. (if DHCP is configured) DHCP Failed or WAN No Cable Button flashes every 2 seconds. (if SIP server is configured) HT496 fails to register Button flashes every 2 seconds. Red light steady.
CONFIGURATION GUIDE CONFIGURING HT496 THROUGH VOICE PROMPT DHCP MODE Select voice menu option 01 to enable HT496 to use DHCP. STATIC IP MODE Select voice menu option 01 to enable HT496 to use STATIC IP mode, then use option 02, 03, 04, 05 to set up IP address, Subnet Mask, Gateway and DNS server respectively. FIRMWARE SERVER IP ADDRESS Select voice menu option 13 to configure the IP address of the firmware server.
CONFIGURING HT496 WITH WEB BROWSER HT496 has an embedded Web server that will respond to HTTP GET/POST requests. It also has embedded HTML pages that allow users to configure the HT496 through a Web browser such as Microsoft’s IE and AOL’s Netscape. ACCESS THE WEB CONFIGURATION MENU The HT496 HTML (Web GUI) configuration menu is accessed either from the LAN or WAN port: FROM THE LAN PORT: 1. Directly connect a computer to the LAN port. 2. Open a command window on the computer 3.
END USER CONFIGURATION Once the HTTP request is sent from a Web browser, the user will see a log in screen. There are two default passwords for the login page: User Level: End User Level Administrator Level Password: 123 admin Web pages allowed: Only Status and Basic Settings Browse all pages Only an administrator can access the “ADVANCED SETTING” configuration page.
TABLE 7: HT496 Basic Configuration Settings Definitions End User Password Password to access the Web Configuration Menu. This field is case sensitive with a maximum length of 25 characters. Web Port By default, HTTP uses port 80. This field is for customizable web port. IP Address There are two modes to operate the HT496: DHCP mode: all the field values for the Static IP mode are not used (even though they are still saved in the Flash memory.
Daylight Savings Time Controls whether displayed time is daylight savings time or not. If set to “Yes” and the Optional Rule is empty, then the displayed time will be 1 hour ahead of normal time. • The “Automatic Daylight Saving Time Rule” has the following syntax: o start-time;end-time;saving. Both start-time and end-time have the same syntax: month,day,weekday,hour,minute o month: 1,2,3,..,12 (for Jan, Feb, .., Dec) o day: [+|-]1,2,3,..,31 o weekday: 1, 2, 3, .., 7 (for Mon, Tue, ..
TABLE 8: HT496 Device Status Page Definitions MAC Address The device ID in HEX format. This is needed for ISP troubleshooting. WAN IP Address Shows WAN IP address of HT496. Product Model Contains the product model info. Software Version Program: This is the main software release. Boot and Loader are seldom changed. System Up Time Shows system up time since the last reboot. Registered Indicates whether the HT496 is registered to the service provider’s server.
TABLE 9: HT496 Advanced Configuration Page Definitions Admin Password This contains the password to access the Advanced Web Configuration page. This field is case sensitive. Home NPA Local area code for North American Dial Plan. Layer 3 QoS This field defines the layer 3 QoS parameter which can be the value used for IP Precedence or Diff-Serv or MPLS. Default value is 48. Layer 2 QoS This setting includes two fields. The 802.1Q/VLAN Tag contains the value used for layer 2 VLAN tag.
Caller ID Scheme Select the Caller ID Scheme to suit the standard of different area. • Bellcore (North America) • CID-Canada • DTMF-Brazil • DTMF-Sewden • DTMF (Denmark) • ETSI-DTMF (Finland, Sweden) • ETSI-FSK (France, Germany, Norway, Taiwan, UK-CCA) On-hook Voltage Select the on-hook voltage to suit different area or PBX. Here is the voltage the FXS port will supply to connected analog Phone or PBX. Polarity Reversal Default is No.
TABLE 10: HT496 Individual Account Settings Definitions SIP Server This field contains the URI string or the IP address (and port, if different from 5060) of the SIP proxy server. e.g., the following are some valid examples: sip.my-voipprovider.com, or sip:my-company-sip-server.com, or 192.168.1.200:5066 Outbound Proxy This field contains the URI string or the IP address (and port, if different from 5060) of the outbound proxy. If there is no outbound proxy, this field SHOULD be blank.
Enable Call Features Default is Yes. Advanced call features and feature codes functions are supported locally. Use Bell-style 3-way Conference If this parameter is set to “Yes”, user will be able to make Bellcore style 3-way conference. *23 will be disabled. Off-hook Auto-Dial This parameter automatically configures and dials User ID or extension number upon off-hook. Only the user part of a SIP address needs is entered here.
Early Dial This parameter controls whether the early INVITE each time a key is pressed. If set to “Yes”, an INVITE is sent for each dialed number. If set to NO, INVITE is sent after the “(Re-)Dial” button is pressed or after 5 seconds have elapsed. The “Yes” option should be used ONLY if there is a SIP proxy configured and the proxy server supports 484 Incomplete Address response, otherwise the call is rejected. This feature is NOT designed to work with and should NOT be enabled for direct IP-toIP calling.
SAVING THE CONFIGURATION CHANGES After making a change, click the “Update” button in the Configuration page. The HT496 will display the following screen to confirming changes. Reboot or power cycle the HT496 to enable the changes. FIGURE 4: SCREENSHOT OF SAVE CONFIGURATION PAGE REBOOTING THE HT496 FROM REMOTE The administrator of the HT496 can remotely reboot the HT496 by clicking the “Reboot” button at the bottom of the configuration page.
SOFTWARE UPGRADE Software upgrade can be done via either TFTP or HTTP. The corresponding configuration settings are in the ADVANCED SETTINGS configuration page. FIRMWARE UPGRADE THROUGH TFTP/HTTP To upgrade via TFTP or HTTP, the “Firmware Upgrade and Provisioning upgrade via” field needs to be set to TFTP or HTTP, respectively. “Firmware Server Path” needs to be set to a valid URL of a TFTP or HTTP server, server name can be in either FQDN or IP address format. Here are examples of some valid URL. e.g.
CONFIGURATION FILE DOWNLOAD The HT496 can be configured via Web GUI as well as through the Configuration File through TFTP or HTTP. “Config Server Path” is the TFTP or HTTP server path for configuration file. It needs to be set to a valid URL, either in FQDN or IP address format. The “Config Server Path” can be same or different from the “Firmware Server Path”. A configuration parameter is associated with each particular field in the web configuration page.
RESTORE FACTORY DEFAULT SETTING WARNING! Restoring the Factory Default Setting will DELETE all configuration information of the phone. Please BACKUP or PRINT out all the settings before you approach to following steps. Grandstream will not take any responsibility if you lose all the parameters of setting and cannot connect to your VoIP service provider. RESET VIA IVR 1. Find the MAC address of the device. It is a 12 digits HEX number located on the bottom of the unit. 2. Encode the MAC address.