Grandstream Networks, Inc. HT–496 Dual FXS Port Analog Telephone Adaptor HT–496 User Manual Firmware Version 1.0.3.64 VoIPon www.voipon.co.uk www.grandstream.com support@grandstream.com sales@voipon.co.
TABLE OF CONTENTS HT-496 User Manual WELCOME.................................................................................................................................................... 4 INSTALLATION............................................................................................................................................ 5 EQUIPMENT PACKAGING...............................................................................................................................
TABLE OF FIGURES HT–496 User Manual FIGURE 1: CONNECTING THE HT– 496 ............................................................................................................ 5 FIGURE 2: CONFIGURING THE HT–496 ............................................................................................................ 6 FIGURE 3: SCREENSHOT OF CONFIGURATION LOG- IN PAGE ...........................................................................
Welcome Thank you for purchasing the Grandstream HT–496, the affordable, feature rich Analog Telephone Adaptor designed for both the residential and business user. HandyTone-496 is a next generation dual-port SIP IAD for Internet data, voice, and fax.
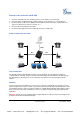
Installation EQUIPMENT PACKAGING The HT–496 ATA package contains: • • • One HT–496 Main Case One Universal Power Adaptor One Ethernet Cable CONNECTING YOUR ATA The HT–496 is easy to configure. The HT–496 has two FXS ports. Each FXS port can have a separate SIP account. This is a key feature of HT–496. Both ports can make calls concurrently.
FIVE EASY STEPS TO INSTALL THE HT–496 1. Connect a standard touch-tone analog telephone (or fax machine) to first FXS port. 2. Connect another standard touch-tone analog telephone (or fax machine) to second FXS port. 3. Insert the Ethernet cable into the WAN port of HT–496 and connect the other end of the Ethernet cable to an uplink port (a router or a modem, etc.) 4. Connect a PC to the LAN port of HT–496. 5. Insert the power adapter into the HT–496 and connect it to a wall outlet.
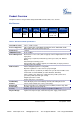
Product Overview HandyTone-496 is a next generation dual-port SIP IAD for Internet data, voice, and fax. KEY FEATURES Ethernet Ports DHCP FXS Port PSTN Pass – through Voice Mail Indicator Voice Codec Remote Configuration 2 RJ45 (LAN) Server/ Client 2 No Yes iLBC, G.723, G.711, G.729, G.726, T.38 TFTP/HTTP TABLE 2: HT–496 Technical Specifications Lines/SIP Accounts Protocol Support(1) 2 lines / 2 SIP accounts SIP 2.
TABLE 3: HT–496 Hardware Specifications LAN Interface 1 x RJ45 10 Mbps WAN Interface 1 x RJ45 10 Mbps FXS phone port 2 x FXS Button 1 LED Green and red / solid state & blinking state Universal Switching Power Adaptor Input: 100-240VAC 50-60 Hz Output: +5VDC, 1200mA UL certified Dimension 70mm (W) x 130mm (D) x 27mm (H) Weight 0.6lbs (0.3kg) Temperature 40 - 130ºF / 5 – 45ºC Humidity 10% - 90% (non-condensing) Compliance FCC/CE/C-Tick Grandstream Networks, Inc. VoIPon www.voipon.co.
Basic Operations GET FAMILIAR WITH VOICE PROMPT HT–496 stores a voice prompt menu (Interactive Voice Response or IVR) for quick browsing and simple configuration. The IVR menu and the LED button work with the FXS port 1 only.
- never upgrade 47 “Direct IP Calling” Enter a 12 digit IP address to make a direct IP call, after dial tone. (See “Make a Direct IP Call”.) 99 “RESET” Press “9” to reboot the device; or Enter encoded MAC address to restore factory default setting (See “Restoring Factory Settings”) “Invalid Entry” Automatically returns to main menu NOTE: 1. Pressing the button during the IVR session will prompt a dial tone and the menu goes directly to “Direct IP Call” option. 2.
PLACING A PHONE CALL PHONE OR EXTENSION NUMBERS 1. Dial the number directly and wait for 4 seconds (Default “No Key Entry Timeout”); or 2. Dial the number directly and press # (Use # as dial key” must be configured in web configuration). Examples: 1. Dial an extension directly on the same proxy, (e.g. 1008), and then press the # or wait for 4 seconds. 2. Dial an outside number (e.g. (626) 666-7890), first enter the prefix number (usually 1+ or international code) followed by the phone number.
Expected outcomes: a) A quick confirmation tone (call waiting tone) followed by a dial tone. This indicates the transfer is successful. Hang up or place another call. b) A quick busy tone followed by a restored call (on supported platforms only). The busy tone indicates the transfer failed. c) Continuous busy tone. The phone call has timed out. Note: continuous busy tone does not indicate the transfer has been successful, nor does it indicate the transfer has failed.
Call Features The HT–496 supports all the traditional and advanced telephony features. TABLE 5: HT–496 Call Feature Definitions Key *23 *30 *31 Call Features 3-way conference Block Caller ID (for all subsequent calls) Send Caller ID (for all subsequent calls) *50 *51 *67 *70 *71 *72 Disable Call Waiting (for all subsequent calls) Enable Call Waiting (for all subsequent calls) Block Caller ID (per call) Disable Call Waiting (per call) Enable Call Waiting (per call) Unconditional Call Forward.
LED LIGHT PATTERN INDICATION Following tables show the LED light pattern indication. The LED shows PHONE1 status only. TABLE 6: HT–496 LED Definitions RED LED indicates not normal status Button flashes every 2 seconds. (if DHCP is configured) DHCP Failed or WAN No Cable Button flashes every 2 seconds. (if SIP server is configured) HT–496fails to register Button flashes every 2 seconds. Firmware Upgrading Red light steady.
Configuration Guide CONFIGURING HT–496 THROUGH VOICE PROMPT DHCP MODE Select voice menu option 01 to enable HT–496 to use DHCP. STATIC IP MODE Select voice menu option 01 to enable HT–496 to use STATIC IP mode, then use option 02, 03, 04, 05 to set up IP address, Subnet Mask, Gateway and DNS server respectively. FIRMWARE SERVER IP ADDRESS Select voice menu option 13 to configure the IP address of the firmware server.
FROM THE WAN PORT: The WAN port HTML configuration option is disabled by default from factory. To access the HTML configuration menu from the WAN port: 1. Enable the “WAN Port Web Access” option via IVR option 12. 2. Find the WAN IP address of the HT–496using voice prompt menu option 02. 3. Access the HT–496Web Configuration page by the following URI via WAN port: http://HandyTone-IP-Address (the HandyTone-IP-Address is the WAN IP address for the HT–496).
TABLE 7: HT–496 Basic Configuration Settings Definitions End User Password Password to access the Web Configuration Menu. This field is case sensitive with a maximum length of 25 characters. Web Port By default, HTTP uses port 80. This field is for customizable web port. IP Address There are two modes to operate the HT–496: DHCP mode: not all the field values for the Static IP mode are used (even though they are still saved in the Flash memory.
Daylight Savings Time Controls whether displayed time is daylight savings time or not. If set to “Yes” and the Optional Rule is empty, then the displayed time will be 1 hour ahead of normal time. • The “Automatic Daylight Saving Time Rule” has the following syntax: o start-time;end-time;saving. Both start-time and end-time have the same syntax: month,day,weekday,hour,minute o month: 1,2,3,..,12 (for Jan, Feb, .., Dec) o day: [+|-]1,2,3,..,31 o weekday: 1, 2, 3, .., 7 (for Mon, Tue, ..
Cloned WAN MAC Address: Set a specific MAC address. Set in Hex format. LAN Subnet Mask Sets the LAN subnet mask. Default value is 255.255.255.0. LAN DHCP Base IP: Base IP for the LAN port that functions as a gateway for the subnet. Default value is 192.168.2.1. DHCP IP Lease Time: Value is set in number of hours. Default value is 120hr (5 Days.) The amount of time IP address are assigned to LAN clients.
ADVANCED USER CONFIGURATION Login to the advanced user configuration page the same way as for the basic configuration page. The password is case sensitive and the factory default password for Advanced User is “admin”. Advanced User configuration includes the end user configuration and the advanced configurations including: a) SIP configuration, b) Codec selection, c) NAT Traversal Setting and d) other miscellaneous configuration. Following is a snap shot of the advanced configuration page.
TABLE 9: HT–496 Advanced Configuration Page Definitions Admin Password This contains the password to access the Advanced Web Configuration page. This field is case sensitive. Home NPA Local area code for North American Dial Plan. Layer 3 QoS This field defines the layer 3 QoS parameter that can be the value used for IP Precedence or Diff-Serv or MPLS. Default value is 48. Layer 2 QoS This setting includes two fields. The 802.1Q/VLAN Tag contains the value used for layer 2 VLAN tag.
Caller ID Scheme Select the Caller ID Scheme to suit the standard of different area. • Bellcore (North America) • CID-Canada • DTMF-Brazil • DTMF-Sweden • DTMF (Denmark) • ETSI-DTMF (Finland, Sweden) • ETSI-FSK (France, Germany, Norway, Taiwan, UK-CCA) On-hook Voltage Select the on-hook voltage to suit different area or PBX. Polarity Reversal Default is No. If set to “Yes”, polarity will be reversed upon call establishment and termination.
TABLE 10: HT–496 Individual Account Settings Definitions SIP Server This field contains the URI string or the IP address (and port, if different from 5060) of the SIP proxy server. e.g., the following are some valid examples: sip.my-voip-provider.com, or sip:my-company-sip-server.com, or 192.168.1.200:5066 Outbound Proxy This field contains the URI string or the IP address (and port, if different from 5060) of the outbound proxy. If there is no outbound proxy, this field SHOULD be blank.
modes supported: 1) in audio which means DTMF is combined in audio signal (not very reliable with low-bit-rate codec), 2) via RTP (RFC2833), or 3) via SIP INFO. Multiple selections of DTMF method are supported. Send Flash Event Default is No. If set to yes, flash will be sent as DTMF event. Enable Call Features Default is Yes. Advanced call features and feature codes functions are supported locally. Use Bell-style 3-way Conference Enables Bellcore Style 3-way Conference if parameter is set to “Yes”.
• for G.729/G.728, 64 (x10ms) and 64 (x2.5ms) frames respectively. G723 Rate: Default is 6.3kbps rate. Defines the encoding rate for G723 vocoder. iLBC frame size: Sets the iLBC frame size in 20ms or 30ms iLBC payload type: Defines payload time for iLBC. Default value is 97. Valid range: 96 - 127. Silence Suppression This controls the silence suppression/VAD feature of G.723. If set to “Yes”, a small quantity of VAD packets (instead of audio packets) will be sent during the period of silence.
SAVING THE CONFIGURATION CHANGES After making a change, click the “Update” button in the Configuration page. The HT–496 will display the following screen to confirming changes. Reboot or power cycle the HT–496 to enable the changes. FIGURE 5: SCREENSHOT OF SAVE CONFIGURATION PAGE REBOOTING THE HT–496 FROM REMOTE The administrator of the HT–496 can remotely reboot the HT–496 by clicking the “Reboot” button at the bottom of the configuration page.
Software Configuration Software upgrades are completed via TFTP or HTTP. The corresponding configuration settings are in the ADVANCED SETTINGS configuration page. FIRMWARE UPGRADE THROUGH TFTP/HTTP To upgrade via TFTP or HTTP, the “Firmware Upgrade and Provisioning upgrade via” field (IVR option 17) needs to be set to TFTP or HTTP, respectively. “Firmware Server Path” needs to be set to a valid URL of a TFTP or HTTP server, server name can be in either FQDN or IP address format.
Directions: 1. Unzip the file and put all of them under the root directory of the TFTP server. 2. Put the PC running the TFTP server and the HT–496 phone in the same LAN segment. 3. Please go to File -> Configure -> Security to change the TFTP server's default setting from "Receive Only" to "Transmit Only" for the firmware upgrade. 4. Start the TFTP server, in the phone’s web configuration page 5. Configure the Firmware Server Path with the IP address of the PC 6.
Restore Factory Default Setting WARNING: Restoring the Factory Default Setting will delete all configuration information of the phone. Please backup or print all the settings before you restoring factory default settings. Grandstream is not responsible for restoring lost parameters and cannot connect to your VoIP service provider. Directions for Restoration: Disconnect network cable and power cycle the unit before resetting factory default settings. 1. Step 1: Find the MAC address of the device.
Glossary of Terms ADSL Asymmetric Digital Subscriber Line: Modems attached to twisted pair copper wiring that transmit from 1.5 Mbps to 9 Mbps downstream (to the subscriber) and from 16 kbps to 800 kbps upstream, depending on line distance. AGC Automatic Gain Control is an electronic system found in many types of devices. Its purpose is to control the gain of a system in order to maintain some measure of performance over a changing range of real world conditions.
FQDN Fully Qualified Domain Name. A FQDN consists of a host and domain name, including top-level domain. For example, www.grandstream.com is a fully qualified domain name. www is the host, Grandstream is the second-level domain, and and.com is the top level domain. FXS Foreign eXchange Office. An FXS device can be an analog phone, answering machine, fax, or anything that handles a call from the telephone company like AT&T. They should also operate the same way when connected to an FXS interface.
MTU A Maximum Transmission Unit (MTU) is the largest size packet or frame, specified in octets (eightbit bytes), that can be sent in a packet- or frame-based network such as the Internet. The maximum for Ethernet is 1500 byte. NAT Network Address Translation NTP Network Time Protocol, a protocol to exchange and synchronize time over networks The port used is UDP 123 Grandstream products using NTP to get time from Internet OBP/SBC Outbound Proxy or another name Session Border Controller.
UDP User Datagram Protocol (UDP) is one of the core protocols of the Internet protocol suite. Using UDP, programs on networked computers can send short messages known as datagrams to one another. UDP does not provide the reliability and ordering guarantees that TCP does; datagrams may arrive out of order or go missing without notice. However, as a result, UDP is faster and more efficient for many lightweight or time-sensitive purposes.