User's Manual
Manuals
Brands
Grandstream Networks Manuals
Electronics
HIGH AVAILABILITY UCM CONNECTOR
9
10
11
12
13
14
15
16
17
18
HA100 User Manual
P
a
g
e
|
15
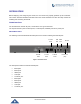
Figure 8: HA
100 Connection with UC
M A
and UCM B
1
...
...
13
14
15
16
17
...
18