Grandstream Networks, Inc. Analog IP Gateway GXW40XX 4, 8 or 24 FXS Ports GXW40XX User Manual Firmware Version 1.0.4.2 www.grandstream.com support@grandstream.
TABLE OF CONTENTS GXW40XX User Manual WELCOME.................................................................................................................................................... 4 GATEWAY GXW40XX OVERVIEW.............................................................................................................. 4 SAFETY COMPLIANCE................................................................................................................................ 4 WARRANTY......................
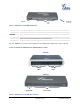
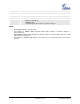
TABLE OF FIGURES GXW40XX User Manual Figure 1: Diagram of GXW4004-8 and GXW4024 Back Panel...................................................................................5 Figure 2: Diagram of GXW4004-8 and GXW4024 Display Panel ..............................................................................6 TABLE OF TABLES GXW40XX User Manual Table 1: Definitions of the GXW Connectors ..............................................................................................................
WELCOME Thank you for purchasing the Grandstream GXW40XX Analog FXS IP Gateway. The GXW40XX offers an easy to manage, easy to configure IP communications solution for any business with virtual and/or branch locations.
CONNECT YOUR GXW40XX GATEWAY Connecting the GXW40XX gateway is easy. GXW40XX package. Before you begin, please verify the contents of the EQUIPMENT PACKAGING Unpack and check all accessories. Equipment includes: • • • one device unit one RJ45 Ethernet cable one 12V universal power adapter CONNECT THE GXW40XX Follow these four (4) steps to connect your GXW40XX gateway to the Internet and access the unit’s configuration pages. 1. Connect standard touch-tone analog phones to the FXS ports. 2.
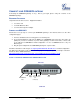
50 PIN Telco Connector LAN Port FXS Ports TABLE 1: DEFINITIONS OF THE GXW CONNECTORS LAN WAN RESET DC 12V CONSOLE LINE FXS1 – FXS24 Connect the LAN port with an Ethernet cable to your PC. Connect to the internal LAN network or router. Factory Reset button. Press for 7 seconds to reset factory default settings. Power adapter connection Console connection for a PC. When the unit loses power or unit became unregistered, FXS port 1 will be able to make/receive calls from the PSTN line connected to this port.
Power LED Ready LED Console LAN LED WAN LED LED 1–24 Indicates Power. Remains ON when Power is connected and turned ON. Remains ON after boot-up. Turns ON when Console port is being used. Indicates LAN (or WAN) port activity Indicates PC (or LAN) port activity Indicate status of the respective FXS Ports on the back panel Busy - ON (Solid Green) Available - OFF Slow blinking FXS LEDs indicates Voice Mail for that port. NOTE: All LED lights display green when ON.
GXW40XX FEATURES The GXW4000 series is a next generation IP voice gateway that is interoperable and compatible with leading IP-PBXs, Softswitches and SIP platforms. The GXW4000 series FXS gateway is autoconfigurable, remotely manageable and scalable. The GXW4000 series gateways come in three models - the GXW-4004,GXW-4008 and GXW4024, each offering superb voice quality, traditional telephony functionality, easy deployment, and 4,8 and 24 FXS ports respectively.
G.726 provides proprietary VAD, CNG, and signal power estimation, Voice Play Out unit (reordering, fixed and adaptive jitter buffer, clock synchronization), AGC (automatic gain control), Status output, Decoder controlling via voice packet header VAD, CNG, and signal power estimation, Voice Play Out unit (reordering, fixed and adaptive jitter buffer, clock synchronization), AGC (automatic gain control), Status output, Decoder controlling via voice packet header G.
HARDWARE SPECIFICATION The hardware specifications of the GXW FXS series are detailed in Table 4.
BASIC OPERATIONS UNDERSTANDING GXW VOICE PROMPTS GXW40XX has a built-in voice prompt menu for simple device configuration. To enter the voice prompt menu, press *** on the standard analog phone connected to any FXS port.
“Invalid Entry” Enter MAC address to restore factory default setting (See Restore Factory Default Setting section) Automatically returns to Main Menu Five Success Tips when using the Voice Prompt 1. “*” shifts down to the next menu option 2. “#” returns to the main menu 3. “9” functions as the ENTER key in many cases to confirm an option 4. All entered digit sequences have known lengths - 2 digits for menu option and 12 digits for IP address.
Destination ports can be specified by using “*” (encoding for “:”) followed by the port number. Examples: a) If the target IP address is 192.168.0.160, the dialing convention is *47 or Voice Prompt with option 47, then 192*168*0*160. followed by pressing the “#” key if it is configured as a send key or wait 4 seconds. In this case, the default destination port 5060 is used if no port is specified. b) If the target IP address/port is 192.168.1.
2. Caller A then dials Caller C’s number followed by # (or wait for 4 seconds). 3. If Caller C answers the call, Caller A and Caller C are in conversation. Then A can hang up to complete transfer. 4. If Caller C does not answer the call, Caller A can press “flash” to resume call with Caller B. NOTE: When Attended Transfer fails and A hangs up, the GXW40XX will ring back user A to remind A that B is still on the call. A can pick up the phone to resume conversation with B.
FXS Port #1: SIP UserID and Authenticate ID entered, Hunting group set to "Active" FXS Port #2: SIP UserID and Authenticate ID left blank, Hunting Group set to "1" FXS Port #3: SIP UserID and Authenticate ID left blank, Hunting Group set to "1" FXS Port #4: SIP UserID and Authenticate ID entered, Hunting group set to "Active" FXS Port #5: SIP UserID and Authenticate ID left blank, Hunting Group set to "4" FXS Port #6: SIP UserID and Authenticate ID left blank, Hunting Group set to "4" FXS Port #7: SIP UserI
On the GXW4024 inter-port calling is achieved by dialing *** and 7 plus two extra digits corresponding to the port number. For example the user connected to port 1 can be reached by dialing *** and 701; the user connected to port 24 can be reached by dialing *** 724. PSTN PASS THROUGH/LIFE LINE This feature is only applicable to GXW4004 and GXW4008 models.
CALL FEATURES GXW40XX supports the traditional telephony features available in a PBX as well as additional advanced telephony features. TABLE 6: CALL FEATURES TABLE (STAR CODE) Key Call Features *02 Forcing a Codec (per call) *027110 (PCMU), *027111 (PCMA), *02723 (G723), *02729 (G729), *0272616 (G726-r16), *0272624 (G724-r24), *0272632 (G726-r32), *0272640 (G726r40), *027201 (iLBC) *03 Disable LEC (pe call) Dial “*03” + ” number ”. No dial tone is played in the middle.
CONFIGURATION GUIDE CONFIGURING GXW40XX VIA VOICE PROMPT DHCP MODE Select voice menu option 01 to enable GXW40XX to use DHCP. STATIC IP MODE Select voice menu option 01 to enable GXW40XX to use STATIC IP mode, then use option 02, 03, 04, 05 to set up IP address, Subnet Mask, Gateway and DNS server respectively. FIRMWARE SERVER IP ADDRESS Select voice menu option 13 to configure the IP address of the firmware server.
NOTE: • WAN side HTTP access is disabled by default for security reasons. You can enable HTTP access on the configuration page by setting “WAN side HTTP access” to be YES. • Initial access to the configuration pages is always from the LAN port. The instructions are listed above. • The IVR announces 12 digits IP address, you need to strip out the leading “0” in the IP address. For ex. IP address: 192.168.001.014, you need to type in http://192.168.1.14 in the web browser.
Preferred VOCODER (Codec) The GXW40XX supports a broad range of voice codecs. Under Profile web pages, choose your preferred order of different codecs: • PCMU/A (or G711µ/a) • G729 A/B/E • G723 • G726 (16/24/32/40) • iLBC • AAL2 (all G726) DEFINITIONS This section will describe the options in the Web configuration user interface. As mentioned, a user can log in as an administrator or end-user.
DHCP hostname This option specifies the name of the client. This field is optional but may be required by some Internet Service Providers. Default is blank. DHCP domain This option specifies the domain name that client should use when resolving hostnames via the Domain Name System. Default is blank. DHCP vendor class ID Used by clients and servers to exchange vendor-specific information. Default is HT500. PPPoE account ID PPPoE username.
Reply to ICMP on WAN port If set to “Yes”, the GXW40XX will respond to the PING. Default is No. “Yes” setting may make the gateway vulnerable to a Denial of Service attack. Note: This option is not present on GXW4024 WAN side HTTP/Telnet Access If set to “Yes”, user can access the configuration page through the WAN port, instead of through the “PC” port. WARNING: this configuration is less secure than default option. Default is No.
PPPoE Link Up Shows whether the PPPoE connection is running if connected to DSL modem. NAT Shows type of NAT the GXW40XX is connected to via its WAN port. It is based on STUN protocol. Port Status Displays relevant information regarding the individual FXS ports.
Via TFTP Server This is the IP address of the configured TFTP server. If selected and it is non-zero or not blank, the GXW40XX retrieves the new configuration file or new code image from the specified TFTP server at boot time. After 5 attempts, the system will timeout and then it will start the boot process using the existing code image in the Flash memory. If a TFTP server is configured and a new code image is retrieved, the new downloaded image is saved into the Flash memory.
Firmware Key For firmware encryption. It should be 32-digit in Hexadecimal Representation. End user should keep it blank. SSL Certificate The GXW40XX series supports SIP over TLS. It has built-in private key and SSL certificate. The user specified SSL certificate used for SIP over TLS is in X.509 format. SSL Private Key You may also customize the SSL Private Key. The user specified SSL private key used for SIP over TLS is in X.509 format. SSL Private Key Password Enter SSL Private Key password here.
Lifeline Mode Life line feature ensures user can place/receive a PSTN call in an emergency situation. 1. If set to “Auto”, in case of power loss or loss of SIP registration, the PSTN line will be seamlessly connected to analog phone connected to FXS port. 2. If set to “Always Connected” the PSTN line will be always connected to the phone connected to FXS port. VoIP calls will not be allowed in this configuration. 3.
Secondary RADIUS Auth Port Secondary Radius server authentication port. Default value is 1812 Secondary RADIUS Acct Port Secondary Radius server accounting port. Default value is 1813 Secondary Radius Server Secret Special secret string should be preconfigured according to RADIUS Server configuration RADIUS Timeout Default value is 2 seconds. The time between retries the GXW will send “AccessRequest” message to RADIUS server in purpose to authenticate it. RADIUS Retry Default value is 3 times.
Hunting Group This feature enables the gateway to register all existing FXS ports with the same phone number. Each incoming call will be routed to first available port in round robin mode. User may configure all ports as members of the same Hunting Group or it may configure different port combinations for more than one Hunting Group. For example: Ports 1, 3 and 5 are members of the same Hunting Group, the rest of the ports may have separate numbers and may be reached independently.
TABLE 11: PROFILE SETTINGS Profile Active When set to Yes the SIP Profile is activated. Primary SIP Server Primary SIP Server’s IP address or Domain name provided by VoIP service provider. Failover SIP Server Failover SIP Server’s IP address or Domain name provided by VoIP Service provider. This server will be used if the Primary SIP server becomes unavailable. Prefer Primary SIP Server Default is no.
Local SIP port Defines the local SIP port the GXW40XX will listen and transmit. The default value for Profile 1 is 5060 and 6060 for Profile 2. Local RTP Port Defines the local RTP-RTCP port pair the GXW40XX will listen and transmit. It is the base RTP port for channel 0. When configured, channel 0 will use this port _value for RTP and the port_value+1 for its RTCP; channel 1 will use port_value+2 for RTP, port_value+3 for its RTCP and so on.
Use NAT IP NAT IP address used in SIP/SDP message. Default is blank. Distinctive Ringtone Custom Ring Tone 1 to 3 with associate Caller ID: when selected, if Caller ID is configured, then the device will ONLY uses this ring tone when the incoming call is from the Caller ID. System Ring Tone is used for all other calls. When selected but no Caller ID is configured, the selected ring tone will be used for all incoming calls.
Early Dial Default is No. Use only if proxy supports 484 response. This parameter controls whether the phone will send an early INVITE each time a key is pressed when a user dials a number. If set to “Yes”, an INVITE is sent using the dial-number collected thus far; Otherwise, no INVITE is sent until the “(Re-)Dial” button is pressed or after about 5 seconds have elapsed if the user forgets to press the “Re-Dial” button.
Subscribe for MWI Default is No. When set to “Yes” a SUBSCRIBE for Message Waiting Indication will be sent periodically. Send Anonymous If this parameter is set to “Yes”, the “From” header along with Privacy and P_Asserted_Identity headers in outgoing INVITE message will be set to anonymous, blocking Caller ID. Anonymous Call Rejection Default is No. If set to Yes, incoming calls with anonymous Caller ID will be rejected with 486 Busy message. Special Feature Default is Standard.
iLBC Payload type Default value is 97. Defines payload type for iLBC. The valid range is between 96 and 127. AAL2-G726-16 Payload type Default value is 100. Range is from 96 to 127. AAL2-G726-24 Payload type Default value is 99. Range is from 96 to 127. AAL2-G726-32 Payload type Default value is 104. Range is from 96 to 127. AAL2-G726-40 Payload type Default value is 103. Range is from 96 to 127. G729E payload type Default value is 102. Range is from 96 to 127. VAD Default is No.
Hook Flash timing Time period when the cradle is pressed (Hook Flash) to simulate FLASH. To prevent unwanted activation of the Flash/Hold and automatic phone ring-back, adjust this time value. On Hook Timing On-hook timing is the minimum time for an on-hook event to be validated. Gain Handset volume adjustment. RX is for receiving volume (direction FXSto analog phone), TX is for transmission volume (Analog phone to FXS). Default values are 0dB for both parameters.
SOFTWARE UPGRADE Software upgrade can be done via either TFTP or HTTP/HTTPS. The corresponding configuration settings are in the ADVANCED SETTINGS configuration page. Firmware Upgrade through TFTP/HTTP/HTTPS To upgrade via TFTP or HTTP/HTTPS, the “Firmware Upgrade and Provisioning upgrade via” field needs to be set to TFTP, HTTP or HTTPS, respectively. “Firmware Server Path” needs to be set to a valid URL of a TFTP or HTTP/HTTPS server, server name can be in either FQDN or IP address format.
3. TFTP server's security settings should be changed from "Receive Only" to "Transmit Only" for the firmware upgrade. 4. Configure the Firmware Server Path with the IP address of the PC 5. Update the change and reboot the unit. CONFIGURATION FILE DOWNLOAD Grandstream SIP Device can be configured via Web Interface as well as via Configuration File through TFTP or HTTP/HTTPS. “Config Server Path” is the TFTP or HTTP/HTTPS server path for configuration file.
RESTORE FACTORY DEFAULT SETTING WARNING! Restoring the Factory Default Setting will DELETE all configuration information of the phone. Please BACKUP or PRINT out all the settings before you approach to following steps. Grandstream will not take any responsibility if you lose all the parameters of setting and cannot connect to your VoIP service provider. FACTORY RESET There are two (2) methods for resetting your unit: Reset Button Reset default factory settings following these four (4) steps: 1.