
User's Manual
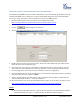
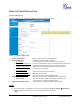

Table Of Contents
- Welcome
- Connect your GXV3672_HD/FHD
- Product Overview
- Installation Guide
- Basic Settings Explanation
- System Settings Page
- Figure 3: System Settings Page
- Video & Audio Setting Page
- Figure 4-1: Video & Audio Settings Page
- Figure 4-2: Video & Audio Settings Page
- CMOS Settings Page
- Figure 5: CMOS Settings Page
- Networking Setting Page
- Figure 6: Networking Setting Page
- DDNS Settings Page
- Figure 7: DDNS Setting Page
- SIP Setting Page
- Figure 8-1: SIP Setting Page
- Figure 8-2: SIP Setting Page
- Status Page
- Figure 9: Status Page
- Advanced Settings Explanation
- User Management Page
- Figure 10: User Management Page
- Maintenance Page
- Figure 11: Maintenance Page
- SMTP Setting Page (Email Alarm)
- Figure 12: SMTP Setting Page
- FTP Settings Page (Upload Alarm)
- Figure 13: FTP Setting Page
- Alarm Server Settings Page (Upload Alarm to supported VMS or HTTP Server)
- Figure 14: Alarm HTTP Server Setting Page
- Motion Detection Configuration Page (Set Alarm)
- Figure 15-1: Motion Detection Configuration Page
- Figure 15-2: Motion Detection Schedule Configuration Page
- Syslog Settings Page (Troubleshooting)
- Figure 16: Alarm Server Setting Page
- Software Upgrade
- Software Upgrade via TTFP, HTTP or HTTPS
- Figure 17: Firmware Upgrade and Provisioning
- Instructions for local firmware upgrade using TFTP server:
- Configuration File Download
- Restore Factory Default Setting
- IP Surveillance FAQ

Grandstream Networks, Inc. GXV3672_HD/FHD User Manual Page 16 of 39
Firmware Version 1.0.2.12 Last Updated: 7/2013
BASIC SETTINGS EXPLANATION
System Settings Page
This page allow user to configure the system settings of GXV3672_HD/FHD.
Figure 3: System Settings Page
• Current System Time: Display time current system is running at
• Set the System Time: Configure the time system is running.
o Time Zone: Select from pull down menu the time zone unit located
o Self-Defined Time Zone: Use the self-defined time zone for automatic daylight saving time
adjustment. Format please refer to the “help over mouse”
o Update via NTP Server: Synchronize time using NTP protocol with a Time Server
over the Internet cloud (*)
o Synchronize with
Local Computer: Synchronize time with local computer
o Set the Time Manually: Manually input the time
o Keep Current D/T: Select to use camera current displayed time
• OSD Date Format: Pull down to select date format displayed on video screen
o Device Name: The name of device which will be shown in the result of
“Search Tool” of GSurf_Pro VMS program.
• Expansion Port Mode Select: The setting for external expansion interface module
NOTE:
(*) If select this option, a valid DNS server must be preconfigured under Basic Settings
Networking
button has to be clicked to save all the changes made to the device.