
User's Manual
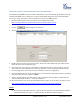
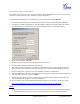
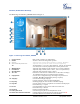
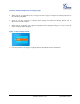
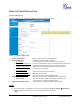
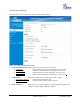
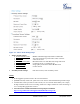
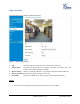

Table Of Contents
- Welcome
- Connect your GXV3672_HD/FHD
- Product Overview
- Installation Guide
- Basic Settings Explanation
- System Settings Page
- Figure 3: System Settings Page
- Video & Audio Setting Page
- Figure 4-1: Video & Audio Settings Page
- Figure 4-2: Video & Audio Settings Page
- CMOS Settings Page
- Figure 5: CMOS Settings Page
- Networking Setting Page
- Figure 6: Networking Setting Page
- DDNS Settings Page
- Figure 7: DDNS Setting Page
- SIP Setting Page
- Figure 8-1: SIP Setting Page
- Figure 8-2: SIP Setting Page
- Status Page
- Figure 9: Status Page
- Advanced Settings Explanation
- User Management Page
- Figure 10: User Management Page
- Maintenance Page
- Figure 11: Maintenance Page
- SMTP Setting Page (Email Alarm)
- Figure 12: SMTP Setting Page
- FTP Settings Page (Upload Alarm)
- Figure 13: FTP Setting Page
- Alarm Server Settings Page (Upload Alarm to supported VMS or HTTP Server)
- Figure 14: Alarm HTTP Server Setting Page
- Motion Detection Configuration Page (Set Alarm)
- Figure 15-1: Motion Detection Configuration Page
- Figure 15-2: Motion Detection Schedule Configuration Page
- Syslog Settings Page (Troubleshooting)
- Figure 16: Alarm Server Setting Page
- Software Upgrade
- Software Upgrade via TTFP, HTTP or HTTPS
- Figure 17: Firmware Upgrade and Provisioning
- Instructions for local firmware upgrade using TFTP server:
- Configuration File Download
- Restore Factory Default Setting
- IP Surveillance FAQ

Grandstream Networks, Inc. GXV3672_HD/FHD User Manual Page 14 of 39
Firmware Version 1.0.2.12 Last Updated: 7/2013
GXV3672_HD/FHD Home Web Page
The Home Page of GXV3672_HD/FHD shown as Figure 1:
Figure 1: Home Page of GXV3672_HD/FHD
1. Control Console: PTZ Console controller for ePTZ function.
2. ZOOM: Zoom in or Zoom out during ePTZ operation.
3. FOCUS: Adjust the focus of image (Not Applicable to GXV3672_HD/FHD).
4. PTZ SPEED/Default Button: Adjust the rotate speed of the control console (Not Applicable);
“D” “Default Button” to reset the video brightness, contrast and saturation
value from (auto or manual) adjusted value to factory default value.
5. BRIGHTNESS: Adjust the image brightness (will automatic save it unless readjusted)
6. CONTRAST: Adjust the image contrast. (Same as above, auto save adjusted value)
7. SATURATION: Adjust the image saturation. (Same as above)
8. View Size: Pull down to select between “Window Size” or “Real Size” to display
the embedded video stream at configured video resolution.
9. Configuration Click to enter “Configuration Page” to configure the parameters of
GXV3672_HD/FHD (Administration privilege required).
10. Language: Click to switch webpage language.
(Current supported: Chinese, English and Russian)
11. Play/Stop: Start/Stop playing the video stream at embedded webpage.
12. Snapshot: Click to capture and save a snapshot of current video frame displayed.
Default directory: C:\Capture
13. Record: Click to Start/Stop record of current video stream into a file.
Default directory: C:\Record
14. Playback: Playback recorded video files
15. Path of File Saved: Click to change the path of record/snapshot file saved.
16. Motion Detection Alarm Indicator: If motion detection alarm triggered, the indicator will flash in red.
Click the indicator icon to turn off the alarm indication.