Grandstream Networks, Inc.
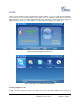
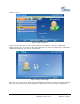
SKYPE Skype is an IP telephony software application that enables millions of users to communicate by initiating and receiving free voice and video calls to other Skype users on computers, mobile devices and other GXV3140 phones. To access Skype on the GXV3140, users could press F3 button underneath “Skype” in IDLE screen (See Figure 1) or select “MENU”-> “Social Networks”->”Skype”.
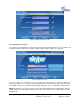
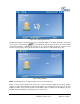
have a pre-existing Skype account, a new account can be created using the Skype application login page on the GXV3140. Select the “Don’t have Skype Name?” button to be navigated through the registration process. (See Figure 3) Figure 3: Skype Login Screen Next, check “Accept” to accept Skype’s agreement terms. (See Figure 4) Users will be required to provide valid information to create a new Skype account.
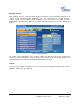
Figure 5: Creating a new Skype account Pre-existing Account Sign-In Users with a pre-existing Skype account can login to Skype by simply entering the correct username and password. Complete sign-in by pressing the “Sign-In” button to login to Skype. (See Figure 6) Figure 6: Skype Login Screen If the user forgets the password, click on “Forgotten password?” button to obtain password reset instructions.
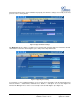
Managing Contacts After signing in, the user’s contact list will be displayed, showing the status information and profile of the contacts on the right-hand window. Additionally, users can add contacts by selecting “Options”-> “Contact”->”Add”. To view detailed contact information, select “View profile”. The ability to remove, block/unblock a contact is also available by selecting the appropriate button in the “Contact” window.
Figure 8: Skype Settings The General Settings tab (See Figure 9) allows users to configure general Skype settings including setting the period of time (in minutes) before showing the user as “Away” when the user is inactive. The time duration for keeping call history information can also be set by selecting a length of period from the “Keep history for:” menu. To clear call history, users simply need to select the button titled “Clear History”.
ring unanswered before the call is forwarded. To properly save all these settings successfully, users must press the “Save” soft key button. Figure 10: Skype Call Features Settings The Ringtones tab (See Figure 11) allows users to change and customize ringtones for both the call and chat function. To hear the current ringtone, press “Play” next to drop down menu. Figure 11: Skype Ringtones Setting To customize or select a different ringtone, users need to select “Customize” from the drop down menu.
Figure 12: Skype Ringtones Setting The Privacy tab (See Figure 13) is very important as it controls incoming calls, chats and personal information exposed to other Skype users. Select “Anyone” or “Only people from my contacts” to set the privileges for incoming calls, chats, phone number view and avatar view. To let others see the contact list, select the “Show how many contacts I have” option.
contact’s screen. Figure 14: Skype Contacts List To place an audio only call, select the contact and then select “Options”->”Contact”->”Audio Call”. Figure 15 depicts the screen when a call is being dialed out. To cancel the call before the connection is established; simply press the “Cancel” soft key button. Figure 15: Placing a call with Skype When the user receives an incoming call, the window depicted below (See Figure 16) will be displayed.
Figure 16: Incoming Skype Call Screen The GXV3140 supports call hold/resume when using Skype. While on an initial call another call request comes in, press the line button ( ) on the GXV3140 and select the line where the corresponding conversation should be established (See Figure 17). To resume the initial call placed on hold, the user should select the line by pressing the line key and selecting the line to switch between the calls.
To initiate a conversation, enter the number or the Skype username to call and then press the “Call” soft key. To search for the country code for the corresponding country, simply select the “Search code” button. WARNING: No emergency calls are allowed as Skype is not a replacement for a standard telephone. Figure 18: Skype Out Call Screen Chats To chat with a Skype contact, go to the tab “Contact” and select the contact person. (See Figure 19) Press “Chat” to initiate the chatting window.
Figure 20: Skype Chat Options To chat, enter the message in the window and press “Send”. The message, name and timestamp will be displayed in the window. To exit the chat, press “Cancel”. (See Figure 21) Figure 21: Skype Chat In the chat window, users can select different options with the “Options” soft key. Select “Show Members” to view chat contacts. Scroll down to “Close Chat” and “Leave Chat” to exit the chat window. Users are also able to view or delete chat history by selecting “Chat History”.
Figure 22: Skype Chat History To add members to a chat, select “Options”-> “Add members” and add a buddy from the contact list. (See Figure 23) Select the contact and press “Add”-> “OK”. Once the contact joins, everyone in this group chat room is able to chat with each other. Figure 23: Adding contacts to Skype chat For more chat options, navigate to the “Chat” tab.
Figure 24: Delete Skype Chat History To view the history of all call events, users can scroll to the “History” tab. By pressing the “Options” soft key, users can delete selected items or clear all history. The ability to remove or block contacts is also available by choosing “Contacts” on one of the selected items in the history list. To view history information in different categories, users can select “View” and press “All”, “Outgoing”, “Incoming”, “Missed” or Voicemail.
Profile To set user personal information, select the “Profile” tab. (See Figure 26) Press F1 to change the status from “Online”, “Away”, “Do not Disturb”, “Invisible” or “Offline”. Figure 26: Set User Status If the profile status is set to “Do not Disturb”, all the incoming calls will be displayed as missed calls in the “Missed Call” menu. The profile status can be changed any time by selecting the appropriate status in the menu.
Figure 28: Edit Skype Profile Information Screen To change the display avatar picture, users can select photos from an existing file or from a snapshot. (See Figure 29) Figure 29: Select Skype profile photo To change an existing user password, press “Change Password”->”Input”. (See Figure 30) Then type in the current old password. Type in the new password and repeat the new password. A green check displayed on the right side of the screen means the password is valid.
Figure 30: Change password for Skype Exit Skype To exit Skype application, press the “Exit” soft key. (See Figure 31) Selecting “Minimize” keeps the Skype application open and navigates the user to the main menu with a small Skype icon ( ) shown in the right corner of the screen. Keeping the application live or minimized eliminates the need to sign into Skype again for making or receiving calls later.
Figure 32: Sign out from Skype Grandstream Networks, Inc. GXV3140 Skype Configuration Guide Firmware version: 1.0.7.