
User's Manual
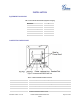
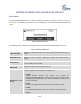
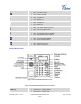

Table Of Contents
- GXP16xx User
- DOCUMENT PURPOSE
- GNU GPL INFORMATION
- WELCOME
- PRODUCT OVERVIEW
- INSTALLATION
- GETTING TO KNOW GXP1610/GXP1620/GXP1625
- CONNECTING TO DEVICES
- RESTORE FACTORY DEFAULT SETTINGS
- EXPERIENCING THE GXP1610/GXP1620/GXP1625
- FCC Statement 15B

Firmware Version 1.0.0.11
GXP1610/GXP1620/GXP1625 User
Guide
Page 13 of 31
To set up the GXP1610/GXP1620/GXP1625, follow the steps below:
1. Attach the phone stand or wall mount to the back of the phone where there are slots;
2. Connect the handset and main phone case with the phone cord;
3. Connect the LAN port of the phone to the RJ45 socket of a hub/switch or a router (LAN side of the
router) using the Ethernet cable;
4. Connect the 5V DC output plug to the power jack on the phone; plug the power adapter into an
electrical outlet. If PoE switch is used in step 3, this step could be skipped;
5. The LCD will display provisioning or firmware upgrade information. Before continuing, please wait for
the date/time display to show up;
6. Using the keypad configuration menu or phone's embedded Web server (Web GUI) by entering the IP
address in Web browser, you can further configure the phone.
SAFETY COMPLIANCES
The GXP1610/GXP1620/GXP1625 phone complies with FCC/CE and various safety standards. The
GXP1610/GXP1620/GXP1625 power adapter is compliant with the UL standard. Use the universal power
adapter provided with the GXP1610/GXP1620/GXP1625 package only. The manufacturer’s warranty
does not cover damages to the phone caused by unsupported power adapters.
WARRANTY
If the GXP1610/GXP1620/GXP1625 phone was purchased from a reseller, please contact the company
where the phone was purchased for replacement, repair or refund. If the phone was purchased directly
from Grandstream, contact the Grandstream Support for a RMA (Return Materials Authorization) number
before the product is returned. Grandstream reserves the right to remedy warranty policy without prior
notification.
Warning:
Use the power adapter provided with the phone. Do not use a different power adapter as this may
damage the phone. This type of damage is not covered under warranty.