Grandstream Networks, Inc. GXP21xx SIP Enterprise Phones Grandstream Networks, Inc. GXP21xx User Manual Firmware version: 1.0.1.
TABLE OF CONTENTS GXP21XX USER MANUAL WELCOME.......................................................................................................................................................... 3 INSTALLATION ................................................................................................................................................. 4 EQUIPMENT PACKAGING .................................................................................................................................
Table 9: LCD Icons ...................................................................................................................12 Table 10: GXP21xx Keypad Buttons .........................................................................................12 Table 11: GXP Call Features ....................................................................................................19 Table 12: Key Pad Configuration Menu ..................................................................................
Welcome Your Grandstream GXP21xx Enterprise IP phone is feature-enriched, sophisticated, yet simple to use. The GXP21xx delivers superior HD audio quality, rich and leading edge telephony features, personalized information and customizable application service, automated provisioning for easy deployment, advanced security protection for privacy, and broad interoperability with most 3rd party SIP devices and leading SIP/NGN/IMS platforms.
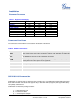
Installation EQUIPMENT PACKAGING Table 1: Equipment Packaging Main Case Handset Phone Cord Power Adaptor Ethernet Cable High Phone Stand Low Phone Stand Wall Mount Spacers (2) GXP2120 Yes Yes Yes Yes Yes Yes Yes Yes GXP2110 Yes Yes Yes Yes Yes Yes Yes Yes GXP2100 Yes Yes Yes Yes Yes Yes No Wall Mount stand CONNECTING YOUR PHONE The connectors of the GXP21xx are located on the bottom of the device.
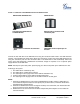
FIGURE 1: CONNECTING THE GXP2120/2110 AND THE GXP EXTENSION GXP2120 with GXP Extension GXP Extension Connecting the GXP2120/2110 to GXP Extension Reverse side of connection with connection plate Reverse side of connection w/connection plate GXP2120/2110 has a special port on the back. Connect the first GXP EXT to the GXP2120/2110 using the connection cable found in the GXP Extension package. The first GXP EXT draws power directly from the phone.
SAFETY COMPLIANCES The GXP21xx complies with FCC/CE and various safety standards. The GXP21xx power adaptor is compliant with the UL standard. Only use the universal power adaptor provided with the GXP21xx package. The manufacturer’s warranty does not cover damages to the phone caused by unsupported power adaptors. WARRANTY If you purchased your GXP21xx from a reseller, please contact the company where you purchased your phone for replacement, repair or refund.
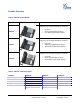
Product Overview Table 3: GXP21xx Product Models Model Overview Picture GXP2120 is an executive SIP phone. It features: GXP2120 Six lines Seven programmable hard keys Four XML programmable soft keys GXP2110 is an executive SIP phone. It features: GXP2110 Four lines Eighteen programmable hard keys Three XML programmable soft keys GXP2100 is an executive SIP phone.
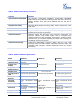
Table 5: GXP21xx Key Features in a Glance Features Benefits Open Standards Compatible SIP RFC3261, TCP/IP/UDP, RTP/RTCP, HTTP/HTTPS, ARP/RARP, ICMP, DNS (A record, SRV and NAPTR), DHCP (both client and server), PPPoE, TELNET, TFTP, NTP, STUN, SIMPLE, SIP over TLS, 802.
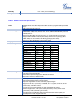
Humidity Compliance 10% – 90% (non-condensing) FCC / CE / C-Tick Table 7: GXP21xx Technical Specifications Lines Protocol Support Display Feature Keys Device Management Audio Features Grandstream Networks, Inc. Multiple direct lines with independent SIP accounts, programmable speed dial keys, XML programmable soft-keys Support SIP 2.0, TCP/UDP/IP, PPPoE, RTP/RTCP, SRTP by SDES, HTTP, ARP/RARP, ICMP, DNS, DHCP, NTP, TFTP, SIMPLE/PRESENCE protocols, TR-069, 802.
Telephony Features Network and Provisioning Firmware Upgrades Advanced Server Features Security Grandstream Networks, Inc. Adaptive jitter buffer control (patent-pending) and packet delay & loss concealment HD audio handset with HD wideband audio codecs for excellent double-talk performance.
Using the GXP21xx SIP Enterprise Phone GETTING FAMILIAR WITH THE LCD GXP21xx has a dynamic and customizable screen. The screen displays differently depending on whether the phone is idle or in use (active screen). Table 8: LCD Buttons Key Button Key Button Definitions LINE SELECTORS Selects the phone line printed on its right-hand side. DATE AND TIME Displays the current date and time. Can be synchronized with Internet time servers. LOGO Displays company logo name.
Call Parking: FOR GXP2120/GXP2110 ONLY. Refer to the GXE5024/5028 Online User Manual for more information. • CallPark When a GXP2120 dials out, the Call Park softkey • SPECIAL SOFTKEYS (Only When Integrated with GXE5024/5028) PickUp will display on screen. To park the call, press the “Call Park” button. When another GXP2120 goes off-hook the Call Pickup softkey will display on screen. To pickup the parked call, press the “Call Pickup” button. Call Queue: FOR GXP2120/2110 ONLY.
MUTE HEADSET DND INTERCOM MENU Mute an active call Press HEADSET key to answer/hang up phone calls while using headset. It also allows user to toggle between headset and speaker Enable/Disable DND. (Not applicable on GXP2100) Press to use intercom if intercom user ID is configured in web GUI Press to enter menu when phone is in idle.
For example: Configure ACCOUNT 1 and ACCOUNT 2 with Account Name as “VoIP 1”, “VoIP 2”, respectively and ensure that they are active and registered. When LINE1 is pressed, you will hear a dial tone and see “VoIP 1” on the LCD display; when LINE2 is pressed, you will hear a dial tone and see “VoIP 2” on the LCD display. To make a call, select the line you wish to use. The corresponding LINE LED will light up in green.
4. USING THE PHONEBOOK: To call a phone number from Phonebook Each entry in the phonebook can be attached to an individual SIP account. The phone will use that SIP account to make the phone call. • Go to the phonebook by: i. Pressing the phonebook button (bottom, left-hand side of phone), or ii. Pressing the DOWN arrow key, or iii. Pressing the menu button and selecting “Phone book” iv. Pressing MENU • Select the phone number by using the arrow keys • Press OK so select • Press OK again to dial. 5.
5. Press OK key to initiate call To make a quick IP call, please see next section. For example: If the target IP address is 192.168.1.60 and the port is 5062 (e.g. 192.168.1.60:5062), input the following: 192*168*1*60#5062 - The “ * ” key represent the dot“.” ; The “#” key represent colon “:”. Press OK to dial out. Quick IP Call Mode The GXP21xx also supports Quick IP call mode. This enables the phone to make direct IP-calls, using only the last few digits (last octet) of the target phone’s IP-number.
PHONE FUNCTIONS DURING A PHONE CALL Call Waiting/ Call Hold 1. Hold: Place a call on hold by pressing the “HOLD” button. 2. Resume: Resume call by pressing the corresponding blinking LINE. 3. Multiple Calls: Automatically place ACTIVE call on “HOLD” by selecting another available LINE to place or receive another call. Call Waiting tone (stutter tone) audible when line is in use. Mute 1. Press the MUTE button to enable/disable muting the microphone. 2.
NOTE: The party that starts the conference call has to remain in the conference for its entire duration, you can put the party on mute but it must remain in the conversation. Also, this is not applicable when the feature “Transfer on call hangup” is turned on. Voice Messages (Message Waiting Indicator) A blinking red MWI (Message Waiting Indicator) indicates a message is waiting. Press the Message button to retrieve the message. An IVR will prompt the user through the process of message retrieval.
CALL FEATURES The GXP21xx supports traditional and advanced telephony features including caller ID, caller ID w/name, call forward/transfer/park/hold as well as intercom/paging and BLF.
Configuration Guide The GXP21xx can be configured in two ways. Firstly, using the Key Pad Configuration Menu on the phone; secondly, through embedded web-configuration menu. CONFIGURATION VIA KEYPAD To enter the MENU, press the round button. Navigate the menu by using the arrow keys: up/down and left/right. Press the OK button to confirm a menu selection. The phone automatically exits MENU mode with an incoming call, the phone is off-hook or the MENU mode if left idle for 20 seconds.
• location if available. Also, the phone will download secondary language if available. Time Settings Press Menu button to choose the menu item Press “←” or follow the soft keys to return to the main menu Config Press Menu button to display the configuration selections: • • • • Factory Functions SIP To change SIP server settings for SIP accounts. Upgrade In this menu setting regarding the firmware server and Config server can be changed.
Call History MENU Answered Calls Dialed Calls Missed Calls Transferred Calls Forwarded Calls Any of previous menus Back Clear All New Entry Phone Book New Entry Download Phonebook XML Back Name: Number: Acct: Confirm Add: Cancel and Return: LDAP Directory Call History Status View Directory Download Directory Search Configuration Back Search Configuration Select Filter Filter Value Back Instant Message Do Not Disturb Phone Book LDAP Directory Instant Message Direct IP Call Preference Config
CONFIGURATION VIA WEB BROWSER The GXP21xx embedded Web server responds to HTTP/HTTPS GET/POST requests. Embedded HTML pages allow a user to configure the IP phone through a Web browser such as Microsoft’s IE or Mozilla Firefox, Google Chrome.
Table 13: Device Configuration - Status MAC Address The device ID, in HEXADECIMAL format. IP Address This field shows IP address of GXP21xx. Product Model This field contains the product model information. Part Number This field contains the product part number. Software Version • Program: This is the main firmware release number, which is always used for identifying the software (or firmware) system of the phone.
802.1x Mode This option allows the user to enable/disable 802.1x mode on the phone. The default value is disabled. To enable 802.1x mode, this field should be set to EAP-MD5. Once enabled, the user would be required to enter the following information below to be authenticated on the network: • • Line Keys x Identity MD5 Password This allows the user to configure the account mapped to each line key, as well as enabling SCA (Shared Call Appearance) for the line. Options available for Key Mode are : 1.
Weather Update By default, “Enable Weather Update:” is set to “Yes”. If set to “No”, weather information will not display on the phone. Settings to customize the display of weather via: • City Code – Enter city code • Update Interval – Refresh time in minutes • Degree Unit – Select Automatic, Fahrenheit or Celsius Weather information is displayed on GXP21xx LCD when “Enable Weather Update” is set to “Yes” and pressing the “SwitchSCR” soft-key once.
Advanced User configuration includes not only the end user configuration, but also advanced configuration such as SIP configuration, Codec selection, NAT Traversal Setting and other miscellaneous configuration. Table 15: Device Configuration – Settings /Advanced Settings Admin Password Administrator password. Only the administrator can access the “Advanced Settings” and “Account Settings” page. Password field is purposely blank for security reasons after clicking update and saved.
Upgrade Via This field allows the user to choose the firmware upgrade method: TFTP, HTTP or HTTPS. Firmware Server Path Defines the server path for the firmware server. It can be different from the Configuration server which is used for provisioning. Config Server Path Defines the server path for provisioning; it can be different from the firmware server. Firmware File Prefix/Postfix Default is blank.
Connection Request Port Enter the connection request port. Phonebook XML Download Selects the file download mode for the download server. Users can choose from TFTP/HTTP/No. Phonebook XML Server Path The URL/IP address of the phonebook download server. Phonebook Download Interval The interval at which the phonebook will be downloaded from the download server (in Minutes). The default setting is 0.
Syslog Level Select the ATA to report the log level. Default is NONE. The level is one of DEBUG, INFO, WARNING or ERROR.
Call Progress Tones Using these settings, users can configure ring or tone frequencies based on parameters from local telecom. By default, they are set to North American standard. Frequencies should be configured with known values to avoid uncomfortable high pitch sounds. Syntax: f1=val,f2=val[,c=on1/off1[-on2/off2[-on3/off3]]]; (Frequencies are in Hz and cadence on and off are in 10ms) ON is the period of ringing (“On time” in “ms”) while OFF is the period of silence.
Display Language Allows user to choose preferred display language in web UI and key pad UI. Currently, the phone supports these languages: English, Simplified Chinese, Traditional Chinese, Korean, Japanese, Italian, Spanish, French, German, Portuguese, Russian, Croatian, Hungarian, Polish and Slovenian.
Authenticate ID SIP service subscriber’s Authenticate ID used for authentication. It can be identical to or different from SIP User ID. Authenticate Password SIP service subscriber’s account password for GXP21xx to register to (SIP) servers of ITSP. Name SIP service subscriber’s name that is used for Caller ID display. DNS Mode The default is set to A Record. If user wishes to locate the server by DNS SRV, the user may select SRV or NATPTR/SRV.
NAT Traversal This parameter activates the NAT traversal mechanism. It has options: No, STUN, Keep-Alive, UPnP, Auto, VPN. If selecting STUN and a STUN server is also specified, the phone performs according to the STUN client specification. Using this mode, the embedded STUN client detects if and what type of NAT/Firewall configuration is used.
Dial Plan Dial Plan Rules: 1. Accepted Digits: 1,2,3,4,5,6,7,8,9,0 , *, #, A,a,B,b,C,c,D,d 2. Grammar: x - any digit from 0-9; a) xx+ - at least 2 digit numbers b) xx.
Session Expiration The SIP Session Timer extension enables SIP sessions to be periodically “refreshed” via a SIP request (UPDATE, or re-INVITE. Once the session interval expires, if there is no refresh via a UPDATE or re-INVITE message, the session is terminated. Session Expiration is the time (in seconds) at which the session is considered timed out, provided no successful session refresh transaction occurs beforehand. The default value is 180 seconds.
Refer-To Use Target Contact Default is “No”. If set to “Yes”, then for Attended Transfer, the “Refer-To” header uses the transferred target’s Contact header information. Transfer on Conference Defines whether or not the call is transferred to the other party if the initiator of the Hangup conference hangs up. Default setting is set to “No”. Preferred Vocoder GXP21xx supports up to 7 different Vocoder types including G.711(a/µ) (also known as PCMU/PCMA), G.723.1, G.729A/B, G.726-32, iLBC, G.
Use # as Dial Key This parameter allows users to configure the “#” key as the “Send” (or “Dial”) key. If set to “Yes”, the “#” key will immediately send the call. In this case, this key is essentially equivalent to the “(Re)Dial” key. If set to “No”, the “#” key is included as part of the dial string. G723 Rate Encoding rate for G723 codec. By default, 6.3kbps rate is set. G726-32 Packing Mode Select “ITU” or “IETF” for G726-32 packing mode. iLBC Frame Size iLBC packet frame size. Default is 20ms.
Software Upgrade & Customization Software (or firmware) upgrades are completed via either TFTP or HTTP. The corresponding configuration settings are in the ADVANCED SETTINGS configuration page. FIRMWARE UPGRADE THROUGH TFTP/HTTP To upgrade via TFTP or HTTP, select TFTP or HTTP upgrade method. “Upgrade Server” needs to be set to a valid URL of a HTTP server. Server name can be in either FQDN or IP address format. Here are examples of some valid URLs. • • firmware.mycompany.com:6688/Grandstream/1.2.3.5 72.
INSTRUCTIONS FOR LOCAL TFTP UPGRADE: 1. Unzip the file and put all of them under the root directory of the TFTP server. 2. The PC running the TFTP server and the GXP21xx should be in the same LAN segment. 3. Go to File -> Configure -> Security to change the TFTP server's default setting from "Receive Only" to "Transmit Only" for the firmware upgrade. 4. Start the TFTP server, in the phone’s web configuration page 5. Configure the Firmware Server Path with the IP address of the PC 6.
Restore Factory Default Setting WARNING: Restoring the Factory Default Setting will delete all configuration information of the phone. Please backup or print all the settings before you restoring factory default settings. We are not responsible for restoring lost parameters and cannot connect your device to your VoIP service provider.