
User's Manual


Grandstream Networks, Inc., 1297 Beacon St., 2
nd
Flr, Brookline, MA 02446 USA
Tel: (617) 566-9300, FAX: (617) 249-1987
www.grandstream.com
GXP2020 6-line SIP Enterprise Phone Quick Installation
Guide
WARNING: Please DO NOT power cycle the GXP2020 when LED lights are flashing during
system boot up or firmware upgrade. You may corrupt firmware images and cause the unit to
malfunction.
WARNING:
Use only the power adapter included in the GXP2020 package. Using an alternative
non-qualified power adapter may possibly damage the unit.
Overview
GXP2020 features 6 lines, each with an individual SIP account and offers a large graphical LCD
display, four (4) XML programmable soft keys, and seven (7) programmable hard keys. It offers
intuitive user interfaces, 5-way conferencing, 2 headset jacks, and three (3) adjustable positioning
angles. The GXP2020 also offers dual 10/100Mbps auto-sensing Ethernet ports with integrated PoE,
secure central configuration with AES Encryption, superior audio quality (using G.722 wide-band
codec) and excellent manageability. The GXP series is fully compatible and interoperable with most
SIP end-user devices, IPPBX and Softswitches.
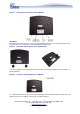
Equipment Packaging - Unpack and check all accessories
The GXP2020 phone package contains
1. One GXP2020 Main Case
2. One Handset
3. One Phone Cord
4. One Universal Power Adaptor
5. One Ethernet Cable
6. One High Phone Stand
7. One Low Phone Stand
8. Two Wall Mount Spacers
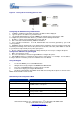
Connect the GXP2020 Enterprise IP Phone
Please use the equipment included in the packaging. Using any other power source may damage the
product.
1. Connect the handset and main phone case with the phone cord.
2. Connect the LAN port of the phone to the RJ-45 socket of a hub/switch or a router (LAN side of the
router) using the Ethernet cable.
3. Connect the 5V DC output plug to the power jack on the phone; plug the power adapter into an
electrical outlet.
4. The LCD will display provisioning or firmware upgrade information. Before continuing, wait for the
date/time display to show up.
5. Using the phone embedded web server or keypad configuration menu, you can further configure
the phone using either a static IP or DHCP.
Last updated on April 1, 2008
2