Grandstream Networks, Inc. DP715_US/DP710_US IP DECT Phone DP715_US/DP710_US User Manual Firmware Version 0.0.0.8 www.grandstream.com http://esupport.grandstream.
TABLE OF CONTENTS DP715_US, DP710_US USER MANUAL WELCOME.................................................................................................................................................... 4 SAFETY COMPLIANCES ................................................................................................................................. 4 WARRANTY .................................................................................................................................................
MANAGING FIRMWARE AND CONFIGURATION FILE DOWNLOAD ...................................................................... 42 RESTORE FACTORY DEFAULT SETTING.............................................................................................. 42 BASE STATION ........................................................................................................................................... 42 HANDSET ...............................................................................................
WELCOME Grandstream DP715_US, DP710_US is the next generation of powerful, affordable, high quality and simple to configure IP DECT Phone for small business, residential users and road warriors. Their compact size, superb voice quality, rich feature set, market leading price-performance and wide range radio coverage enable consumers to maximize the power of IP voice application and mobility for a minimum investment. The DP715_US, DP710_US is SIP and DECT compliant and field proven for flexible deployment.
INSTALLATION EQUIPMENT PACKAGING Table 1: Equipment Packaging DP715_US Yes Yes 2 Yes Yes Yes Yes Base Station Handset Rechargeable batteries Power Adaptor Ethernet Cable Service Card Quick Start Guide DP710_US No Yes 2 Charger unit NO Yes Yes SETTING UP THE BASE STATION Carry out the following steps: 1. Plug the power supply plug into a 230V socket. Plug the connector into the connector socket on the underside of the base unit. 2.
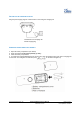
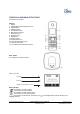
SETTING UP THE CHARGING STATION Plug the power supply plug into a 230V socket to start using the charging unit. 1 2 1 Underside of the charging unit 2 Power supply plug INSERTING THE BATTERIES IN A HANDSET 1. Open the battery compartment (see below). 2. Insert the batteries in the correct polarity (+ and -). 3. Close the battery compartment. 4. To charge the rechargeable batteries for the first time, place the handset in the base unit or charging unit for 16 hours.
Table 2: Definitions of the DP71X Connectors DC 6V Power adapter connection LAN Port (RJ-45) Connect to the internal LAN network. (DP715_US Only) RESET Factory Reset button: Press for 7 seconds to reset factory default settings. DP715_US Only) There are four (4) LED buttons that help you manage the status of your DECT Base DP715. Table 3: Basic Definitions of the DP715 LEDs Pattern LEDs POWER LED Network Registered Call Indicates Power.
PRODUCT OVERVIEW The DP715_US, DP710_US is the next generation of powerful, affordable, high quality and simple to configure IP DECT Phone for small business, residential users and road warriors. Their compact size, superb voice quality, rich feature set, market leading price-performance and wide range radio coverage enable consumers to maximize the power of IP voice application and mobility for a minimum investment. The VoIP network signaling protocol supported is SIP.
SRTP TLS/SIPS Syslog support, telnet, remote management using Web browser Media Control Management Physical Universal Power Supply Power Consumption & Battery Life Dimensions (H x W x D) Weight Environmental Input: 100-240VAC 50-60Hz 0.15A Output: 6VDC/500mA Base unit with handset: approximately 1.4 W Input: 100-240VAC 50-60Hz 0.
CONTROLS AND MENU STRUCTURE KEYS/DISPLAYS/LEDS Handset 1. Display 2. Right display button (display functions) 3. Up/Redial key 4. Right/Recall key 5. On-hook/On-off-key 6. Alphanumeric keypad 7. Keypad lock key 8. Dial pause key 9. Microphone 10. Ringer off-key 11. Down/Calls list key 12. Off-hook key/Handsfree key 13. Left/Internal call key 14. Left display button (display functions) Base station 15.
SYMBOLS Icon LCD Icon Definitions On Hook. Off Hook. Ringing. Internal Call. Handsfree Speaker ON. Keypad Locked. ABC Upper Case. Abc Lower Case. Direction to further menu items. Call list entries. New voicemail message. Handset ringer off. Alarm set. Aerial icon: in range (steady) - out of range (flashing) DISPLAY KEYS The display keys are the keys immediately below the display: and . Their function changes depending on the current context.
MENU STRUCTURE The handset has an easy-to-use menu structure. Every menu opens a list of options. To open the main menu, press the right display key when the handset is on and in standby mode. Press the key or key to scroll to the menu option you require. The instructions in this user guide show the key symbols and the item number on the device overview. Then press to select further options or confirm the setting displayed. Exit menu or go up a menu level To go to the previous menu item, press .
HANDSET - SETTINGS AND OPERATION TURNING THE HANDSET ON/OFF 1. Press the off-button to turn the handset on. 2. To switch the handset off, press and hold the off-key until the handset switches off. REGISTERING A HANDSET TO THE DECT BASE STATION Up to 5 handsets can be registered to one base station. Each handset can, for its part, be registered to up to four base units and the user can choose which base unit he wishes to use.
COMPLETING CALLS There are five ways to complete a call: A. Make an External call 1. Press 2. The Charge/In use indicator (LED) on the base unit flashes and the call icon appears in the display. 3. Dial the number you want once you hear the dialing tone. 4. The number appears on the display and is dialed. 5. To finish the call, press or replace the handset in the base unit or the handset charging unit. B. Making an internal call 1. Press INT. 2. Internal appears in the display. 3.
5. The number shown in the display is dialed automatically. 6. To finish the call, press or replace the handset in the base unit or the handset charging unit. ANSWERING CALLS There are 2 ways to answer calls: A. Answer a call from the handset manually The handset starts to ring during an incoming external or internal call. You can switch off the ringer temporarily by pressing Silent. 1. The call symbol appears in the display. 2. The caller's number appears in the display.
Consult the call history 1. Press to retrieve the most recent entry. 2. The phone number of the most recent caller appears. If the caller's name is entered in the phonebook, the name will be shown in the first line. If there is no entry and the calling number is not transmitted Withheld is shown. The date and time for each call show when the call was received in the second and third line. The following information is also displayed in the third or fourth line: – New: Unread or unanswered call.
THE PHONEBOOK You can store 200 numbers (up to 24 digits long) with an associated name (up to 16 characters long) in the phonebook. Saving a new entry in the phonebook 1. Press . 2. Press Option and confirm the New Entry with to add a new entry. • Name: appears in the display. 3. Enter the name using the alphanumeric keys. 4. Press Save and enter the phone number. 5. Press Save and select the ringer melody required. 6.
6. Press 7. Press . . again to confirm or to cancel without deleting. Display the details of phonebook entries 1. Press . 2. Enter the initial letter of the name required using the alphanumeric keys and/or scroll to the entry required. 3. Press Option. 4. Scroll with or to Show Details and press . 5. The name, phone number and ringer melody you have assigned to the entry appear in the display. 6. Press to return to the list of entries.
Note: The volume is adjusted in the same way in handsfree mode. Muting the microphone Press the display key to switch off the microphone during a call. You can now talk freely without the caller on the telephone hearing you. Press Off again to switch the microphone back on. Setting the ringer volume on the handset You can adjust the ringer volume for an incoming call (internal or external) to one of 6 levels (level 1 to 5 and off). If you select Off, the icon appears in the display.
Setting the key lock You can lock the keypad against unintentional entries. It is, however, still possible to pick up incoming calls even with the keypad locked. Enabling or disabling the keypad lock: 1. Enable: press and hold for approximately 2 seconds. 2. The display shows Keypad Locked briefly and the key lock icon appears in the display. 3. Disable: press Unlock, then to unlock the keys again. 4. Keypad Unlocked appears briefly in the display.
Setting an alarm 1. 2. 3. 4. 5. 6. Press . Press or repeatedly, select Time. Press to confirm. Press or repeatedly, select Set Alarm. Press to confirm. Press or repeatedly and select one of the four possible settings: 9 Once, 9 Every Day, 9 Mon to Fri 9 Off. Confirm with . When you select Once, Every Day or Mon to Fri, the display shows: Time (24hr): 07:00 7. Enter the alarm time required using four digits and press Save. 8.
Stop watch 1. 2. 3. 4. 5. 6. 7. Press . Scroll with to Tools and press . Scroll with or to Stop Watch and press . Press Start, to start the watch. Press Stop, to stop the watch. Press Start again to allow the stop watch to continue to run. Press Reset to reset the stop watch to 00:00. UNDERSTANDING DP715 VOICE PROMPT DP715 has a built-in voice prompt menu for simple device configuration. The IVR menu and the LED button work with any of the Handset. Pick up the handset and dial “***” to use the IVR menu.
- always check - check when pre/suffix changes - never upgrade 18 Subscription Mode Press "9" to toggle subscription mode on the base. Subscription mode is automatically exited after 120 seconds. 47 “Direct IP Calling” Enter the target IP address to make a direct IP call, after dial tone. (See “Make a Direct IP Call”.
Using Star Code 1. Pick up the Handset and press then dial “*47” 2. Enter the target IP address. Note: NO dial tone will be played between step 1 and 2. Examples of Direct IP Calls: a) If the target IP address is 192.168.0.160, the dialing convention is *47 or Voice Prompt with option 47, then 192*168*0*160. followed by pressing the “#” key if it is configured as a send key or wait 4 seconds. In this case, the default destination port 5060 is used if no port is specified.
Note: continuous busy tone does not indicate the transfer has been successful, nor does it indicate the transfer has failed. It often means there was a failure to receive second NOTIFY – check firmware for most recent release. Attended Transfer Assume that Caller A and B are in conversation. Caller A wants to Attend Transfer B to C: 1. Caller A presses RECALL on the Handset for dial tone. 2. Caller A then dials Caller C’s number followed by # (or wait for 4 seconds). 3.
*50 *51 *67 *82 *69 *70 *71 *72 *73 *74 *78 *79 *87 *90 *91 *92 *93 Flash/Hook (Recall) # Disable Call Waiting (for all subsequent calls) Enable Call Waiting (for all subsequent calls) Block Caller ID (per call). Dial “*67” + ” number ”. No dial tone is played in the middle. Send Caller ID (per call). Dial “*82” + ” number ”. No dial tone is played in the middle. Call Return Service: Dial *69 and the phone will dial the last incoming phone number received. Disable Call Waiting (per call).
FIRMWARE UPGRADE MODE Select voice menu option 17 to choose firmware upgrade mode among the following three options: 1) Always check, 2) check when pre/suffix changes, and 3) never upgrade. CONFIGURING THE BASE STATION VIA WEB BROWSER DP715 Base Station has an embedded Web server that will respond to HTTP GET/POST requests. It also has embedded HTML pages that allow users to configure the DP715 through a web browser such as Microsoft’s IE, AOL’s Netscape or Mozilla Firefox installed on Windows or Unix OS.
1. STUN Server (under Advanced Settings webpage) Enter a STUN Server IP (or FQDN) that you may have, or look up a free public STUN Server on the internet and enter it on this field. If using Public IP, keep this field blank. 2. Use Random Ports (under Advanced Settings webpage) This setting depends on your network settings. Generally if you have multiple IP devices under the same network, it should be set to Yes. If using a Public IP address, set this parameter to No. 3.
DHCP domain Default is blank. This option specifies the domain name that client should use when resolving hostnames via the Domain Name System. DHCP vendor class ID Default is HT7XX. Used by clients and servers to exchange vendor-specific information.. PPPoE account ID PPPoE username. Necessary if ISP requires you to use a PPPoE (Point to Point Protocol over Ethernet) connection. PPPoE password PPPoE account password. PPPoE Service Name Default is blank. This field is optional.
Table 8: Status Page MAC Address The device ID, in HEX format. This is very important ID for ISP troubleshooting. The Mac address will appear in this place. The MAC address will be used for provisioning and can be found on the label coming with original box and on the label located on the bottom panel of the device. RFPI Address IP Address This field shows the IP address of the DP715. Product Model This field contains the product model info.
Table 9: Advanced Settings Admin Password This contains the password to access the Advanced Web Configuration page. This field is case sensitive. Only the administrator can configure the “Advanced Settings” page. Password field is purposely left blank for security reasons after clicking update and saved. The maximum password length is 25 characters. Layer 3 QoS This field defines the layer 3 QoS parameter which can be the value used for IP Precedence or Diff-Serv or MPLS. Default value is 48.
Firmware File Postfix Default is blank. End user should keep it blank. Config File Prefix Default is blank. End user should keep it blank. Config File Postfix Default is blank. End user should keep it blank. Allow DHCP Option 66 If set to “Yes”, configuration and upgrade server information can be obtained using DHCP to override server option 66 from DHCP server located in customer’s environment. Default setting is Yes. Automatic Upgrade Choose “Yes” to enable automatic upgrade and provisioning.
Lock Keypad Update Default is No. If set to “Yes”, the configuration update via keypad is disabled. Disable Voice Prompt Default is No. Disables the voice prompt configuration. Disable Direct IP Call Default is No. Disables the Direct IP Call function. Failover to FXO Gateway Default is Disable. If Enabled, the unit will start routing the calls to the FXO Gateway configured via Direct IP Call When it loses registration from your SIP Server.
Primary RADIUS Acct Port Default is 1813. Specifies the port to be used for the Primary RADIUS Account. Primary RADIUS Server Secret Specifies the secret string to be used to authenticate the RADIUS connection to the Primary Server. It should match RADIUS configuration. RADIUS Timeout Default is 2. RADIUS Retry Default is 3. Download Device Configuration Allows user to download and save a text file containing all the P values of each setting as configured at that point on the unit.
SIP Registration Controls whether the DP715 needs to send REGISTER messages to the proxy server. The default setting is Yes. Unregister on Reboot Default is No. If set to Yes, the SIP user’s registration information will be cleared on reboot. Outgoing Call without Registration Default is No. If set to “Yes,” user can place outgoing calls even when not registered (if allowed by Internet Telephone Service Provider) but is unable to receive incoming calls.
Proxy-Require SIP Extension to notify SIP server that the unit is behind the NAT/Firewall. Use NAT IP Ring Timeout NAT IP address used in SIP/SDP message. Default is blank. Default value is 60 Sec. Incoming call will stop ringing when not picked up given a specific period of time. Default value is 20 Sec. If call is not answered within this designated time period, the callwill be forwarded to the next member of a Hunt Group. Linear, Circular, parallel and Shared line. Default is Circular.
Example of a simple dial plan used in a Home/Office in the US: { ^1900x. | <=1617>[2-9]xxxxxx | 1[2-9]xx[2-9]xxxxxx | 011[2-9]x. | [3469]11 } Explanation of example rule (reading from left to right): • ^1900x. - prevents dialing any number started with 1900 • <=1617>[2-9]xxxxxx - allows dialing to local area code (617) numbers by dialing 7 numbers and 1617 area code will be added automatically • 1[2-9]xx[2-9]xxxxxx |- allows dialing to any US/Canada Number with 11 digits length • 011[2-9]x.
Force INVITE Session Timer can be refreshed using INVITE method or UPDATE method. Select “Yes” to use INVITE method to refresh the session timer. Enable 100rel PRACK (Provisional Acknowledgment) method enables reliability to SIP provisional responses (1xx series). Preferred Vocoder The DP715 supports up to 6 different Vocoder types including G.711 A-/U-law, G.726-32 , G.723, G.729A/B and iLBC.
SIP User ID For example: Port 1, 2, and 3 are members of the same Hunting Group. Handset 1 is registered with a SIP account. Handset 2, and 3 are not registered. Handset 2 and 3 will be able to place outbound calls using the SIP account of Handset 1. Select appropriate value for Hunting Group feature. The original SIP account should be set to Active while the group members should be set to the port number of the Active Handset.
with redirection settings so that they will be redirected to customer’s TFTP or HTTP/HTTPS server for further provisioning. Grandstream also provide GAPSLITE software package which contains our NAT friendly TFTP server and a configuration tool to facilitate the task of generating device configuration files. The GAPSLITE configuration tool is now free to end users. The tool and configuration template are available for download from http://www.grandstream.com/support/tools .
Note: Alternatively, the user can upload the firmware single file from his/her computer using a local directory. For more instructions see below. Also the user can download a free TFTP or HTTP server and conduct local firmware upgrade. A free windows version TFTP server is available for download from Our latest official release can be http://support.solarwinds.net/updates/New-customerFree.cfm. downloaded from http://www.grandstream.com/support/firmware .
Firmware and Configuration File Prefix and Postfix Firmware Prefix and Postfix allows device to download the firmware name with the matching Prefix and Postfix. This makes it the possible to store ALL of the firmware with different version in one single directory. Similarly, Config File Prefix and Postfix allows device to download the configuration file with the matching Prefix and Postfix. Thus multiple configuration files for the same device can be stored in one directory.
2. IVR Command Reset default factory settings using the IVR Prompt (Table 5): 1. 2. 3. 4. Dial “***” for voice prompt. Enter “99” and wait for “reset” voice prompt. Enter the encoded MAC address (Look below on how to encode MAC address). Wait 15 seconds and device will automatically reboot and restore factory settings. Encode the MAC Address 1. Locate the MAC address of the device. It is the 12 digit HEX number on the bottom of the unit. 2. Key in the MAC address.
This device complies with part 15 of the FCC Rules. Operation is subject to the following two conditions: (1) This device may not cause harmful interference, and (2) this device must accept any interference received, including interference that may cause undesired operation. Note: This equipment has been tested and found to comply with the limits for a Class B digital device, pursuant to part 15 of the FCC Rules.