Grandstream Networks, Inc. GXP2020 6-line SIP Enterprise Phone GXP2020 User Manual Firmware Version 1.1.4.3 www.grandstream.com support@grandstream.
TABLE OF CONTENTS GXP2020 USER MANUAL WELCOME.................................................................................................................................................... 4 INSTALLATION............................................................................................................................................ 5 EQUIPMENT PACKAGING ...............................................................................................................................
TABLE OF FIGURES GXP2020 USER MANUAL FIGURE 1: FIGURE 2: FIGURE 3: FIGURE 4: FIGURE 5: FIGURE 6: FIGURE 7: CONNECTORS ON THE BOTTOM OF THE GXP2020............................................................................ 5 ATTACHING THE WALL-MOUNT SPACERS ......................................................................................... 6 LOCATION OF THE FIXED HANGERS ON GXP2020............................................................................. 6 WALL MOUNTING THE GXP2020................
Welcome Your Grandstream GXP2020 features a new sophisticated design and is very easy to use. The GXP2020 combines advanced feature functionality with the latest technology to offer excellent audio quality, ease of use, expandability, and broad interoperability with 3rd party SIP platforms. It is ideal for the enterprise customer. This 6 line enterprise SIP phone offers more advanced functionality than the GXP2000.
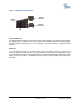
Installation EQUIPMENT PACKAGING The GXP2020 phone package contains: 1) 2) 3) 4) 5) 6) 7) 8) One GXP2020 Main Case One Handset One Phone Cord One Universal Power Adaptor One Ethernet Cable One High Phone Stand One Low Phone Stand Two Wall Mount Spacers CONNECTING YOUR PHONE The connectors of the GXP2020 are located on the bottom of the device.
WALL-MOUNT GXP2020 can be wall mounted. For proper wall mounting please place the two wall-mount spacers into the proper holes on the bottom of the GXP2020 as show below: Figure 2: Attaching the Wall-Mount Spacers To position the phone on the wall, place two fixed hangers on the wall, hang the back of the phone on the fixed hangers.
Figure 4: Wall Mounting the GXP2020 ` Tab with extension Handset Rest Tab with extension up Tab SAFETY COMPLIANCES The GXP2020 phone complies with FCC/CE and various safety standards. The GXP2020 power adaptor is compliant with the UL standard. Only use the universal power adaptor provided with the GXP package. The manufacturer’s warranty does not cover damages to the phone caused by unsupported power adaptors.
Product Overview GXP2020 features 6 lines, each with an individual SIP account and offers a large graphical LCD display, four (4) XML programmable soft keys, and seven (7) programmable hard keys. It offers intuitive user interfaces, 5-way conferencing, 2 headset jacks, and three (3) adjustable positioning angles. Like the GXP2000, the GXP2020 also offers dual 10/100Mbps auto-sensing Ethernet ports with integrated P-o-E, secure central configuration with AES Encryption, superior audio quality (using G.
Table 4: GXP2020 Technical Specifications Lines Protocol Support Display Feature Keys Device Management Audio Features Telephony Features Network and Provisioning Firmware Upgrades Advanced Server Features Security 6 direct lines with independent SIP accounts, 7 programmable speed dial keys 4 XML programmable soft-keys Support SIP 2.
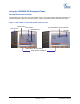
Using the GXP2020 SIP Enterprise Phone GETTING FAMILIAR WITH THE LCD The GXP2020 has a dynamic and customizable screen. The screen displays differently depending on whether the phone is idle or in use (active screen). Figure 5 illustrates the IDLE and ACTIVE screens. Figure 5: LCD in IDLE (on-hook) and ACTIVE (off-hook) mode.
Table 5: LCD Button Definitions Key Button Key Button Definitions LINE SELECTORS (6) Selects the phone line printed on its right-hand side. SIP PHONE LINES Displays the available phone lines. Choose a phone line by pressing the corresponding line selector on the left-hand side. DATE AND TIME Displays the current date and time. Can be synchronized with Internet time servers. LOGO Displays company logo. This logo can be customized.
Figure 6: Getting Familiar with Key Pad Message Waiting Indicator Voice Message button Graphical LCD screen Menu Keys Line 1-6 keys Softkeys Dedicated buttons Speed Dial Buttons (Programmable Buttons) Phonebook button Standard Keypad Send Button Hand Free Button Hold Button Table 7: GXP2020 Button Definitions Key Button Key Button Definitions LINE BUTTONS (6) 6 Line keys with LED, can be configured to different SIP profiles TRANSFER TRANSFER key: Transfer an ACTIVE call to another number CONF P
MAKING PHONE CALLS HANDSET, SPEAKERPHONE AND HEADSET MODE Handset can be toggled between Speaker and Headset. To switch between Handset and Speaker/Headset, press the Hook Flash in the handset cradle or press the SPEAKER button. MULTIPLE SIP ACCOUNTS AND LINES The GXP2020 can support up to 6 independent SIP accounts. Each account is capable of independent SIP server, user and NAT settings. Each of the 6 line buttons is “virtually” mapped to an individual SIP account.
i. Hand-free option 1. Press the CALL RETURN soft-key ii. Hand-set option 1. Take the Handset off-hook 2. Press the CALL RETURN soft-key 4. USING THE CALL HISTORY: To call the a phone number in the phone’s history When using the call history, the phone will use the same SIP account as was used for the last call/call attempt. Thus, when returning a call made to the third SIP account, the phone will use the third SIP account return the call. • Press the MENU button to bring up the Main Menu.
MAKING CALLS USING IP ADDRESSES Direct IP calling allows two phones to talk to each other in an ad hoc fashion without a SIP proxy. VoIP calls can be made between two phones if: • both phones have public IP addresses, or • both phones are on a same LAN/VPN using private or public IP addresses, or • both phones can be connected through a router using public or private IP addresses (with necessary port forwarding or DMZ) To make a direct IP call, please follow these steps: 1.
ANSWERING PHONE CALLS RECEIVING CALLS 1. Incoming single call: Phone rings with selected ring-tone. The corresponding account LINE flashes red. Answer call by taking Handset/SPEAKER/Headset off hook or pressing SPEAKER or by pressing the corresponding account LINE button. 2. Incoming multiple calls: When another call comes in while having an active call, the phone will produce a Call Waiting tone (stutter tone). Next available lines will flash red (as described in section 4.3.2).
5-WAY CONFERENCING The GXP2020 can host conference calls and supports 5-way conference calling. 1. Initiate a Conference Call: Establish a connection with two or more parties Press CONF button Choose the desired line to join the conference by pressing the corresponding LINE button. Repeat step 2 and 3 for all parties that you want to join the conference. This can be done at any time, thus also if a n 2. Cancel Conference: Canceling establishing conference call.
CALL FEATURES The GXP2020 supports traditional and advanced telephony features including caller ID, caller ID w/name, call forward/transfer/park/hold as well as intercom/paging and BLF.
CONFIGURATION GUIDE The GXP2020 can be configured in two ways. Firstly, using the Key Pad Configuration Menu on the phone; secondly, through embedded web-configuration menu. CONFIGURATION WITH KEY PAD To enter the MENU, press the round button. Navigate the menu by using the arrow keys: up/down and left/right. Press the OK button to confirm a menu selection, delete an entry by pressing the MUTE/DEL button.
Display “Configure” Press Menu button to display the configuration selections: • Network. To enable/disable DHCP. To setup IP-address, Net mask and Gateway address • SIP To change SIP-server settings for primary account. • Audio • Upgrade In this menu setting regarding the firmware server and config server can be changed. It also enables the user to make the phone attempt to download new firmware. • Factory Reset Key in the physical/MAC address on back of the phone.
Figure 7: Key Pad GUI Call Flow Grandstream Networks, Inc. GXP–2020 User Manual Firmware 1.1.4.
CONFIGURATION WITH WEB BROWSER The GXP2020 embedded Web server responds to HTTP/HTTPS GET/POST requests. Embedded HTML pages allow a user to configure the IP phone through a Web browser such as Microsoft’s IE or Mozilla Firefox.
Table 10: Device Configuration - Status Definitions Hardware Revision Hardware version number: Main Board, Interface Board MAC Address The device ID, in HEXADECIMAL format. IP Address This field shows IP address of GXP2020 Product Model This field contains the product model information. Software Version • • Program: This is the main software (firmware) release number, always used to identify the software (firmware) system of the phone.
Advanced User configuration includes not only the end user configuration, but also advanced configuration such as SIP configuration, Codec selection, NAT Traversal Setting and other miscellaneous configuration. Table 12: Advanced User Configuration Page Definitions Admin Password Administrator password. Only the administrator can configure the “Advanced Settings” page. Password field is purposely blank for security reasons after clicking update and saved. The maximum password length is 25 characters.
Use # as Dial Key This parameter allows users to configure the “#” key as the “Send” (or “Dial”) key. If set to “Yes”, the “#” key will immediately send the call. In this case, this key is essentially equivalent to the “(Re)Dial” key. If set to “No”, the “#” key is included as part of the dial string. Local RTP port This parameter defines the local RTP-RTCP port pair used to listen and transmit. It is the base RTP port for channel 0.
DTMF Payload Type This parameter sets the payload type for DTMF using RFC2833. Default is 101. Syslog Server The IP address or URL of System log server. This feature is especially useful for ITSPs. Syslog Level Select the ATA to report the log level. Default is NONE. The level is one of DEBUG, INFO, WARNING or ERROR.
INDIVIDUAL ACCOUNT SETTINGS The GXP2020 has 6 line appearances, each with an independent SIP account. Each SIP account requires its own configuration page. Their configurations are identical. Table 13: SIP Account Configuration Page Definitions Account Active This field indicates whether the account is active. The default value for the primary account (Account 1) is Yes. The default value for the other two accounts is No. Account Name The name associated with each account - displayed on LCD.
NAT Traversal This parameter activates the NAT traversal mechanism. If activated (by choosing “Yes”) and a STUN server is also specified, the phone performs according to the STUN client specification. Using this mode, the embedded STUN client detects if and what type of NAT/Firewall configuration is used. If the detected NAT is a Full Cone, Restricted Cone, or a Port-Restricted Cone, the phone will use its mapped public IP address and port in all of its SIP and SDP messages.
Force INVITE Session Timer can be refreshed using INVITE method or UPDATE method. Select “Yes” to use INVITE method to refresh the session timer. Enable 100rel PRACK (Provisional Acknowledgment) method enables reliability to SIP provisional responses (1xx series). This is required to support PSTN internetworking.. Account Ring Tone There are 4 uniquely defined ring tones: • One (1) System Ring Tone: when selected, all calls will ring with system ring tone.
Software Upgrade & Customization Software (or firmware) upgrades are completed via either TFTP or HTTP. The corresponding configuration settings are in the ADVANCED SETTINGS configuration page. FIRMWARE UPGRADE THROUGH TFTP/HTTP To upgrade via TFTP or HTTP, select TFTP or HTTP upgrade method. “Upgrade Server” needs to be set to a valid URL of a HTTP server. Server name can be in either FQDN or IP address format. Here are examples of some valid URLs. • • firmware.mycompany.com:6688/Grandstream/1.0.0.
DIRECTIONS TO CONFIGURE LOCAL TFTP: 1. Unzip the file and put all of them under the root directory of the TFTP server. 2. The PC running the TFTP server and the GXP2020 should be in the same LAN segment. 3. Go to File -> Configure -> Security to change the TFTP server's default setting from "Receive Only" to "Transmit Only" for the firmware upgrade. 4. Start the TFTP server, in the phone’s web configuration page 5. Configure the Firmware Server Path with the IP address of the PC 6.
Restore Factory Default Setting WARNING: Restoring the Factory Default Setting will delete all configuration information of the phone. Please backup or print all the settings before you restoring factory default settings. Grandstream is not responsible for restoring lost parameters and cannot connect to your VoIP service provider. DIRECTIONS FOR RESTORATION: Disconnect network cable and power cycle the unit before resetting factory default settings. 1.