Model 29578 Desktop Speakerphone with Amplified Volume and Tone Control User’s Guide
Important Information NOTICE: This product meets the applicable Industry Canada technical specifications. Operation is subject to the following two conditions: (1) This device may not cause interference, and (2) This device must accept any interference, including interference that may cause undesired operation of the device. The equipment must be installed using an acceptable method of connection.
Interference Information This equipment generates and uses radio frequency energy which may interfere with residential radio and television reception if not properly installed and used in accordance with instructions contained in this manual. Reasonable protection against such interference is ensured, although there is no guarantee this will not occur in a given installation.
Notice must be given to the telephone company upon termination of your telephone from your line. REN Number On the bottom of this equipment is a label indicating, among other information, the Ringer Equivalence Number (REN) for the equipment. The REN is useful in determining the number of devices you may connect to your telephone line and still have all of these devices ring when your telephone number is called.
Table of Contents Important Information. ....... 2 Interference Information. ... 3 Telephone Network Information. .................. 3 REN Number....................... 4 Hearing Aid Compatibility (HAC)............................ 4 Introduction....................... 6 Before You Begin................ 7 Parts Checklist.....................7 Telephone Jack Requirements.....................7 Installation ........................ 8 Important Installation Guidelines..........................8 Base Layout.....
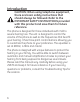
Introduction CAUTION: When using telephone equipment, there are basic safety instructions that should always be followed. Refer to the IMPORTANT SAFETY INSTRUCTIONS provided with this product and save them for future reference. This phone is designed for those individuals with mild to severe hearing loss. The unit is designed to control the volume of the phone as well as the frequencies that best fit your hearing. It has three pitch control buttons allowing you to customize the phone to your preference.
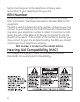
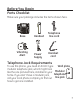
Before You Begin Parts Checklist Make sure your package includes the items shown here. Base Vibrating Alert Handset Telephone line cord Power Supply Handset cord Telephone Jack Requirements Wall plate To use this phone, you need an RJ11C type modular telephone jack, which might look like the one pictured here, installed in your Modular telephone home. If you don’t have a modular jack, line jack call your local phone company to find out how to get one installed.
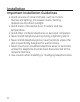
Installation Important Installation Guidelines • Avoid sources of noise and heat, such as motors, fluorescent lighting, microwave ovens, heating appliances and direct sunlight. • Avoid areas of excessive dust, moisture and low temperature. • Avoid other cordless telephones or personal computers. • Never install telephone wiring during a lightning storm. • Never install telephone jacks in wet locations unless the jack is specifically designed for wet locations.
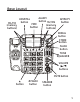
Base Layout M1/M3 (memory buttons) HOSPITAL button ALARM button M2/M4 FIRE (memory button buttons) AMPLIFY button REDIAL button STORE button FLASH button TONE EQUALIZER VOLUME (p/q) buttons MUTE button * button # PAUSE button SPEAKER button
Back & Side Views DATA jack LINE jack AMPLIFY Override Switch RINGER VOL (HIGH/LOW/OFF) switch RINGER PITCH (HIGH/LOW) switch NECKLOOP 10 (BACK VIEW) VIBRATING ALERT (SIDE VIEW)
Installing the Phone Installing Backup Batteries CAUTION: Disconnect the phone cord from the wall outlet before installing or replacing the batteries. In case of a power outage, the phone uses 4 AA alkaline batteries for backup power for incoming voice amplification and visual ringer functions. 1. Unplug the power adaptor and the telephone line before installing batteries. 2. Carefully turn over the phone, and release latch on battery compartment and remove cover. 3.
NOTE: Remove the batteries if storing the unit for over 30 days to prevent damage in the event of leaking batteries. Connecting the Telephone Line 1. 2. 3. 4. 12 NOTE: The unit is shipped from the factory for placement on a level surface. Choose an area near a telephone wall jack (RJ11C), and place your cordless telephone on a level surface, such as a desktop or tabletop, or you may mount it on the wall.
CAUTION: To reduce risk of personal injury, fire, or damage use only the 5-2784 power adaptor listed in the user’s guide. This power adaptor is intended to be correctly orientated in a vertical or floor mount position. 5. You can stretch out the kick-stands on the bottom of the base for a better viewing angle when placed on desktop. 6. Connect one end of the coiled handset cord to the jack on the handset. 7. Plug the other end of the coiled handset cord to the jack on the base. 8.
Wall Mounting 1. Plug the AC power adaptor into the electrical outlet and the DC connector into the jack on the back of the base. 2. Plug one end of the straight telephone line cord into the jack on the bottom of the base. 3. Close the kick-stands on the bottom of the base unit if you’ve opened them before. 4. Feed the line cord through the groove and plug the end into the modular telephone jack. Excess telephone line can be stuffed into the recess area on the bottom of the Base Unit. 5.
Telephone Operation Speakerphone For hands-free operation and convenience, this unit is equipped with a speakerphone. For best speakerphone performance, avoid the following: • Areas with high background noise. (The microphone might pick up these sounds and prevent the speakerphone from going into the receiving mode when you finish talking.) • Surfaces affected by vibration. • Recessed areas such as in a corner, under a cupboard, or next to a cabinet, which can generate an echo effect.
Placing a Call Handset 1. Pick up the handset and listen for a dial tone. 2. Dial the number you want to call. 3. When finished, hang up the handset. Speakerphone 1. Press the speaker button on the base and listen for a dial tone. 2. Dial the number you want to call. 3. When finished, press the speaker button to hang up. Answering a Call NOTE: Make sure the ringer switch is set to HI or LO, or the phone will not ring. The visual ring indicator will flash at all settings. Handset 1.
Speakerphone 1. When the phone rings, press the speaker button to answer a call. 2. When finished, press the speaker button to hang up. You may switch between the speakerphone and the handset during the dialing process or anytime during a conversation. Speakerphone to Handset - Pick up the handset to disable the speakerphone. The speakerphone indicator turns off. Handset to Speakerphone - Press the speaker button, and then hang up the handset.
The “AMPLIFY” button controls the increased volume level and tone equalizer of the handset. 1. Press the volume (p or q) button to minimum, pick up the handset and press the amplify button to turn on the incoming voice amplifier . The indicator around the button illuminates. 2. Adjust the volume by pressing the volume (p or q) button. When the amplify button is pressed , an extra level of amplified volume is added providing up to 40dB of gain and level control.
Tone Equalizer The phone’s 3-band tone equalizer boosts the sound of the three frequency ranges ( 600Hz, 1.2KHz, 2.4KHz ) to compensate for the ear’s limited sensitivity in these ranges. 1. To turn on the equalizer, press the “amplify” button after you pick up the handset, or any time during the a call. The indicator around the button illuminates. 2. To adjust the setting open the equalizer cover.
Mute Use the mute button to interrupt a phone conversation to talk privately with someone else in the room . A conversation can be muted while using the speakerphone, handset or neckloop. 1. Press the mute button. The mute indicator illuminates. 2. Press mute again to turn it off. Note: Switching from speakerphone to handset cancels mute. Vibrating Alert The unit is equipped with a 2.5mm vibrating alert jack for an optional vibrating pad to alert you when the phone is ringing.
Redial You may redial the last number you called by pressing the redial button after you get a dial tone. NOTE: The Redial feature holds in memory the last phone number you dialed (as many as 32 digits). If you pressed any numbers after dialing the phone number, (for example, when accessing a voice-menu system) those numbers also are redialed.
Memory Store as many as 7 numbers in memory for easy dialing. Three can be stored in the Emergency Quick Dial locations, and four in the one-touch memory on the top of the Base unit. You can use the space provided to either write the name of your contacts or stick pictures for easy recognition. Storing a Number in Memory 1. 2. 3. 4. 5. Pick up the handset or press SPEAKER. Press the STORE button. Dial the number to be stored (up to 16 digits). Press the STORE button.
Changing a Stored Number Follow the same steps as “Storing a Number into Memory.” The new numbers will overwrite the existing numbers. Dialing a Number from Memory You can dial numbers from memory when using the handset or speakerphone. When you get a dial tone, press the onetouch memory button for the number you want to dial. Dialing the Emergency Quick Dial Numbers If you have previously programmed your Emergency Quick Dial numbers, you only need to press the button after you get a dial tone.
Troubleshooting Guide No dial tone • Check installation: Make sure the telephone line cord is connected to the base unit and the wall phone jack. • Check the hook switch. Make sure it fully extends when the handset is lifted from the cradle. • You must have touch-tone service on your line to use this phone. If you do not know what type of service you have, check with the phone company. • Make sure speakerphone indicator comes on (if using speakerphone.
Low handset or speaker volume • Check the receiver or speaker volume settings. Can’t be heard by other party • Make sure phone cord is securely plugged in. • Make sure extension phones are on the hook at the same time you’re using the phone. It is normal for the volume to drop when additional extension phones are used at the same time. Memory dialing • Make sure you entered numbers correctly. (See “Memory.”) • Make sure the telephone is properly installed. Pick up the handset and listen for the dial tone.
General Product Care To keep your telephone working and looking good, follow these guidelines: • Avoid putting the phone near heating appliances and devices that generate electrical noise (for example, motors or fluorescent lamps ). • DO NOT expose to direct sunlight or moisture. • Avoid dropping the unit and other rough treatment. • Clean with a soft cloth. • Never use a strong cleaning agent or abrasive powder because this will damage the finish.
Warranty Thomson Digital Technologies Ltd., warrants to the purchaser or gift recipient that if any manufacturing defect becomes apparent in this product within 1 year from the original date of purchase, it will be replaced free of charge, including return transportation. This warranty does not include damage to the product resulting from accidents, misuse or leaking batteries. Should your product not perform properly during the warranty period, either: 1.
Attach your sales receipt to this booklet for future reference. This information is required if service is needed during the warranty period.
Accessory Information DESCRIPTION Vibrating Alert Power Adaptor MODEL NO. 5-2810 5-2784 To order, call the nearest distributor for your area; Ontario: (905) 624-8516 Manitoba: (204) 783-2088 British Columbia: (604) 438-8001 Quebec: (514) 352-9071 A shipping and handling fee will be charged upon ordering. It is required by law to collect appropriate sales tax for each individual state, country, and locality to which the merchandise is being sent. Items are subject to availability.
Index A Accessory Information 29 Adding a Pause to the Dialing Sequence 22 Amplified Audio 17 Answering a Call 16 B Back & Side Views 10 Base Layout 9 Before You Begin 7 C Changing a Stored Number 23 Connecting the Telephone Line 12 D Dialing a Number from Memory 23 Dialing the Emergency Quick Dial Numbers 23 30 F Flash 20 G General Product Care 26 H Handset 16 Hearing Aid Compatibility (HAC) 4 I Important Information 2 Important Installation Guidelines 8 Installation 8 Installing Backup Batteries 11 I
Index N Neckloop 19 P Parts Checklist 7 Placing a Call 16 R Redial 21 REN Number 4 S Speakerphone 15, 16, 17 Storing a Number in Memory 22 T Telephone Jack Requirements 7 Telephone Network Information 3 Telephone Operation 15 Tone Equalizer 19 Troubleshooting Guide 24 V Vibrating Alert Volume 17 W Wall Mounting Warranty 27 20 14 31
Model 29578 00019316 (Rev. 0 Can E/F) 07-31 Printed in China Thomson Digital Technologies Ltd. © 2007 Thomson Digital Technologies Ltd.
Modéle 29578 Système Téléphonique pour Bureau avec Haut-parleur, Amplificateur de Volume et Contrôle de la Tonalité Guide de l’utilisateur
Renseignements Importants AVIS: Ce produit est conforme aux spécifications techniques applicables d’Industrie Canada. Son fonctionnement est soumis aux deux conditions suivantes : (1) Cet appareil ne peut causer de l’interférence, et (2) Cet appareil doit accepter toute interférence, y compris l’interférence pouvant entraîner le fonctionnement non souhaitable de l’appareil.
Renseignements sur L’interférence Cet appareil produit et utilise l’énergie radiofréquence qui peut gêner la réception radio et télévision résidentielle s’il n’est pas installé ou utilisé conformément aux instructions contenues dans ce guide. Une protection raisonnable est assurée contre une telle interférence, mais rien ne garantit qu’un appareil donné ne produira pas d’interférence.
Facteur D’équivalence de Sonnerie (REN) L’étiquette sous cet appareil indique notamment le facteur d’équivalence de sonnerie de l’appareil. Le REN permet de déterminer le nombre d’appareils que vous pouvez raccorder à votre ligne téléphonique et qui sonneront quand votre numéro de téléphone est composé. Dans la plupart des régions (mais pas toutes), la somme des REN de tous les appareils raccordés à une ligne ne doit pas dépasser 5.
Introduction ATTENTION : Vous devez respecter certaines règles de sécurité lorsque vous utilisez un appareil téléphonique. Reportez-vous aux INSTRUCTIONS IMPORTANTES DE SÉCURITÉ qui accompagnent ce produit et conservez-les pour référence ultérieure. Ce téléphone est fait pour les individus souffrants d’une perte auditive légère ou sévère. Cet appareil est conçu pour permettre le contrôle du volume du téléphone ainsi que des fréquences que vous percevez le mieux.
Table des Matières Renseignements Importants......2 Renseignements sur L’interférence....................3 Information sur le Réseau Téléphonique.....................3 Facteur D’équivalence de Sonnerie............................4 Compatibilité avec les Prothéses Auditives. ..........................4 Introduction...........................5 Avant de Commencer...............7 Liste de Piéces...........................7 Exigences de la Prise Téléphonique. .......................
Avant de Commencer Liste de Pièces Assurez-vous que la boîte contient les articles suivants. Base Combiné Alerte par Adaptateur vibration CA Cordon téléphonique Cordon de combiné Exigences de la Prise Téléphonique Pour utiliser ce téléphone, vous devez Placa de pared disposer dans la maison d’une prise téléphonique modulaire de type RJ11C (CA11A), qui peut ressembler à celle illustrée ici.
Information Importante sur L’installation Importantes Lignes Directrices sur L’installation • Évitez les sources de bruit et de chaleur, comme les moteurs, les lampes fluorescentes, les fours à micro-ondes, les appareils de chauffage et le soleil direct. • Évitez les endroits extrêmement poussiéreux, humides et froids. • Évitez les autres téléphones sans cordon et les ordinateurs personnels. • Ne jamais installer les câbles téléphoniques pendant un orage électrique.
Présentation de la Base ALARM FIRE HOSPITAL (bouton (bouton pour (bouton D’INCENDIE) l’HÔPITAL) pour le M2/M4 SERVICE) M1/M3 (boutons (boutons memoíre) memoíre) * (bouton) AMPLIFY (bouton Amplify) REDIAL (bouton recomposition) STORE (mémoriser bouton) FLASH (bouton flash) TONE EQUALIZER (Égalisateur de tonalité) VOLUME (p/q) (boutons ID appelan-volume) MUTE (bouton sourdine) # PAUSE SPEAKER (bouton pause) (haut-parleur bouton)
Vue Arrière et de Côté DATA jack (Prise pour transmission de donnés) AMPLIFY Override Switch (Interrupteur d’amplification du volume) Interrupteur RINGER VOL (HIGH/LOW/OFF) (Vue Arrière) Interrupteur Vibrating Alert jack RINGER PITCH (Prise pour (HIGH/LOW) alerte par vibration) Neckloop jack (Prise pour appareil Neckloop) 10 LINE jack (Prise pour ligne téléphonique) (VUE DE Côté)
Installation du Téléphonique Installation des Piles de Secours AVERTISSEMENT: Débranchez le cordon téléphonique de la prise murale avant d’installer ou de remplacer les piles. En cas de coupure de courant, le téléphone utilise quatre piles alcalines AA comme source d’alimentation de secours pour les fonctions d’amplification de la voix et de sonnerie visuelle. 1. Débranchez l’adaptateur d’alimentation et le cordon téléphonique avant d’installer les piles. 2.
REMARQUE: Retirez les piles avant d’entreposer cet appareil pendant plus de 30 jours afin d’éviter les dommages causés par des piles qui coulent. Raccordement de la Ligne Téléphonique REMARQUE: L’appareil est expédié de l’usine pour installation sur une surface plane. 1. Choisissez en endroit près d’une prise électrique murale et d’une prise de téléphone modulaire (RJ11C); placez le téléphone sans fil sur une surface de niveau, comme un bureau ou une table, ou installez-le sur le mur. 2.
ATTENTION: Pour réduire le risque de blessure, d’incendie ou de dommage matériel, n’utilisez que l’adaptateur 5-2734 mentionné dans le guide de l’utilisateur. Cet adaptateur de courant doit être correctement placé en position verticale ou monté sur le sol. 5. Vous pouvez déplier la béquilles située sous la base pour obtenir un meilleur angle de vision lorsque celle-ci est placée sur un bureau. 6. Branchez une des extrémités du cordon extensible du combiné à la prise du combiné. 7.
Installation sur un Mur 1. Branchez l’adaptateur d’alimentation CA dans une prise électrique murale et la sortie CC dans la prise située à l’arrière de la base. 2. Branchez une extrémité du cordon téléphonique dans la prise sous la base. 3. Refermez les béquilles sous la base si vous les avez dépliées. 4. Insérez le cordon téléphonique dans la rainure et branchez l’extrémité dans la prise téléphonique modulaire. 5.
Fonctionnement du Téléphone Haut-Parleur Cet appareil est doté d’un haut-parleur pour converser facilement à mains libres. Pour obtenir le meilleur rendement de haut-parleur possible, évitez ce qui suit : • Endroits à bruit de fond élevé. (Le microphone peut capter ces bruits et empêcher le haut-parleur de passer en mode réception quand vous avez fini de parler.) • Les surfaces sensibles aux vibrations.
Faire un Appel Combine 1. Décrochez le combiné et attendez le signal de manœuvre. 2. Composez le numéro désiré. 3. Quand vous avez terminé, raccrochez le combiné. Haut-Parleur 1. Appuyez sur le bouton SPEAKER de la base et attendez le signal de manœuvre. 2. Composez le numéro désiré. 3. Quand vous avez terminé, appuyez sur le bouton SPEAKER pour raccrocher. Repondre a un Appel REMARQUE: Assurez-vous que le sélecteur RINGER est à HI ou à LO, sans quoi le téléphone ne sonnera pas. Combine 1.
Vous pouvez passer du haut-parleur au combiné, et vice versa, pendant la composition ou en tout temps durant une conversation. Haut-parleur à combiné - Décrochez le combiné pour désactiver le haut-parleur. Le voyant de haut-parleur s’éteint. Combiné à haut-parleur - Appuyez sur le bouton SPEAKER, puis raccrochez le combiné. Le voyant de haut-parleur s’allume et le combiné est désactivé. Volume Vous pouvez commander le volume du récepteur du combiné et du haut-parleur.
Amplification du Volume Vous pouvez appuyer sur le bouton amplify pour augmenter temporairement le volume du combiné pendant un appel. Pour revenir au niveau normal, appuyez à nouveau sur cette touche. Le niveau de volume revient à la normale lorsque le combiné est replacé sur la base après un appel. Le bouton “AMPLIFY” contrôle l’amplification du volume et l’égalisateur du combiné. 1.
AVERTISSEMENT: Cet appareil est fait pour les utilisateurs souffrants d’une perte auditive et amplifie le volume à son niveau le plus élevé automatiquement lorsque l’interrupteur d’amplification du volume est à la position “ON”. Si vous désirez empêcher l’amplification automatique, veuillez glisser l’interrupteur d’amplification du volume situé à l’arrière de l’appareil à la position “OFF”.
Neckloop Cet appareil est aussi muni d’une prise Neckloop de 3,5 mm pour le branchement d’un appareil Neckloop optionnel (acheté séparément). Lorsque l’appareil Neckloop est branché, le signal audio de l’émetteur du combiné sera transféré à l’appareil Neckloop. L’émetteur du combiné n’émettra aucun son. REMARQUE: Le branchement d’un appareil Neckloop ne modifiera pas le fonctionnement du haut-parleur de la base ou le microphone du combiné.
Flash Appuyez sur le bouton FLASH pour activer les services d’appel personnalisés, comme l’appel en attente ou le renvoi d’appel, offerts par la compagnie de téléphone. Recomposition Vous pouvez recomposer le dernier numéro appelé en appuyant sur le bouton REDIAL après le signal de manœuvre. REMARQUE: La fonction Recomposition garde en mémoire le dernier numéro de téléphone composé (jusqu’à 32 chiffres).
Mémoire Vous pouvez mémoriser jusqu’à 7 numéros pour faciliter la composition. Vous pouvez enregistrer trois numéros dans les emplacements de numéros d’urgence et quatre dans la mémoire à une touche au haut de la base. Vous pouvez utiliser l’espace offert pour écrire le nom de vos contacts ou coller des images pour les reconnaître facilement. Mémorisation d’un Numéro 1. 2. 3. 4. 5. Décrochez le combiné ou appuyez sur SPEAKER. Appuyez sur le bouton STORE.
Appuyez et gardez enfoncée le bouton #pause au moment où une pause est nécessaire dans la séquence de composition. La pause dure environ quatre secondes; si elle doit durer plus longtemps, appuyez et gardez enfoncée le bouton #pause à nouveau. Remplacement D’un Numero Memorise Suivez les mêmes étapes que la rubrique “Enregistrement d’un numéro dans la mémoire”. Les nouveaux numéros effacent les numéros existants.
Guide de Depannage Aucun signal de manœuvre. • Vérifiez ou répétez les étapes d’installation: Le cordon téléphonique est-il branché dans la base et la prise téléphonique modulaire? • Vérifiez l’interrupteur-crochet. Ressort-il complètement quand vous décrochez le combiné du socle ? • Vous devez être abonné au service de composition par tonalité pour utiliser cet appareil. Si vous ne savez pas à quel genre de service vous êtes abonné, vérifiez avec la compagnie de téléphone.
Le téléphone ne sonne pas • Assurez-vous que le sélecteur de sonnerie est à HI ou LO. • Il y a peut-être trop de postes sur la même ligne. Débranchez quelques postes téléphoniques. • Vérifiez s’il y a un signal de manœuvre. S’il n’y a pas de signal de manœuvre, consultez les solutions pour “Aucun signal de manœuvre”. Volume de combiné ou de haut-parleur faible • Vérifiez les réglages de volume du récepteur ou du hautparleur.
Soins et Entretien Voici quelques conseils simples pour préserver le bon fonctionnement et l’apparence de ce téléphone: • Éviter de placer le téléphone près d’un appareil de chauffage ou d’un appareil produisant du bruit électrique (ex. : moteurs, lampes fluorescentes, etc.). • Ne pas exposer le téléphone directement au soleil ou à l’humidité. • Éviter d’échapper l’appareil et de le manipuler violemment. • Nettoyer le téléphone avec un chiffon doux.
Garantie Thomson Digital Technologies Ltd., garantit à l’acheteur de cet appareil ou à la personne qui le recevrait en cadeau, que si cet appareil présente un défaut de fabrication pendant l’année suivant la date d’achat, il sera remplacé sans frais. Les frais de transport de retour sont payés. Cette garantie ne couvre pas les dommages attribuables aux accidents, à une mauvaise utilisation ni à des piles qui fuient. Si cet appareil ne fonctionne pas convenablement pendant qu’il est sous garantie: 1.
Joindre le reçu de caisse à ce guide pour référence ultérieure. Cette information pourrait être demandée s’il faut faire réparer l’appareil pendant qu’il est sous garantie.
Information pour Accessoires DESCRIPTION Alerte par Vibration Adaptateur CA No. PIÉCE 5-2810 5-2784 Pour commande, appelez le distributeur le plus proche pour votre secteur; Ontario: (905) 624-8516 Manitoba: (204) 783-2088 British Columbia: (604) 438-8001 Quebec: (514) 352-9071 Des frais d’expédition et de manutention seront ajoutés au montant de la commande. Nous sommes tenus par la loi de percevoir la taxe de vente appropriée pour chaque province dans laquelle la marchandise est expédiée.
Index A Ajout de Pause a la Sequence de Composition 22 Alerte par Vibration 20 Amplification du Volume 18 Avant de Commencer 7 C Combine 16 Compatibilité avec les Prothéses Auditives 4 Composition D’un Numero Memorise 23 Composition Des Numéros D’Urgence 23 F Facteur D’équivalence de Sonnerie 4 Faire un Appel 16 Flash 21 Fonctionnement du Téléphone 15 G Garantie 27 Guide de Depannage 24 H Haut-Parleur I 15, 16 Importantes Lignes Directrices sur L’installation 8 Information Importante E sur
Index Installation des Piles de Secours 11 Installation du Téléphonique 11 Installation sur un Mur 14 Introduction 5 Renseignements Importants 2 Renseignements sur L’interférence 3 Repondre a un Appel L Soins et Entretien 26 Sourdine 20 Liste de Piéces 7 M Mémoire 22 Mémorisation d’un Numéro 22 N Neckloop 16 S V Volume 17 Vue Arrière et de Côté 10 20 P Présentation de la Base 9 R Raccordement de la Ligne Téléphonique 12 Recomposition 21 Remplacement D’un Numero Memorise 23 31
Modèle 29578 00019316 (Rév. 0 CAN E/F) 07-31 Imprimé en Chine Thomson Digital Technologies Ltd. © 2007 Thomson Digital Technologies Ltd.