
Operation Manual


21
GB
If two freezers or a freezer and a refrigerator are
placed side by side, there must be at least 2 cm
clearance between them.
If the appliance is not built in but positioned with
its door hinge side against a wall, there should be
at least 5 cm between the appliance and the wall
in order to allow the door to open easily.
The freezer must not be laid horizontally while
being transported or moved. If the appliance has
been tilted more than 40°, the power supply must
not be connected until the appliance has stood
upright for at least two hours.
The appliance is intended for connection to alter-
nating current. The connection values for voltage
(V) and frequency (Hz) are given on the nameplate
in the cabinet.
Power must be connected via a wall socket with
switch. The wall socket should be easily acces-
sible.
All earthing requirements stipulated by the local
electricity authority must be observed. The appli-
ance plug and wall socket should then give correct
earthing. If in doubt, contact your local supplier or
an authorised electrician.
WARNING
The exible cord (mains lead) tted to this appliance
has three cores for use with a 3-pin 13-amp or 3-pin
15-amp plug. If a BS 1363 (13-amp) fused plug is
used, it should be tted with a 13-amp fuse.
IMPORTANT
The cores in this mains lead are coloured in ac-
cordance with the following code:
GREEN-AND-YELLOW: EARTH
BLUE: NEUTRAL
BROWN: LIVE
These colours might not correspond with the colour
markings identifying the terminals in your plug.
Proceed as follows:
Connect the GREEN-AND-YELLOW core to the
plug terminal marked “E” or by an earth symbol, or
coloured GREEN or GREEN-AND-YELLOW. Con-
nect the BLUE core to the plug terminal marked “N”
or coloured BLACK. Connect the BROWN core to
the plug terminal marked “L” or coloured RED.
3
Electrical connection
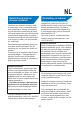
4
You can change the
door from right-hinged
to left-hinged or vice
versa yourself
5
Illustration shows how easy it is to change the
door from right-hinged to left-hinged - or vice versa.
Take off the table top by removing two screws at the
front of the cabinet and three at the back.
Lay the appliance on its back with the door up.
Remove the door handle.
Unscrew the adjusting screws and take the
brackets off.
Remove the door.
Take off the upper hinge bracket and ret it on the
opposite side of the cabinet.
Replace the door.
Move the pin on the hinge bracket to the other
threaded hole before retting the hinge brackets
on the opposite lower side of the cabinet.
Remember to replace the shim washer on the
hinge pin.
Ret the adjusting screws and the door handle.
Replace the table top.
Specically for Fresh line models 5A
Switch the cabinet off by turning the thermostat
knob to ”0”. Empty the cabinet and begin by
removing the door handle. Tilt the cabinet 40°
in order to gain access to the lowest hinge.
Remove the adjustable feet. Remove the three
screws holding the lowest bracket in place using
a Phillips screwdriver. (1). Remove the door
and unscrew the three screws from the bracket
on the base on the cabinet (2).