2.66” CORR UGA TION WINDING CORRUGA UGATION ST AIR STAIR Installation Manual 15' to 60' Diameter Bins See other details: Appendix A - 90' to 105' Diameter Bins Appendix B - 75' to 78' Diameter Bins Appendix C - 60' to 72' Diameter Bins PNEG-1177 Date: 04-01-06 PNEG-1177 1004 East Illinois Street Assumption, IL 62510-0020 PHONE: (217) 226-4421 FAX: (800) 800-5329 PNEG-1177 2.
Page 2 of 16 2.
Table of Content CONTENTS CONTENTS 2.66" Winding Stair Installation ..................................................................................... 4 Installing Wall Brackets ......................................................................................... 5 Installing Horizontal Step Brackets and Wall Brace .............................................. 6 Installing Platform Mounting Brackets and Platform ............................................. 7 Step Assembly ........................
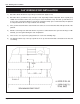
2.66" Winding Stair Installation 2.66" WINDING STAIR INSTALLATION 1) Determine which direction the steps will go around the bin. (Right or Left) 2) Determine where you want the steps to begin or end, depending on what is important. Each step will go up 10.666" and around the tank 9 3/8" (one bolt space on the horizontal seam). The 2.66" system will have 3 steps per ring. The platform will then cover 56.25" around the tank (6 spaces around the tank).
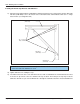
2.66" Winding Stair Installation Installing Wall Brackets : 7) The wall brackets (LDR-4082) are to be mounted to the sidewall using horizontal seam bolts. The top wall bracket mounts to the horizontal seam in the hole shown (see diagram). Mount the bracket on the horizontal seam bolt directly below the left side of the roof steps if the steps go to the left or below the center of the manway if the steps will be mounted to the right of the platform.
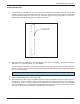
2.66" Winding Stair Installation Installing Horizontal Step Brackets and Wall Brace: 11) Attach the horizontal wall bracket (LDR-4083) to wall bracket with (2) 3/8 x 1" flange bolts and nuts. Attach the wall brace(LDR-4084) to the to the bottom of the horizontal bracket and wall bracket with 3/8" x 1" flange bolts and nuts.
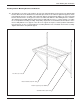
2.66" Winding Stair Installation Installing Platform Mounting Brackets and Platform: 14) The platform is to be at the same height as the top of the horizontal bracket in the top ring. The platform wall brackets will need to be field drilled to accommodate placement. Preassemble the platform support as shown in the diagram. Place the assembly on the tank wall, align the horizontal angle with the top of the horizontal bracket, mark the 4 holes evenly spaced, remove assemble and drill holes.
2.66" Winding Stair Installation 15) Attach the platform decking with 5/16" x ¾” bin bolts and nuts. 16) Attach the handrails as shown in the diagram. Handrail (TDP-5002)-30” Platform Vertical Angle (LS-371) Handrail (LS-6702) Vertical Entrance Angle (LS-6621) Platform Floor (LS-6703) Platform End Toe Plate (TDP-5011) Page 8 of 16 2.
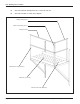
2.66" Winding Stair Installation Step Assembly 17) The ends of the steps are bolted to the step body with 5/16" slot truss bolts and flange nuts. The ends are bolted under and behind the step body. Tighten all 8 bolts after they are all in place and assemble all of the steps. NOTE: Some of these bolts will need to be removed for attaching the step to the horizontal bracket. The front inside bolt may need to be removed if it interferes with the horizontal bracket or the step under it.
2.66" Winding Stair Installation Step Mounting Holes (Bin side) Step Mounting Holes (handrail side) See Appendix A, B & C for 60' to 105’ Diameter Bins Base Strap Mounting Holes Reference the diagram to determine which hole/slot combination you should use to position the step. The location of the bolt within the slot will vary according to the diameter of the bin. Use the 5/16" x ¾” truss head bolts and flange nuts to attach the steps with one bolt through the top tab into the step above.
2.66" Winding Stair Installation 20) After the braces are installed, level each step and tighten all the bolts between the steps and in the braces. As you tighten, adjust the steps in the slots to curve with tank. 21) Continue raising the tank and adding wall brackets. Add three steps for each ring. Handrail Posts and Handrail 22) Attach the handrail posts to the end of the horizontal bracket with (2) 3/8" X 1" flange bolts and nuts. Make sure the post is plumb and tighten the bolts. PNEG-1177 2.
2.66" Winding Stair Installation 23) Each top handrail piece is set up to slide inside or over the one above it. Attach the upper handrail to the posts using a 5/16" x 1 ¼” bin bolt and nut. Put the bolt head on the inside of the stairs and loosely attach the nut. Continue adding stair sections and handrail. When all of the top handrail is in place, begin leveling the posts and tightening the handrail bolts from the top down. The tank diameter will determine where in the slot the bolt will be located.
2.66" Winding Stair Installation 25) Bolt the intermediate handrail in place near the middle of the post with 5/16" x 3/4" bolts and flange nuts. Install the larger end of the telescoping tubes toward the top to keep moisture from running in the tube. The length of each piece may need to be shortened in the top section and bottom section. Intermediate Handrail mounting hole PNEG-1177 2.
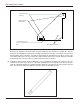
Appendix A Appendix A Holes / slots to be used to position the steps for a 90' to 105' bin. Step mounting holes (handrail side) Step mounting holes (bin side) Page 14 of 16 2.
Appendix B Appendix B Holes / slots to be used to position the steps for a 75' to 78' bin. (handrail side) Step mounting holes (bin side) PNEG-1177 2.
Appendix C Appendix C Holes / slots to be used to position the steps for a 60' to 72' bin. Step mounting holes (handrail side) (bin side) Page 16 of 16 2.