
Service Manual User guide

ASSEMBLY OF POWER ASSIST SECTION. Use only hydraulic oil in Power Assist Section.
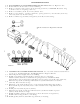
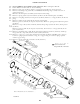
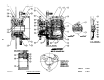
Use Repair Kit No. 02-400-059. Refer to Figures 20 & 23.
Clean all parts thoroughly before assembling.
Install valve stem (item 41) and spring (item 42) in housing.
Install o’ring or copper ring (item 43) on plug (item 44). NOTE: If an o’ring was found
on plug replace with an o’ring, if a copper ring was found on plug replace with a cop-
per ring.
Lubricate cup seal (item 37) with type fluid used in system. Install these parts
in housing (item 35) in this order: steel washer (item 36), cup seal (item 37),
teflon back-up ring (item 38), brass washer (item 39) and retaining ring (item 40).
Note direction of seal.
Lubricate o’ring (item 28) with type fluid used in system and install on piston
(item 29).
Install piston (item 29) on piston (item 25) between the two v-cup seal slots.
Note direction of piston (item 29).
Lubricate back-up rings (items 23 & 427) and v-cup seals (items24 & 26) with type fluid
used in system and install on piston (item 25). Note direction of seals.
Install spring (item 30) on piston (item 25).
Install piston (item 31) over spring (item 30) and piston (item 25).
Install retaining ring (item 34) on piston (item 25).
Lubricate o’ring (item 22) with type fluid used in system and install on end plug
(item 21).
Install end plug assembly (items 21 & 22) on piston (item 25).
Install retainer (item 32) over piston (item 31) and install spring (item 33)
over retainer (item 32).
Install entire internal parts assembly (item 45) into housing bore. Use a twisting
motion when inserting end of piston (item 25) through cup seal (item 37).
Install retaining ring (item 20) in housing (item 35).
Install boot (item 19) on end plug (item 21) and push rod (item 18) into boot,
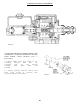
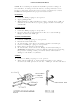
CONNECTING CYLINDER RESERVOIR SECTION TO POKER ASSIST SECTION AND MOUNTING BRAKE
VALVE ON VEHICLE. Refer to Figures 20 & 21.
Attach cylinder Reservoir Section to Power Assist Section with three cap screws
and three lockwashers.
Install unit on vehicle. Connect push rod. Connect fluid lines. Bleed system of
air. Tighten fittings if leaks should occur. Make several applications to be sure
Brake Valve is working properly.
5 . 0
5 . 1
5 . 2
5 . .3
5 . 4
5 . 5
5 . 6
5 . 7
5 . 8
5 . 9
5 . 10
5 . 11
5 . 12
5 . 13
5 . 14
5 . 15
5 . 16
6 . 0
6 . 1
6. 2
23