
Service Manual User guide
Mixing parts of one type rim with those of
another is potentially dangerous. Always
check DOT chart or manufacturer for
approval.
Don’t reinflate a tire that has been run flat
without first inspecting the tire, tube,
flap, rim and wheel assembly. Double
check the side ring, flange, bead seat, lock
ring and “O” ring for damage and make
sure that they are secure in the gutter
before inflation.
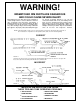
MOUNTING AND INFLATION:
Don’t try to seat rings or other compon-
ents by hammering while tire is inflated
or partially inflated.
Double check to make sure all components
are properly seated prior to inflation.
Inflate in a safety cage or use safety chains
during inflation.
Don t inflate tire before all components
are properly in place. Place in safety cage
and inflate to approx. 10 psi, recheck com-
ponents for proper assembly. If assembly
is not proper, deflate and correct. Never
hammer on an inflated or partially inflated
tire rim assembly. If assembly is proper
at approx. 10 psi, continue to inflate to
fully seat the tire beads. Then completely
deflate the tire to prevent localized over
stretching of tube. Reinflate to recom-
mended operating pressure.
Never sit on or stand in front of a tire and
rim assembly that is being inflated. Use a
clip on chuck and make sure inflation hose
is long enough to permit the person inflat-
ing the tire to stand to the side of the tire,
not in front or in back of the tire assembly.
Follow tire and rim manufacturer’s rec-
ommended mounting, demounting inflat-
ing and deflating procedures for tires and
rims.
Don’t hammer on rims or components with
steel hammers. Use rubber, lead, plastic or
brass faced mallets if it is necessary to tap
components together.
SERVICING TIRE AND RIM
ON VEHICLE:
Don’t try to drive an assembled or par-
tially assembled tire and rim over a cast
spoke wheel by hammering. Stop - deflate
and examine to determine the reason for
the improper fit. Look for distortion or to
components that are not properly locked
or seated.
Block the tire and wheel on the opposite
side of the vehicle before you place the
jack in position.
Regardless of how hard or firm the ground
appears, put hardwood blocks under the
jack. Always crib up vehicle with blocks
just in case the jack should slip.
OPERATION:
Don’t use undersized rims. Use recom-
mended rim for tire. Check Goodyear/
Motor Wheel catalogs for proper tire/rim
matching.
Don’t overload or over-inflate tire/rim
assemblies. Check your rim manufacturer
if special operating conditions are
required.
Never run a vehicle on one tire of a dual
assembly. The carrying capacity of the
single tire and rim is dangerously ex-
ceeded and operating a vehicle in this
manner can result in damage to the rim
and tire.
ADDITIONAL NOTES APPLYING
TO EARTHMOVER RIMS:
Use caution when removing heavy earth-
mover rim components. Use mechanical
aids. This will help protect you from
injury.
Demounting tools apply pressure to rim
flanges to unseat tire beads. Keep your
fingers clear. Always stand to one side
when you apply hydraulic pressure (if
the tool slips off, it can fly with enough
force to cause severe bodily injury or
death).
When using a cable or chain sling, stand
clear; it might snap and lash out.
Never attempt to weld on an inflated tire/
rim assembly or on a rim assembly with a
deflated tire.
Wall charts containing mounting and de-
mounting instructions for all Goodyear
off-highway rims are available through
your Goodyear rim supplier. Ask for
“OFF-HIGHWAY RIM MOUNTING AND
DEMOUNTING CHART SET NO
EM73-2154". This set contains four charts
covering all Goodyear off-highway rims.
!
!
!
!
!
!
!
!
!
!
!
!
!
!
!
!
!
!
13