
User's Manual


9-1
42000Modu-Flo
®
System
R
OPERATION AND
SERVICE INSTRUCTIONS
Modu–Flo®
System
SECTION 9
SYSTEM OPERATION
9.1 GENERAL ................................................................. 9-1
9.2 SYSTEM INFORMATION ........................................... 9-1
9.2.1 System Setup ................................................ 9-1
9.2.2 System Filling ................................................ 9-1
9.2.3 System Bleeding ........................................... 9-1
9.2.4 System Start-up ............................................. 9-1
9.3 OPERATING TIPS ..................................................... 9-1
9.3.1 General .......................................................... 9-1
9.4 MATERIAL CONSIDERATIONS ................................. 9-2
9.4.1 Material Cleanliness ..................................... 9-2
9.4.2 Temperature Effects ...................................... 9-2
9.1 GENERAL
9.1.1 This section describes operating procedures for a
Modu-Flo System. Detailed descriptions of the system
components are covered in Sections 1 through 8.
9.2 SYSTEM INFORMATION
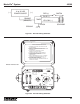
9.2.1 System Setup.
9.2.1.1 Before attempting to operate any system, check the
following:
a. Check that the reservoir or tank is securely fastened to
a vertical surface. Make sure that the fill cup or grease-
fill fitting may be easily reached.
b. Check that the manifold is securely connected to the
base of the reservoir or tank. If a remote manifold is
used, make sure it is securely fastened to a vertical
surface, and tubing or hose is connected from the
reservoir to the manifold inlet.
c. Check that the pump is securely fastened to the
manifold.
d. Check all electrical connections to any solenoids,
controllers, level switches or pressure switches used
on the system.
e. Check that all accessories plumbed into the manifold
are secure. Make sure all hose or tubing connections
are tight.
9.2.2 System Filling. The reservoirs or tanks should be
filled as described in Section 2 of this manual. To fill the
remainder of the system, attach a hand pump to the system
fill check valve on the manifold and cycle the hand pump
until the system is filled.
9.2.3 System Bleeding. Proper filling of the system will
reduce the chance of air entrapment. The manifold/pump
assembly still must be bled to remove air which will be
trapped inside the pump. To do this, loosen the setscrew in
the TEST port while the pump is in the dispense stroke.
Tighten the setscrew before the pump reloads. Lubricant
should come out of the vent hole when the pump is dis-
pensing. Cycle the pump several times until air-free
lubricant is dispensed out of the bleed hole, then tighten the
setscrew.
9.2.4 System Start-up. Before starting any system, make
sure that all filling and bleeding steps have been com-
pleted. Refer to Bulletin 30103 for filling and bleeding a
series progressive system. Check the pneumatic or
hydraulic inlet pressure and verify that it is adjusted correctly.
The actual setting will vary from system to system depend-
ing on type of lubricant used and other system variables.
The correct pressure for any particular system will be
determined during initial setup of the system and should not
need to be changed.
9.2.4.1 Check the output of the lubricant pump. Adjust the
output as described in Section 3 of this manual.
9.2.4.2 The system is now ready to run. The pump is
cycled by an external source, such as a timer, counter,
control package, or customer-supplied directional valve.
Once this external source is engaged, the system will cycle
as programmed.
9.3 OPERATING TIPS
9.3.1 General. While the system is operating the
following components may be checked:
9.3.1.1 Check that the pump is cycling according to
schedule. The solenoid or directional valve which operates
the pumps should be actuated by the system controller.
9.3.1.2 Visually check the system for leaks and loose
fittings. Make sure that hoses do not become kinked and
are not rubbing on anything.