
manual


12
See images -
Front Tube
Rear Tube
See images -
See images -
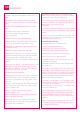
Use slide adjuster at shoulder and waist for
further adjustment. Repeat on other side.
When changing harness strap slots,
MAKE SURE harness straps are going through
same slots in seat pad.
The harness straps must go into the slot that
is even with or slightly above the shoulders.
Avoid twisting straps.
Assembling Product
Attaching Tray
To Secure Child
To Adjust Recline
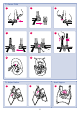
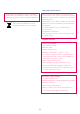
Place feet with the text “FRONT” onto the front
tube as shown. The text “FRONT” should face
floor.
Secure front foot with screw. Repeat on other side.
Snap front tube onto swing legs. CHECK that all
tubes are securely attached.
See image
Place feet with the text “REAR” onto the rear
tube as shown. The text “REAR” should face floor.
Secure foot with screw. Repeat on other side.
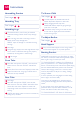
Snap hangar tubes into brackets on each side of
housing.
CHECK that hangar tubes are secure in brackets by
pulling firmly on them.
Head Support
Only use this head support on this swing. Never
use this head support on any other product.
Starting Product
WARNING: avoid serious injury from falling or sliding
out. Always use harness. After fastening buckles, adjust
belts to get a snug fit around your child.
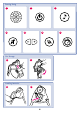
TO TURN PRODUCT ON:Press On /Off button or
press any speed from 1 to 6. When pressing On/Off
button, it automatically starts with the last speed setting
that was selected before the product was turned off.
Observe the swinging motion for a minute. It takes
time for the product to adjust to a setting. Change
setting if needed.
A small, quiet baby will swing higher on each setting
than a larger, more active baby.
Your seat may be stopped at any time the motor is
running without damaging the motor. Push product to
restart.
If your product motor stops operating by itself, a
protective device may have been activated. Turn off
motor, wait three minutes, then restart swing.
TO TURN PRODUCT OFF: Press On /Off button.
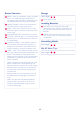
Attaching Legs
The double buttons must fit into the channels
inside the housings. Button MUST snap through
hole.
Insert rear legs into holes in housing as shown.
Button MUST snap through hole.
REPEAT steps 10 through 12 with other housing
and legs.
See image
Swing the legs outward until the single button snaps
into its notch. CHECK that the legs are properly
attached by twisting them in the housings.
See images
-
See images -