
Safety Instructions
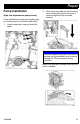
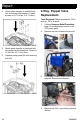


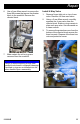
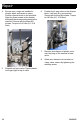
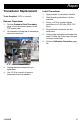
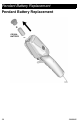
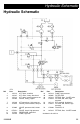
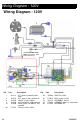
Table Of Contents
- Contents
- Models
- Warnings
- Component Identification
- Grounding
- Pressure Relief Procedure
- Setup
- Operation
- Display
- Manifold Assembly Parts
- Motor Assembly Parts
- Control Box Parts - 120V
- Control Box Parts - 230V
- Technical Specifications
- Compliance
- Graco Standard Warranty
- Graco Information
- Maintenance
- Troubleshooting
- Repair
- Pendant Battery Replacement
- Hydraulic Schematic
- Wiring Diagram - 120V
- Wiring Diagram - 230V
- Renegade TSP Torque Series Pump Parts

Repair
3A6884B 33
5. Lift the black solenoid to gain clearance
to the 7/8 in. hex on the body of the
poppet valve. Loosen and remove.
6. Install new solenoid valve without the
new 3/4 in. top retaining nut.
7. Torque the 7/8 in. hex to 19-21 ft. lbs
(25.8-28.5 N•m).
8. Reinstall the top 3/4 in. retaining nut,
torque to 4-5 ft. lbs (5.4-6.8 N•m).
9. Reconnect the terminal and tighten
Phillips head screw.
10. Reinstall shroud and top half of frame.
Pressure Set Valve
Replacement
Tools Required: 1-1/16 in. wrench.
1. Perform Pressure Relief Procedure,
page 10 and disconnect power to the
TSP power pack.
2. Use a 1-1/16 in. wrench to loosen.
3. Remove plastic protective cap from new
valve. Ensure washer remains on new
valve.
4. Screw in new valve by hand. Tighten to
57-61 ft. lb (77.2-82.7 N
•m).
Pressure Relief Valve
Replacement (1,500 and
12,000 PSI)
Tools Required: 16 mm wrench.
1. Perform Pressure Relief Procedure,
page 10 and disconnect power to the
TSP power pack.
2. Loosen and remove valve with 16 mm
wrench.
3. Replace new valve and torque to 50-55
ft. lbs (67.8-74.6 N
•m).
1,500 psi relief valve shown