
User's Manual


Installation and Setup
14 3A0418E
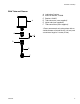
Activation
A Intended breaking point
B Seal
C Gas generating pellet
D Top ring
Activate the lubricator prior to installation.
For the following instructions, unless otherwise
instructed, refer to FIG. 8.
1. Verify the activator screw contains the gas
generating pellet.
2. Hold the lubricator with the plug end facing
down.
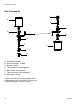
3. Screw the correct activator for your applica-
tion into the bottom of the lubricator and
hand tighten (F
IG. 9). (See page 13 for acti-
vator options and/or Parts, page 18).
4. When the activator is screwed in hand
tight, insert a suitable tool through the top
ring (D). Continue to tighten the activator
until the ring breaks off at the intended
breaking pint (A) (F
IG. 10).
DO NOT BREAK RING OFF BY HAND!
5. Shake the lubricator and listen for the pellet
rattle inside the canister to insure that the
gas generating pellet (C) (F
IG. 8) has fallen
from the activator into the bladder. This
starts the chemical dispensing reaction that
builds up pressure (up to 4 bar / 58 psi) and
causes the piston to move forward.
6. Write the installation and replacement
dates on the lubricator.
NOTE: Once a lubricator is activated, the dis-
charge period cannot be changed. Do not
remove the activator from the lubricator at any
time.
FIG. 8
FIG. 9
A
B
C
D
FIG. 10
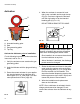
Do not puncture, open or take canister apart.
Opening or breaking the canister will expose
users to the fluid and gases stored inside.
• Once installed, do not remove the activator
from the lubricator at any time.
• After a lubricator is activated, the discharge
period cannot be changed.
A
D