
User's Manual


Changing the Lubrication Canister
20 3A0417D
Changing the Lubrication
Canister
When the red and green LED light up at the
same time, the lubrication canister is empty
and should be replaced.
Removing Lubrication Canister
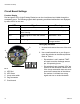
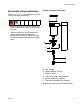
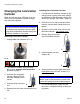
1. Unplug cable from lubricator (FIG. 9).
2. To disconnect adapter from lubrication
point, follow pressure relief procedure
provided on page 9.
3. Unscrew and completely
remove adapter (B) from
lubricator. Adapter will be
reused.
4. Unscrew cover from drive
unit.
5. Remove drive unit from the lubrication con-
trol.
Installing New Lubrication Canister
1. If a different size lubrication canister or dis-
charge period is going to be used, change
dip switches to reflect the new canister size
and/or time change. See Table 1, page 13.
2. Place drive unit on top of new lubrication
canister until the teeth of both pieces are
locked.
3. Screw the cover of the drive unit onto the
lubrication canister - hand tighten only.
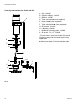
4. Remove plug (A) from bot-
tom of lubrication canister.
5. Install lubricator unit into
adapter (B).
6. Screw lubricator into the lubrication point -
hand tighten only
. DO NOT screw it in a
second time.
7. For oil filled lubricators, make sure the
lubricator is installed vertically (outlet point-
ing down).
NOTICE
The drive unit and circuit board must always
be protected from moisture to prevent dam-
aging these components. Always change the
lubrication canister in a dry place.
FIG. 9
B
NOTICE
Never screw in the lubricator a second time
or the self-sealing threads will be damaged.
A
B