
User's Manual


Prime/Purge
52 3A0294G
Prime/Purge
1. Follow Pressure Relief Procedure on page 51.
2. Priming only: replace pail of material if necessary.
3. Remove the spray tip and tip guard from gun or
remove the nozzle from the dispense valve.
4. Flushing only: If desired, remove built-in fluid filter
(present on some models). Reinstall filter cap after
removing fluid filter.
5. Place pump in material (if priming) or solvent (if
flushing).
6. Turn air regulator to 0 psi.
7. Open the manual shutoff valve(s).
8. Perform a manual purge.
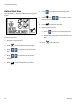
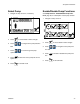
a. Change to manual mode in the run screen. See
Change Operation Mode, page 62.
b. Place a drain tube in a grounded waste pail.
Open drain/purge valve slightly by rotating
counterclockwise.
c. Increase pressure on the air regulator until the
pump begins to move. Run the pump until no air
is released from the drain/purge valve or until
clean solvent flows from the drain tube. Close
drain/purge valve by rotating clockwise. The
pump will stall.
9. Prime or purge hose and gun/valve.
a. If necessary, change to manual mode in the run
screen. See Change Operation Mode, page
62.
b. Hold a metal part of the gun/valve firmly to the
side of a grounded metal pail.
c. Press and hold or step on the foot
switch (purchase separately) until all air in the
hose is purged
10. If priming, the system is now ready to dispense; go
to Dispense a Shot, page 65.
If flushing, follow the Operation on page 62; leave
the solvent in and store the equipment.
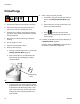
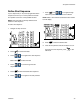
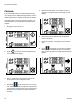
FIG. 103: Flush with Solvent
+
Drain/Purge
Valve