
User's Manual


System Setup
20 3A0260H
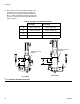
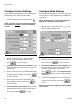
Configure Control Settings
Set the controls for the dispense source, how dispense
commands are sent, and auto mode settings.
1. From the Home screen, select the Setup icon
.
NOTE: The Setup screens are password protected.
Enter password “PGM10
”to access the following
screens.
2. Press the drop-down list for Command Value
Source and select Display or Remote. Press
Enter to confirm selection.
3. If Command Value Source is set to Remote, enter
the Remote Max Flow (cc/min) for the 10 VDC com-
mand source.
4. Press the drop-down list for Run Mode Bead Adjust
and select Enable or Disable. Press Enter
to confirm selection.
5. Press the drop-down list for Job End Mode and
select Display or Remote. Press Enter to
confirm selection.
6. If Job End Mode is set to Display, press Job End
Delay Display field and enter desired delay time in
seconds. Press Enter to confirm.
Configure Mode Settings
Set the dispense mode (bead or shot). The bead scale
and pre-charge are also adjustable from the Mode Set-
tings screen.
NOTE: See Appendix A - User Interface Display on
page 81 for a description of each feature.
1. With the system in setup mode,
press
to navi-
gate to the Mode Settings screen.
2. Press the drop-down list for Mode. Select Bead or
Shot. Press Enter to confirm selection.
3. If Command Value Source is set to Display, press
the drop-down list for Fixed Command Flow Rate
then enter the flow rate in cc/min. Press
Enter to confirm. See Configure Control
Settings for instructions to set the Command Value
Source value.
4. If Shot Time is displayed, press the drop-down list
for Shot Time in Seconds. Press Enter to
confirm.
NOTE: Shot Time is only displayed if Dispense Mode
is set to Shot.
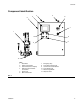
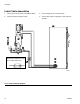
F
IG. 11
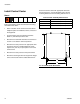
FIG. 12