
User's Manual


Repair
3A0238P 31
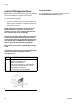
Install Motor
See FIG. 27 and FIG. 28.
1. Install motor coupler (202) onto motor (201). Apply
thread sealant to threads of screw. Torque motor
coupler set screw to 15 ft-lb (20.3 N•m).
NOTE: The coupler (202) must be 1.67-1.68 in. from
the face of the motor.
2. Apply thread sealant to threads of four socket head
cap screws (205). Use four screws (205) to attach
the motor adapter plate (203) to motor (201). Torque
to 90 ft-lb (122 N•m).
3. Use four hex head cap screws (244) to attach the
accumulator (242) and mounting plate (240) to
motor (201). Apply thread sealant to threads of
screw. Torque to 35 ft-lb (47 N•m).
4. Install spider coupler (213) into motor coupler (202).
5. Apply thread sealant to threads of four socket head
cap screws (204). Use four screws (204) to attach
the hydraulic housing (206) to the motor adapter
plate (203). Torque to 35 ft-lb (47 N•m).
NOTE: Be sure to align teeth of the pump coupler
(212) with the teeth of the motor coupler (202).
6. Connect the tube assembly (247) to the applicator
housing (206) and the accumulator (242). Torque to
1-1/2 flats past hand tight.
7. Install washers (238) onto hex head cap screws
(239). Align tank gasket (236), hydraulic housing
(206), and tank (237). Install screws (239). Torque
to 15 ft-lb (20.3 N•m).
8. Use two hex head cap screws (258) to connect the
support bracket (257).
9. Install Hydraulic Power Pack. See page 29.
1.68
+.00
-.01
202201