
User's Manual


Repair
3A0238P 27
Repair
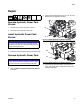
Remove Hydraulic Power Pack
Shroud
1. Remove four screws from base of shroud.
2. Lift shroud off of hydraulic power pack.
Install Hydraulic Power Pack
Shroud
1. Place shroud on top of hydraulic power pack.
2. Install four screws securing shroud to hydraulic tank.
Remove Hydraulic Power Pack
1. Perform Shutdown procedure, see page 21.
2. Perform Remove Hydraulic Power Pack Shroud
procedure.
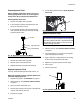
3. Disconnect all hydraulic lines from A1, A2, B1, and
B2 fittings at the applicator housing.
4. Disconnect all electrical cables connected to the
motor, directional valves, temperature switch, and
pressure transducer.
NOTICE
Do not over-torque any item that threads into the
hydraulic tank (237). This will strip the threads and
require tank replacement.
NOTICE
If any debris falls into the hydraulic tank, the debris
must be removed or machine damage will result.
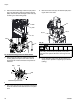
FIG. 21: L-Head Applicator Hydraulic Housing
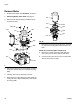
FIG. 22: S-Head Applicator Hydraulic Housing
B2
A2
A1
B1
B2
A2
ti17743a