
User's Manual

Setup/Startup
333388B Operation 11
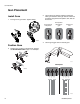
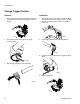
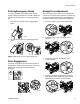
14. Increase pressure control enough to start pump.
Allow fluid to circulate for 15 seconds.
15. Turn pressure down, turn both prime valves horizon-
tal. Disengage gun trigger lock.
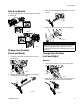
16. Hold all guns against a grounded metal flushing pail.
Trigger guns and increase fluid pressure slowly until
pumps run smoothly.
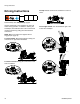
17. Inspect fittings for leaks. If leaks occur, turn sprayer
OFF immediately. Perform
Pressure Relief Proce-
dure
. Tighten leaky fittings. Repeat
Startup
, steps 1
- 17. If no leaks, continue to trigger gun until system
is thoroughly flushed. Proceed to step 18.
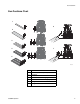
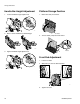
18. Place siphon tube in paint pails.
19. Trigger all guns again into a flushing fluid pail until
paint appears. Assemble tips and guards.
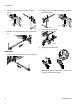
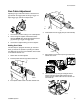
SwitchTip and Guard Assembly
1. Engage trigger lock. Use end of SwitchTip (A) to
press OneSeal (B) into tip guard (D), with curve
matching tip bore (C).
2. Insert SwitchTip in tip bore and firmly thread assem-
bly onto gun.
To avoid skin injection injury, do not stop leaks with
your hand or a rag.
15 SEC.
ti3442a
ti6472a
3304c
ti3441a
ti3442a
PAINT
ti3316a
ti3322b
ti3324a
ti6638a
A
B
C
D
ti3325a
ti3327a