
User's Manual


Installation
332518C 5
Disassembly
NOTE:
• Reference numbers used in the following instruc-
tions refer to Kit Parts provided on the cover of this
manual.
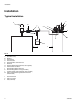
• Upper case letters used in the following instructions
refer to Typical Installation provided on page 4.
• Lower case letters used in the following instructions
refer to component parts or user provided parts not
included in the Kit.
• Steps 1 - 2 only apply to pumps that have already
been in service and are adding an Auto-Fill Shut Off
Valve. For new installations, begin instructions with
Step 3.
1. Disconnect Dyna-Star pump (A) from main power
source.
2. Relieve pressure (see Pressure Relief procedure,
page 3).
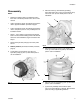
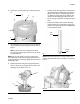
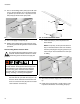
3. Loosen bolts (a) and remove cover (b) from
Dyna-Star pump (A) (F
IG. 3). Save these parts to
use for installation.
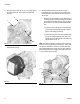
4. Remove screws (c) and washers (d) holding
Dyna-Star Pump (A) to cover (e) and remove pump
from cover (F
IG. 4). Save these parts to use for
installation.
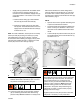
5. Remove the bolts (g) and nuts (gg) (holding the
cover (e) to the reservoir (F) (F
IG. 5). Save these
parts to use for installation.
6. Remove cover (e) and gasket (j) (F
IG. 5). Save these
parts to use for installation.
7. (If previously installed) remove follower plate
and / or low level indicator or dipstick. Discard these
parts according to applicable guidelines.
FIG. 3
b
a
A
FIG. 4
FIG. 5
c
d
A
e
g
e
F
j
gg