
User's Manual


Installation
332517B 3
Installation
Reference numbers used in the following instructions
correspond to the Parts table provided on page 6. Parts
identified with an alpha character are user provided or
already installed components.
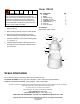
First Time Installation
1. Remove screws (4), washers (5) and gasket (3)
from cover (1). Set these parts aside to use for reas-
sembly.
2. Remove wing nuts (9) and washers (6). Set these
parts aside to use for reassembly.
3. Remove and discard cover from grease bucket (a)
(user supplied).
4. (If used) press follower plate into grease and firmly
press on it to remove all air pockets.
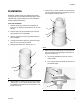
5. Place grease bucket (a) in base (2) (F
IG. 1).
6. Adjust location of washers (6) and nuts (8) on base
rods (2a) (F
IG. 1) up or down until they are as close
as possible to level with the top of the bucket or a lit-
tle below it (F
IG. 2).
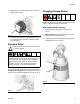
7. Install cover (1) on top of bucket. The ends of base
rods (2a) should pass through the holes (1a) in the
cover brackets as shown in F
IG. 2.
8. Adjust nuts (6) and washers (8) on each base rod
(2a) until washer is snugged tight to the bottom of
the cover bracket (1b).
a. turn nuts (8) clockwise to lower the nut and
washer height.
b. Turn nuts (8) counter-clockwise to raise the nut
and washer height.
FIG. 1
a
2
6, 8
2a
FIG. 2
FIG. 3
2
1
2a
1a
6,8
8
6
1b
2a