
User's Manual


Repair
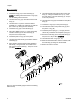
Reassembly
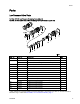
1. Install the o-rings (15) on the seat body (2).
NOTE: Circulating valves have three o-rings (15);
non-circulating valves have two.
2. Lubricate the o-ring (14) and install it in the seat
body (2).
3. Lubricate the u-cup in the seal and retainer
assembly (7). Install in the seat body (2) with the
lips of the u-cup facing into the seat body.
4. Install the o-ring (19) in the seat body (2).
5. Using the 16N257 Tool (111), screw the backup
seal and washer (9) into the seat body (2).
Torque to 20 in-lb (2.2 N•m).
6. Install the piston o-ring (18) on the piston.
7. Lubricate the piston shaft (4) and slide it into the
seat body (2).
8. Apply medium strength (blue) thread sealant to
the ball (3). Using a wrench on the flats of the
ball, screw it onto the shaft (4). Torque to 5 in-lb
(0.5 N•m) maximum.
9. Lubricate the ball and inside surface of the seat
body (2). Using the 16N257 Tool (111), screw
the valve seat (1) into the seat body (2). Torque
to 20 in-lb (2.2 N•m).
10. Lubricate the o-ring (20) and install it in the piston
body (5).
11. Install the o-rings (16) on the piston body (5).
12. Lubricate the inside of the piston body (5) and
the piston o-ring (18).
13. Install the piston spring (11). On high pressure
valves only, install the second piston spring (21).
14. Screw the seat body (2) into the piston body (5).
Torque to 5 in-lb (0.5 N•m) maximum.
15. Lubricate the outer o-rings (15, 16).
16. Slide the assembled valve into the manifold, with
the seat body (2) facing into the manifold.
17.Returnthevalvetoservice.
Fig
ure 2 Valve Assembly (High Pressure Circulating
Val
ve Shown)
4
332454B