
User's Manual


Tools Needed:
2 332226C
Tools Needed:
•Wrench
• Adjustable Wrench
• Phillips Screwdriver
• Cutting Blade
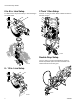
Gun Kit Assembly 16R963
1. If needed, configure unit gun assembly with gun arm
brackets included in Retro-fit Kit.
2. See Parts diagram to assemble bead gun
accessory parts, page 5.
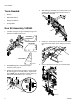
3. Position air switch button (A) begins to touch bracket
(B) when trigger is in neutral position. Tighten hard-
ware.
NOTE:
The gap between air switch button (A)
and bracket (B) should be .02 in. (0.5 mm).
4. Slide bead gun assembly (C) so bead outlet is hori-
zontally level with paint tip guard and as close to
paint outlet as possible.
5. Install 10 in. air line (G) and push into bottom valve.
Push other end into 90° air line fitting (H) on bead
gun.
6. Connect bead hose (D) from gun to bead hopper.
ti20569a
ti20709a
ti20707a
ti20708a
Both Models:
200 Models:
250 Models:
ti20568a
A
B
ti20548a
C
ti20566a
H
G
ti20547b
D