
User's Manual


Service
312780F 53
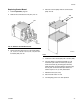
Replacing Solenoids
The RoboMix Fluid Station has a minimum of 4 sole-
noids. If you have optional 3rd flush valve or dump valve
kits installed, you have additional (optional) solenoids
for each additional valve. Refer to Table 8 and Sche-
matic Diagrams, page 30.
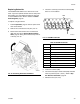
To replace a single solenoid:
1. Follow Preparation, page 50. Shut off power at the
main circuit breaker.
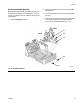
2. Remove the control board cover (427). F
IG
. 27.
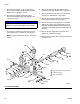
3. Disconnect 2 solenoid wires from control board
(426). See F
IG
. 29 and System Electrical Sche-
matic, page 33. Swing the control board up and out
of the way. F
IG
. 30.
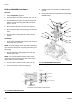
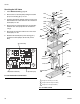
4. Unscrew 2 screws (P) and remove solenoid (486).
See F
IG
. 31 and Table 8.
5. Install new solenoid (486).
6. Connect 2 wires (N) to control board (426). Solenoid
wires are polarized (red +, black –). Refer to Sys-
tem Electrical Schematic, page 33.
7. Reinstall covers (427, 410).
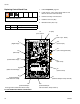
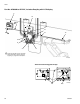
F
IG
. 30: Accessing Solenoids and Meters
427
TI12741a
F
IG
. 31: RoboMix Solenoids
Table 8: RoboMix Solenoids
Solenoid Actuates
Standard
1 Dose Valve A
2 Dose Valve B
3 Air Purge Valve
4 Solvent Purge Valve
Optional
5 3rd Purge Valve
6 Dump Valve A
7 Dump Valve B
TI12655a
486
N
P
4321
567