
User's Manual

Priming and Calibration
312393G 15 of 50
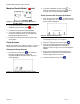
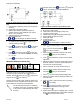
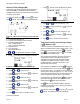
Figure 13: Open Dispense Valve (ODV) Screen (C3)
Key:
A Current ODV Adjustment (in mm from the cylinder
entrance).
B Adjust ODV value Option ICON.
C Relative ODV Position ICON with respect to
cylinder entrance (This ICON will move right or
left at +/- mm transition).
D Cylinder Entrance ICON (stationary).
I Screen Number (C3)
J
& keys will navigate to adjacent screens.
1. To adjust the ODV position with respect to the
cylinder entrance, press
.
2. Press
to increase the value or to decrease
the value. Values of – 5.0 mm to + 5.0 mm are
allowed.
3. Press
to accept the value or to retain the
previous value. The default value from the factory
is – 1.0 mm.
4. Press
twice to return to the Run screen.
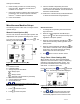
Machine Calibration Shots (C4)
Read all manufacturer’s warning and material MSDS to know the
specific hazards of the material used.
Calibration shots are necessary to program the
machine to properly dispense the correct amount of
material. Several short CAL shots (“
”) and several
long CAL shots (“
”) are required.
Remove the ratio check nozzle, install the static mixer
intended to be used, and adjust the air pressure to the
level intended for use during normal operation.
The air pressure must be set to operating
conditions for this step. Significant changes
in air pressure could adversely affect shot
accuracy.
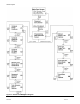
From the Run screen, press
, then press , then press
3 times. The following screen will be displayed.
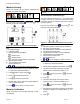
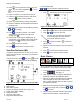
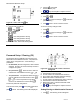
Figure 14: Stroke Calibration (CAL) Screen (C4)
Key:
A Short Shot Column ICON
B Last/Current Short Shot weight (mass) entry.
C Long Shot Column ICON
D
Last/Current Long Shot weight (mass) entry.
E Grams (Weight or Mass unit used)
F Short Shot ICON
G Long Shot ICON
I Screen Number (C4)
J
& keys will navigate to adjacent screens.
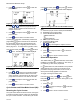
1. Press to arm the machine to take a short CAL
shots. The icon will be highlighted (“
”). Press
to de-arm the machine.
2. Place the empty container below the static mixer,
and press
(green) or the footswitch.
3. Press
and discard the contents of the material
dispensed
4. Repeat the previous 2 steps until the static mixer is
filled with material. Verify the material dispensed
from the mixer is mixed properly.
5. Place a container on a scale and tare (zero) it.
6. Place the tared container below the static mixer,
and press
(green) or the footswitch.
7. Press
to erase existing average weight data.
8. Place the container with the dispensed material on
the tared scale.
9. Enter the mass in grams into the HMI, by pressing
or accordingly.
10. Press
to accept the number. The number
entered will be transferred to the right of the
average icon (“
”).
11. Repeat steps 5 through 10, skipping step 7, several
times. Each additional shot weight will be averaged
in the
row with the previous shots.