
User's Manual

General Repair Information
311021U 6
General Repair Information
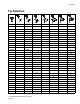
1 Keep all screws, nuts, washers, gaskets, and
electrical fittings removed during repair
procedures. These parts are not normally provided
with replacement assemblies.
2 Test repair after problem is corrected.
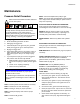
3 If sprayer does not operate properly, review
repair procedure to verify procedure was done
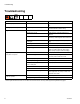
correctly. If necessary, see Troubleshooting Guide,
page 8, for other possible solutions.
4 Install belt guard before operation of sprayer and
replace if damaged. Belt guard reduces risk of
pinching and loss of fingers; see preceding
WARNING.
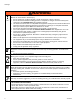
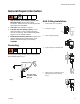
Grounding
Ground sprayer with grounding clamp to earth ground
when flushing sprayer. Fig. 1.
SAE O-Ring Installation
1 Unscrew lock nut to touch fitting.
2 Lubricate o-ring (A).
3 Screw in fitting hand tight.
4 Unscrew fitting until oriented properly.
5 Tighten lock nut to indicate torque. (Make sure washer is
seated properly without pinching
o-ring).
6250
Grounding clamp
water pipe, steel
sign post, or metal
light pole
Fig. 1
A