
User's Manual


308642 9
Operation
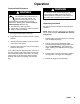
Pressure Relief Procedure
PRESSURIZED EQUIPMENT HAZARD
The equipment stays pressurized until
pressure is manually relieved. To
reduce the risk of serious injury from
pressurized fluid, accidental spray from the
dispenser or splashing fluid, follow the Pressure
Relief Procedure whenever you
D Are instructed to relieve pressure
D Check, clean, or service any system equipment
D Install or clean fluid nozzles
WARNING
1. T urn off the power supply to the pump.
2. T rigger the valve into a waste container to relieve
pressure.
3. Open any bleed-type master air valves and fluid
drain valves in the system.
4. Leave the drain valve open until you are ready to
pressurize the system.
If you suspect that the dispensing valve, extension, or
nozzle is clogged or that pressure has not been fully
relieved after following the steps above, very slowly
loosen a fitting on the fluid line to relieve pressure
gradually, then loosen it completely, then clear the
clog.
WARNING
To reduce the risk of a serious bodily injury, includ-
ing fluid injection, never exceed the maximum
working pressure of the valve you are using or of
the lowest rated component in your system.
Dispensing Procedure
See instruction manual 307965 for electronic meter
operation.
NOTE: Before you begin, make sure you understand
how to unlock the trigger . Model EM6 does not have
a trigger lock.
1. Pull the trigger toward the valve body to open the
valve and begin dispensing.
2. Lock the valve open by keeping the trigger
squeezed and depressing the trigger lock button
(25intheParts Drawing). Then release the
trigger, releasing your forefinger from the trigger
lock last.
3. Pull the trigger toward the valve body to release
the trigger lock. The trigger lock disengages.
4. Release the trigger to stop dispensing.