
User's Manual

5307–283
Service
WARNING
PRESSURIZED EQUIPMENT HAZARD
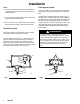
Before removing, cleaning, or servicing the filter
,
close the inlet and outlet ball valves (D, Fig. 1) and
open the fluid drain valve (B) to relieve pressure.
CAUTION
If the filter will not be used for awhile, thoroughly
clean all the parts in solvent and blow them dry
before the paint dries and clogs the filter
. T
o help
prevent damaging the parts, do not clean them with
a wire brush or sharp object.
Indicator
The indicator provides gradual warning of a dirty
element. When the indicator shows 3/4 red, clean the
element. If not cleaned promptly
, the filter bypass valve
opens and fluid will not be filtered.
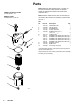
Replace the indicator assembly (1) if the indicator is
not working correctly (it is always red, or never red).
Bypass
V
alve
The
valve opens when a dirty element causes the
filter’
s outlet pressure to drop 15 psi (100 kPa, 1 bar).
below the inlet pressure. This keeps the system pres
-
sure steady and prevents the element from collapsing.
Replace the bypass valve (2) if it is damaged or worn.
Viton O-Ring
The
o-ring seals the bowl (9) to the housing (3). If
material leaks around the bowl, replace the o-ring (6).
Remove the bowl and o-ring. Clean the parts in a
compatible solvent. Be careful not to damage the
o-ring or sealing surfaces of the bowl and housing.
Before assembling, lubricate the parts with No. 2
grease.
Bowl, Element, and Spring
Graco
recommends keeping a spare bowl (9), element
(7), and spring (8) on hand. Before removing the bowl,
direct the fluid through the bypass valve (2) or shut
down the system. Relieve fluid pressure by opening
the drain valve (B).
Holding the bowl with a wrench to keep it from turning,
screw the drain plug (10) out. After the fluid has
drained out, remove the bowl, element, and spring.
Replace immediately with the spare bowl, element,
and spring to keep the paint from drying on the hous
-
ing (3) and other parts. Install the element with the
dome end up. Lubricate the threads of the bowl before
screwing it into the housing; tighten it securely
.
Clean the bowl, element, and spring you removed with
a compatible solvent before the paint dries. Do not use
a wire brush or sharp object to clean. Store until need
-
ed.
Note:
Clean the filter element (7) with a small paint
brush. Blow out lodged particles with air
, and inspect
for damage. Replace if ruptured.