
Full Product Manual
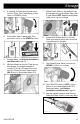
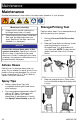
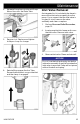
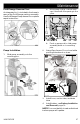
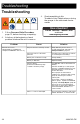
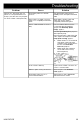
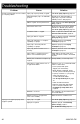
Table Of Contents
- Before You Spray
- Contents
- Important Grounding Information
- Warnings
- Know Your Sprayer
- Know Your Controls
- Grounding Instructions
- Setup
- Start Up
- Spraying
- Cleanup
- Storage
- Reference
- Maintenance
- Troubleshooting
- ProX19 Cordless Cart Sprayer Parts
- ProXChange Pump Parts
- Wiring Diagram - 60VDC
- Technical Specifications
- California Proposition 65
- Graco Standard Warranty
- Graco Information

Maintenance
3A9019C EN 35
4. Squeeze Pump Armor bottle until Pump
Armor flows into the Drain Tube.
5. Remove tool. Replace and tighten
child-proof cap for storage.
6. Reinstall the sprayer Suction Tube.
Ensure that the tube is snug on the inlet
and the clamp is engaged.
Inlet Valve Removal
An integrated tool is included in the frame to
remove the inlet valve assembly from the
pump. If you suspect that the inlet valve is
clogged or stuck, remove the valve
assembly and clean or replace.
1. Perform Pressure Relief Procedure,
page 15.
2. Insert pump inlet into frame and loosen
the inlet valve. Remove inlet valve.
3. Remove inlet valve. Clean and reinstall.
NOTICE
Do not lose the ball and spring inside the
inlet valve assembly. It may fall out when the
inlet valve is removed. Pump will not prime
without the ball and spring.