Read all instructions BEFORE assembly and USE of product. KEEP INSTRUCTIONS FOR FUTURE USE. Lea todas las instrucciones ANTES de armar y USAR este producto. GUARDE LAS INSTRUCCIONES PARA USO FUTURO.
1 WARNING • ADVERTENCIA Pages • Páginas 3-6 2 Features • Características Pages • Páginas 7 2-A Parts List • Lista de piezas 3 Assembly • Ensamblaje 3-A 3-B Playard Set Up • Armado del corralito Bassinet Set Up • Armado del moisés 4 Use • Uso 4-A 4-B Pages • Páginas 15-18 To Fold • Para plegar To Cover • Para cubrirlo 5 Accessories • Accessories 5-A 5-B 6-C Pages • Páginas 19-24 Changing Table • Mesa para cambiar al bebé Storage Bag • Bolsa de almacenamiento 6 Cleaning • Limpieza 6-A 6-B Page
Failure to follow these warnings and the instructions could result in serious injury or death. Setting Up the Playard Using the playard • THIS PRODUCT REQUIRES ADULT ASSEMBLY. • The playard is for playing or sleeping. When used for playing, never leave child unattended and • Keep fingers clear of top always keep child in view. When corners during setup. Be sure used for sleeping, you must still playard is completely set up provide the supervision before use.
Avoiding Suffocation Hazards • Unlike cribs that have rigid sides, the playard has flexible sides. As a result, the playard mattress/pad is specially designed to prevent suffocation. The playard mattress/pad has a solid base, a certain length and width, and is less than one inch thick in order to meet safety standards. Using a thicker or a different sized mattress/pad may allow a child’s head to get between mattress/pad and the side of the playard causing suffocation.
ADVERTENCIA Le non-respect de l’ensemble de ces mises en garde et directives de montage peut causer des blessures graves voire mortelles. Al instalar el corralito proporcionar la supervisión necesaria para mantener la • ESTE PRODUCTO REQUIERE SER ARMADO POR UN ADULTO. continua seguridad de su niño. • Siempre mantenga el corralito • Mantenga cuidado con sus lejos de peligros que pudieran dedos mientras dure la dañar a su bebé.
ADVERTENCIA Para evitar el riesgo de sofocación • Al contrario de las cunas que poseen costados rígidos, el corralito posee costados flexibles. Debido a esto, el colchón del corralito está especialmente diseñado para prevenir la sofocación. El colchón del corralito posee una base sólida, un cierto largo y ancho, y tiene menos de un inch de espesor precisamente para mantener los stándares de seguridad apropiados.
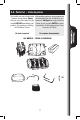
2-A Parts list • Lista de piezas This model may not include some features shown below. Check that you have all the parts for this model BEFORE assembling your product. If any parts are missing, call Customer Service. Este modelo podría no incluir algunas de las características que se indican a continuación. Verifique que tenga todas las piezas de este modelo ANTES de armar su producto. Si falta alguna pieza, llame a Servicio al Cliente. No tools required. No requiere herramientas.
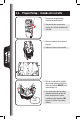
3-A Playard Setup • Armado del corralito 1. Disconnect straps holding mattress around playard. 1. Desconecte las correas que sujetan el colchón alrededor del corralito. 2. Remove mattress from around playard. 2. Saque el colchón del corralito. 3. Pull up on side rails in middle above push button until all four sides are locked. DO NOT push center down yet. 3. Tire hacia arriba las barandas laterales del medio arriba del botón hasta que los cuatro costados estén trabados.
4. When setting up, lock rails BEFORE lowering center. Be sure top rails have become rigid. If not, pull up again until they are rigid. If top rails do not latch, lift the center of the floor higher. CHECK that fabric covers corners. SNAP! ¡CRAC! 4. Cuando instale, estire y enganche los costados ANTES de bajar el centro. Asegúrese que los laterales superiores hayan quedado rígidos. Si no es así, estírelos nuevamente hasta que estén bien rígidos.
7. Pull the two hook and loop tabs under mattress/pad through the slotted holes and attach to hook and loop patch on bottom of playard. 7. Pase las dos lengüetas de nudo y gancho debajo del colchón/almohadilla por los agujeros ranurados y sujete el parche de nudo y gancho en el fondo del corralito. 8. Pull the four snap straps on corners of playard mattress through bottom of playard. Wrap around the tube and fasten snap onto the tube. Repeat on all corners. 8.
3-B Bassinet Set Up • Armado del moisés WARNING SUFFOCATION HAZARD Infants have suffocated: • In gaps between extra padding and side of the bassinet, and • On soft bedding. Use ONLY mattress/pad provided by Graco. NEVER add a pillow, comforter or another mattress for padding. • FALL HAZARD: To help prevent falls, do not use this product when the infant begins to push up on hands and knees or weighs over 15 lbs (6.8 kg), whichever comes first. • Use bassinet with only one child at a time.
ADVERTENCIA PELIGRO DE ASFIXIA Bebés se han asfixiado: • En los espacios entre el acolchado adicional y el costado del moisés, y • En ropa de cama blanda. Use SOLAMENTE el colchón proporcionado por Graco. NUNCA agregue una almohada, edredón u otro colchón como acolchado. • PELIGRO DE CAÍDAS: Pare ayudar a prevenir caídas, no use este producto cuando el niño comienza a levantarse en sus manos y rodillas o pese más de 15 libras (6,8 kg), el que ocurra primero. • Use el moisés con un niño solamente.
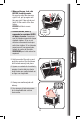
1. You will need to remove the mattress/pad from the bottom of the playard to use inside your bassinet. 1. Necesitará sacar el colchón / almohadilla del fondo del corralito para usarlo adentro del moisés. 2. Attach 8 clips on bassinet clips to playard. 2. Sujete las 8 presillas del moisés al corralito.
3. Insert tapered end of bar into end of other bar with hole in it. Repeat with other set of bars. CHECK: Tubes MUST be assembled before placing mattress/pad in bassinet. 3. Inserte el extremo cónico de la barra en el extremo de la otra barra que tiene un agujero. Repita el procedimiento con el otro juego de barras. VERIFIQUE: Los tubos DEBEN montarse antes de colocar la almohadilla del colchón en el moisés. 4.
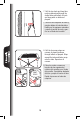
4-A To Fold • Para plegar 1. Release snap straps and hook and loop straps on bottom of playard. Pull mattress fully out of playard. 1. Libere las correas con broche y las correas de nudo y gancho y en el fondo del corralito. Saque el colchón del corralito. 2. DO NOT unlock top rails yet. Pull the center of the playard floor up with the tab in the middle of the playard. Center of floor must be halfway up before top rails will unlock. 2. NO destrabe las barandas superiores todavía.
3. Center of floor must be up. a. Lift up slightly on the top rail. b. Push in on the button located on the side of the top rail to release the two tubes. c. Push down. d. Repeat on all four rails until all tubes are released. • If top rails do not unlatch, DO NOT FORCE. Lift the center of the floor higher. • Both tubes must be released for the top rail to fold. 3. El centro del fondo debe estar arriba. a. Levante suavemente el lateral. b.
4. Do not force. If unit will not fold, look for a partially latched top rail. Squeeze the latch button to release the rail. 4. No la fuerce. Si el corralito no se pliega totalmente, fíjese si los laterales están parcialmente doblados. Apriete el botón y pliegue el lateral.
4-B To Cover • Para cubrir 1. Cover unit with handle out. 1. Cubra la unidad con la manija hacia fuera. 2. Zip together. 2. Cerrar con el cierre.
This model may not include some features shown. Este modelo podría no incluir algunas de las características ilustradas. 5-A Changing Table • Mudador WARNING FALL HAZARD- To prevent death or serious injury, • Always stay within arm’s reach of your child when using the changing table. Never leave child unattended. • The changing table is designed for use only with this Graco playard. Do not use on the floor, bed, counter or other surfaces.
• No use la mesa para cambiar al bebé si está dañada o rota. • Peligro de estrangulamiento: El niño puede levantar la mesa para cambiar al bebé y el cuello puede quedar apretado entre la mesa y el armazón del corralito. Siempre retire el mudador cuando su bebé permanezca en el corralito. Plastic hub Núcleo de plástico 2X 1. Snap changer tubes without plastic hub together as shown. 1. Trabe los tubos del cambiador sin el núcleo de plástico como se indica. SNAP! ¡RUIDO! • Accessories 5 Accessories 2.
Plastic hub Núcleo de plástico 3. Snap changer tubes with plastic hub together as shown. 3. Trabe los tubos del cambiador con el núcleo de plástico como se indica. SNAP! ¡RUIDO! 4. While changer fabric is still facing down, slide assembled changer tubes with plastic hub into other channel in fabric as shown. 4. Mientras la tela del cambiador sigue mirando hacia abajo, deslice los tubos armados del cambiador con el núcleo de plástico en el otro canal de la tela como se indica. 5.
6. Snap leg tubes together as shown. 6. Trabe los tubos de las patas como se indica. SNAP! ¡RUIDO! 7. Snap two short connector tubes into the openings in the plastic hubs as shown. 2X SNAP! ¡RUIDO! 7. Trabe los dos tubos cortos de la conexión en las aberturas en los núcleos de plástico como se indica.
8. Insert changer connector tubes into openings in corners of playard. 8. Ponga los tubos de la conexión del cambiador en los agujeros de las esquinas del corralito. SNAP! ¡RUIDO! 9. CHECK that corners of changer are pulled over the changer frame. 9. VERIFIQUE que las esquinas del cambiador se han tirado sobre el armazón del cambiador. 10. To remove, push in buttons on changer connector tubes while pulling up on corners of changing table. 10.
5-B Storage Bag • Bolsa de almacenamiento WARNING • Always keep objects out of child’s reach. • Remove the bag when child is able to pull himself up in the Pack ‘N Play. • NEVER use on inside of unit. Child may use as a step to c limb out or reach items in bag. • TO AVOID SERIOUS INJURY, NEVER place sharp or pointed objects in storage bag. ADVERTENCIA • Guarde siempre los objetos fuera del alcance del niño. • Saque la bolsa cuando el niño pueda pararse en el Pack ‘N Play.
6-A Care and Maintenance • Cuidado y mantenimiento FROM TIME TO TIME CHECK YOUR PLAYARD for worn parts, torn material or stitching. Replace or repair the parts as needed. Use only Graco® replacement parts. IF PLAYARD IS USED AT THE BEACH, you MUST clean sand off your playard, including the feet, before packing it into cover. Sand in top rail lock may damage it. TO CLEAN PLAYARD, use only household soap or detergent and warm water.
Notes • Notas 26
Notes • Notas 27
6-B Replacement Parts • Warranty Information (USA) Información sobre la garantía y las piezas de repuesto (EE.UU.) In To purchase parts or accessories or for warranty information in the United States, please contact us at the following: Para comprar piezas o accesorios o para obtener información sobre la garantía en los Estados Unidos, por favor comuníquese con nosotros en: www.gracobaby.com or/ó 1-800-345-4109 6-C Product Registration (USA) Registro del producto (EE.UU.